Showing posts with label Craft. Show all posts

Tuesday, March 26, 2013

What's in My Craft Room - My Photo Set-Up

I love seeing other peoples crafty spaces. I love getting ideas from all the pictures and feel inspired to keep my space as organized as I possibly can. I am fortunate to have my girls sharing a large room, so I can use the small room as "my craft room". However, they are growing, and so am I, so we are currently in the midst of renovating (finishing) the space above our garage to become my "studio space". And I couldn't be more excited.

I thought I would share a few pics of my own crafty space and the light box that became my best friend while working on my book. It looks pretty clean here - but that's only because I would work on one chapter for the book (about 4 patterns), clean it all up, and then get working on the next chapter. So I snapped the pictures in between chapters. Cheating? I think so! I didn't take pics of my fabric stash or my knick-knacks - but will do that when they are all unpacked!

A few people have also asked (as well as my offering) what my photo set up is like. So I'm going to share that too.

This is my trusty Kenmore sewing machine. I do hope to get a Bernina soon, a Juki someday, and a baby lock as well...but until then, this workhorse has been so good to me. It currently sits on the Porter Desk (from Pottery Barn). The drawer underneath is awesome - but the weight of my machine is proving to be too heavy for the top, and is beginning to sag! *cringe*. So I will have to switch things up when I move up to the studio and will most likely put my computer on this desk instead.

My awesome green chair is from my husband. It was my birthday gift a few years ago and he picked out my favorite color.

Here is my photo box. It's actually a light tent and can fold up into a little pouch. I know it's quick and easy to make a cardboard photo box - but this is a great investment since it's about $60. You can't put the cardboard one away and hope that it survives. This one is great for using, traveling, and storage! That's totally my opinion and I'm not being paid to say that. I will say though - that I had to by some white fabric to hang & lay inside, because the material it is made with is very wrinkled and not seamless. I bought some bright white velour material at Joann's. You can ask them if they would recommend anything in particular - but this white material is great because it doesn't show everything (like wrinkles). Keep a sticky roll next to the light box though - you'll need it once in a while to remove threads and fiber specs. I pinned the fabric up in the back at the top, so it drapes nicely and doesn't create a shadow.

To make this box or any box work right - you also need the right lighting. The awesome thing I was told at a photo store nearby - was to use photo bulbs in a regular desk lamp - saves you a ton of cash! The bulbs (added a pic of the packaging below) will run you about $15-$20 and the desk lamp can be purchased at Target or anywhere for $10! That is - if you don't already have one! I used 2 that I already had - and they have both been great. You can use up to 4, both sides, top and back. I only have 2. And it works fine. The green one was from target years ago and the other one is adjustable up down and every which way. That helps too.

I took a few pics of some Heather Bailey and Amy Butler fabric in the light box, and some little lavender stems in an old ink jar.


If you have any questions for me let me know. You can leave me a comment below - and I'll reply as soon as I can. Just so you know - I didn't use any filter effects on any of the pics. It was a while ago - but I did change the saturation levels on the flower image - it was fun playing with these flowers in the light box. Thanks for visiting and I hope you all have a great time creating in your space.

Saturday, March 9, 2013

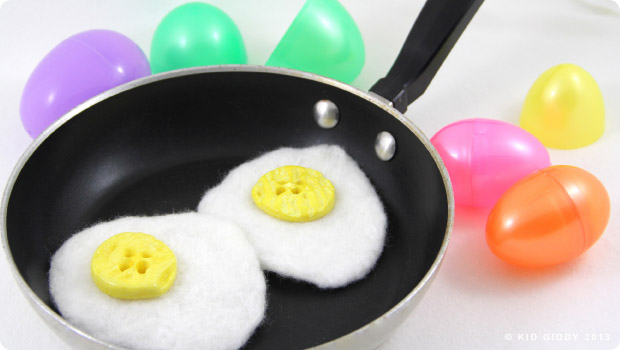
Sunny Side Up Easter Eggs w/Buttons Galore and More

Good Saturday morning to you all! What's for breakfast at your house today? Over here we have made some sunny side up eggs just in time for Easter (or April Fools!).


A couple of months ago I agreed to do a fun blog hop with some other designers and the folks at Buttons Galore and More...Here's just a few of the buttons I got...and get to play with! The first thing I did was sort them all and played with them. As I look at them, I let the ideas come to the surface and the first project I knew I had to make was some eggs...sunny side up! It was the only thing I could think of when I saw these huge yellow, asymmetrical buttons...yolks! Does that make me weird? I think so! But fun. Always fun!


Here's what you'll need:
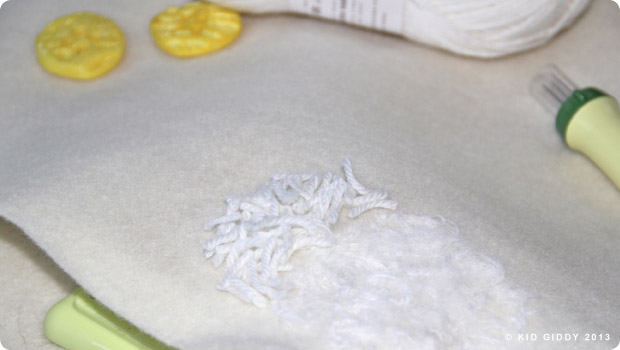
I used a natural wool felt for my base
I used a bright white wool yarn to make the egg whites.
You'll need needle felting tools (Mat, needles & brush (for cleaning the mat)
The "Buttons Galore and More" Yellow "Yolk" buttons
& a little Yellow yarn or ribbon for tying the yolk to the egg

(If you want to make these way easier - you can use bright white fleece and sew a couple of pieces right sides together, leaving open a small space for turning, sew on the buttons, and then close the opening with a ladder stitch.)

These would be great for Easter Egg Spoon Races - put them in a plastic Easter egg and off you go...if it drops and pops open, you've cracked the egg and have to start all over again. They would also be a lot of fun for April Fools...maybe on a slice of felted bread, with some felted bacon on the side?!

Be sure to check out all of the other designers today participating in the Buttons Galore and More blog hop! I hear you can also enter for your chance to win a Viewtainer, packed with buttons and ribbon, by simply entering a comment at this link here. Fun Fun Fun!

I hope you have a wonderful day! 


http://kidgiddy.us2.list-manage1.com/subscribe?u=9ea4c419178a2e61b529af8aa&id=975aef860e


Although I was given free buttons from Buttons Galore and More, the opinions set forth in this post, are my own. This tutorial is shared with you in the hopes that you will learn a new fun craft. Please do not use my tutorials for your own gain. Please do not use my photos without permission and please do not retake any photos to remake the tutorial for your own blog or another company or in another language. These photos and the text are copyright protected. If you'd like to "Pin" the one finished project photo, please credit me by using "#kidgiddy". Thank you for your cooperation.

Monday, July 2, 2012

Beat the Heat This Summer Frozen Washcloths Craft - DCC Blog Hop

The heat waves are upon us folks...or they are coming soon, and I've got a great way to beat the heat this summer. Get your craft on with me, and make some awesome, freezing cold washcloths to keep you as cool as a cucumber!

I don't remember everything from when I was little. My memories are spotty at best, as if I took one photo out of an entire album to keep, and lost all the rest. One of the fondest memories I do have though, of my Grandma Pratt was of her packing up wash clothes for a day on the golf course.

The night before her golf day, she would get her stash of washcloths, dunk them in cool water, wring them out and package them in small sandwich baggies (or maybe it was just saran wrap?), then pop them in the freezer. The next morning, she would grab all the washclothes from the freezer and pack them in the cooler with a couple of ice packs on top.

She was a confident woman. I always felt that way about her. That she knew who she was and didn't let anyone walk all over her. She was also brilliant. She explained to us that she used these washclothes on really hot days on the golf course to keep her cool. She said when she got hot, she'd lay one on the back of her neck or wrap it around her wrist and that would help cool her body temp down. Or she would simply 'dab' (because ladies didn't 'wipe') the sweat from her brow. lol! I've never forgotten these washcloths.

They are really easy and fun to make for all ages!


Here's what you need:
A pack of (inexpensive) plain washcloths - I used white (as did my grandmother, you can use any color you'd like)
Fabric Markers - I used Marvvy Uchida Fine Tip Fabric Markers
Embossing Heat Tool - I used the Marvvy Uchida model #2500 (this will help set each color so it doesn't bled through or blend with each color. It also sets it prior to washing)
Cardboard to lean on

Here's what you do:
1. Set your cardboard on your table top.
2. Place the corner of a washcloth in the center of the board.
3. With an idea already in mind, begin your design by dotting with the Fine Tip fabric marker as you go along. I found dotting to be easier and more effective on terry cloth than drawing, as it helps get further down, and gives you a richer color.
4. After each color, set with the Embossing heat tool. Be sure to read all the manufacturers instructions prior to using. It can get very hot and should be used with care.
5. Once your design is completed, finish it with the embossing heat tool again to set the design prior to washing. You can also throw it in the dryer.
6. Once they are set, you can give them a quick wash.
7. Don't dry them, but add a little more water too them (not dripping) and place them in the freezer folded in 3's or in quarters, in separate baggies. Do not put them in touching the side of the freezer or an ice cream maker bowl. Certain things will cause it to stick and not release. (may also depend on how much water is in the washcloth).

My girls made their own too and had a lot of fun! My only recommendation when deciding what design to put on your washcloths, is to only outline. Trying to fill it all in can use up your marker quickly and again it's difficult on terry cloth. On the thermometer design, I dotted it a little to looked filled in, but when you look closely at it, it's really not.

Here are some ways you can use them:

  • On any hot summer day - This may be at home, or at the beach, during the day or at night - no matter when - it's a great way to cool off!
  • Lunch Surprise - for a little refresher after lunch or recess - pack a frozen washcloth in your child's lunch bag, with a small ice pack to keep it really cold! My girls love this, and their friends are jealous! I've wanted to bring in tons for the classroom - but I wasn't allowed.
  • Sick Days - when the girls get really sick, it helps keep their core temp down to avoid tons of meds when it's just not that bad! It also helps with the stomach bug and they heat up quickly!
  • I Workout - no matter what sport you play (for my Grandmother it was Golf, for me it's Karate and Insanity workouts, for my husband it's Tennis) we can all use them to stay cool while we get our workouts done!
There are so many ways to benefit from these washcloths and beat the heat! Make one, make a ton, either way - it will be fun and cool this summer with your new frozen washcloth! (I will post a pic of my grandmothers cloths later...I can't locate the pics - so I'll take new ones. She did sailboats!)

Thanks for stopping by and crafting with me. If you'd like to see more vacation crafts, please hop around through the Designer Crafts Connection Blog Hop to check out what the other designers have come up with!


http://kidgiddy.us2.list-manage1.com/subscribe?u=9ea4c419178a2e61b529af8aa&id=975aef860e


This tutorial is shared with you in the hopes that you will learn a new fun craft. Please do not use my tutorials for your own gain. Please do not use my photos without permission and please do not retake any photos to remake the tutorial for your own blog or another company. These photos and the text are copyright protected. If you'd like to "Pin" one of the photos, please credit me by using "#kidgiddy". Thank you for your cooperation. Although I was given Marvvy Uchida products free for my use, the ideas and opinions are my own.