Showing posts with label gift. Show all posts

Saturday, May 12, 2012

Flower Pins Tutorial - DCC ImpressArt Blog Hop


Long time no post...right?! Well I'm excited today to share with you all a really sweet gift I made for all the teachers at my daughters Primary school for Teacher Appreciation week!

I received the set of ImpressArt Metal Stamps to use for this blog hop and needed to make something for the teachers this week, since I'm also on the PTA. I thought, why not combine the efforts? When my friend Nora came over to help make the flowers, I decided to they would look really cool with little metal discs in the center! I quickly ran out of metal discs as I was making at least 30, and turned to my box of wooden buttons. I wasn't sure if the ImpressArt Metal stamps would work on the wooden buttons, since I have never used these, but they came out so cute - they worked so well on the metal and wood! It was so much fun to play with everything, that I am now, totally addicted!

I took pictures while I made them, so you can make a few for gifts as lapel pins, hair bands, headbands, bracelets, necklaces, and every other option under the sun!

Here's what you'll need from ImpressArt:
-ImpressArt Alphabet Stamp Set, Set Name, Jeanie (lowercase)
-ImpressArt Design Stamp, Whimsy Flower, Whimsy Heart & Fun Star
-ImpressArt Metal Stamping Blank Discs (with 2 holes)
-ImpressArt Metal Stamping Hammer
-ImpressArt Steel Stamping Block
-ImpressArt Stamp Straight Tape (I didn't want mine straight, but you may, this helps!)

Here's what else you'll need to make the flowers:
- 5" Tulle roll (color is your preference, I used white)
-Linen Fabric
-Scrap Fabrics
-Wooden Buttons (optional)
-Flower Shape (either a machine cutter, your own simple pattern, or a pre-made flower template)
-Needle & Thread
-Scissors

If this is your first time using ImpressArt Metal Stamps, please be sure to check out their website and resources page. They even have a "viewer" so it can help you plan what you want to use and what it will look like!
Here's what you do:
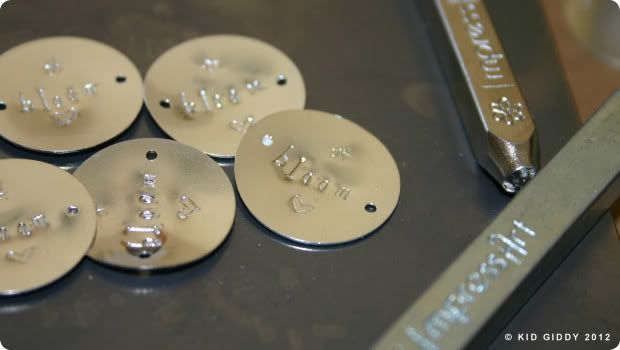
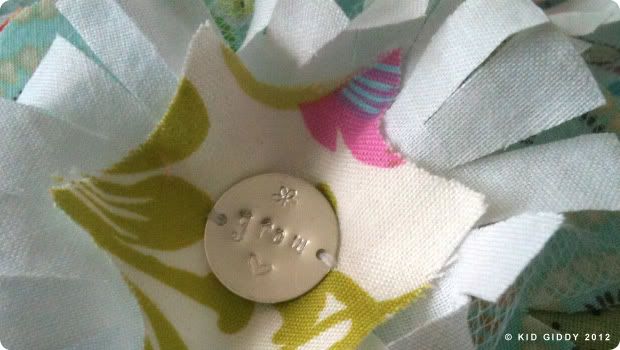
Decide what word and design you are going to use and stamp the discs. They puckered as I hammered, so I just flipped them over after and flattened them out a little. This is before I flattened them out. I used the word "bloom".
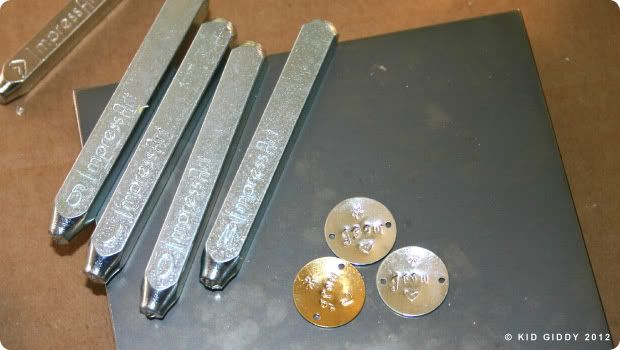
On the smaller discs I used the word "grow" (since that has to do with flowers also), and stamped the heart & flower.
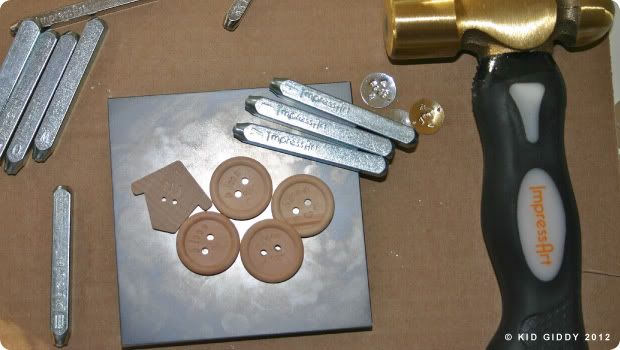
When I ran out of discs in the 9th hour, I turned to wood, it worked like a charm! I LOVE these tools!
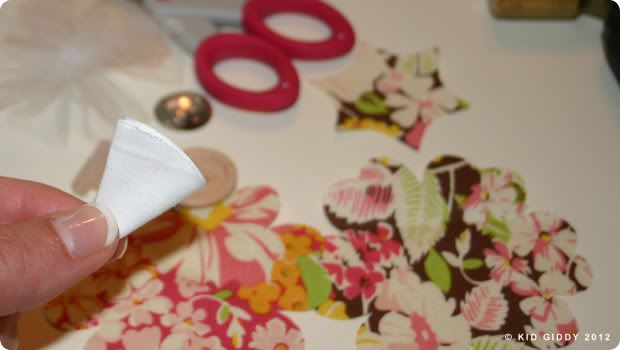
Cut out all your round circles. The circle should be approx. the same size if not a tiny bit smaller than the flowers. Fold the white round circle in half, 3 times. Cut the all the folded edges (leave a 1/2"- do not cut all the way to the center) 
Next cut 2 straight lines (again leave the 1/2" of the center protected and intact)
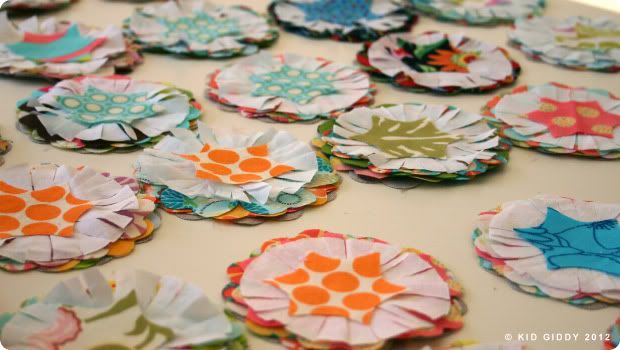
Cut all your flowers with your own template, or a purchased template or die cut. I cut one piece of Linen for the base, and 3 pieces of fabric for each flower. I also used one white circle and one tiny center scrap, but know that you can use as many as you want. It all depends on how fluffy you want your flowers to be. Once you have cut all your flowers from your scraps, and your white circles, you can pre-stack them to match them up. Don't they look so pretty? Thanks Nora!
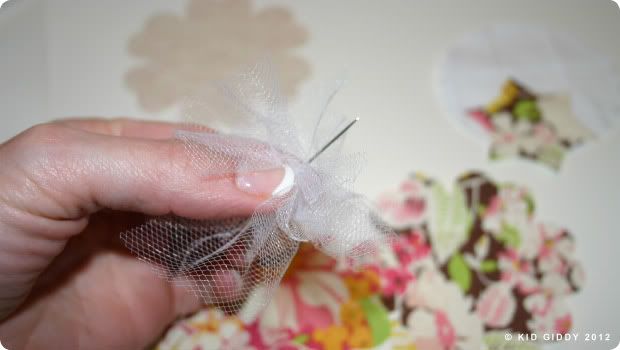
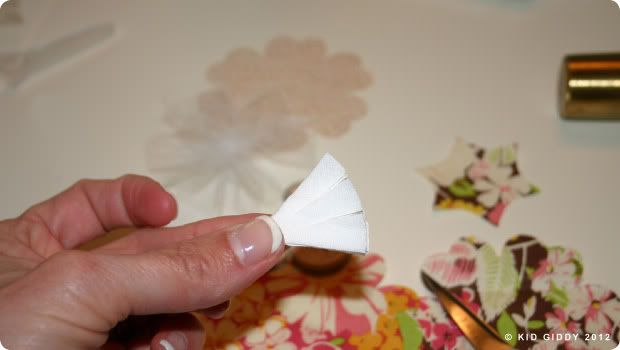
To fluff your flowers, cut a piece of the 5 1/2" width Tulle roll (approx 11" in length) and cut in half. Using one strip, thread your needle and at one end of the tulle (lengthwise) gather it with a running stitch 
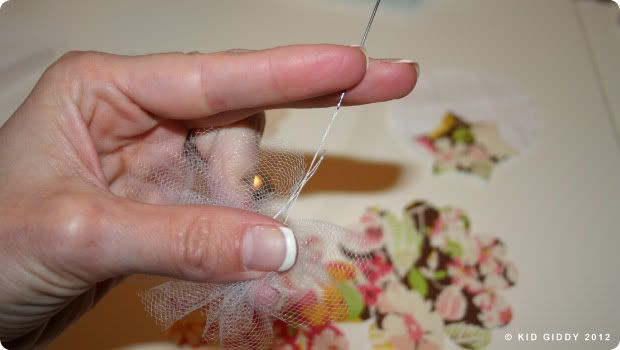
Before pulling the thread all the way though, loop your needle through the end and pull tight.
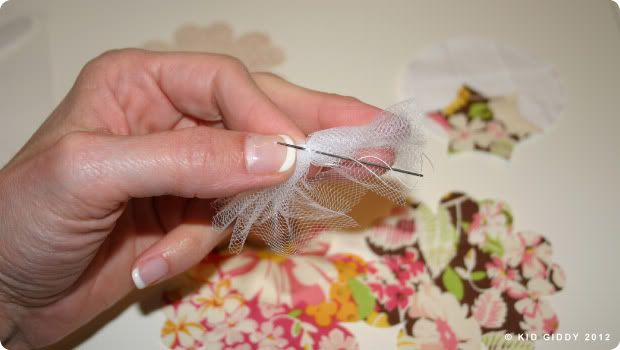
Wrap the thread around the gathered center a few times and then tie off with a double knot.
When all the pieces are ready for assembly, here is the order I used. I felt the tulle worked best under the white layer!
Once the pieces are layered, you can sew the pieces together. You can put a small pin in the back for a brooch, or sew an extra piece on the back to make it useful for a hair rubber band, or stitch it onto a headband, or even onto a beautiful ribbon to make a necklace. Make as many flowers as you'd like. But please do not sell them. Give them as gifts!


I really had so much fun using these ImpressArt Metal stamps! Sometimes I am so fearful of trying something new that I tend to shy away from it. But I jumped at the chance to try these out and was not disappointed. This is something I will use time and time again for gift tags, jewelry, and many other fun projects.

If you would like your own set of ImpressArt Metal Stamps, you can head over to the ImpressArt Facebook page to enter to win! The Grand Prize is valued at up to $120.00 and contains:
1- ImpressArt alphabet set of the winner's choice
1- ImpressArt Steel Stamping Block, small
1- ImpressArt Metal Stamping Hammer
1- ImpressArt Stamp Straight Tape
An Assortment of metal discs

After you enter to win your own set, be sure to hop around to see all the other folks that have joined in this hop and the fun projects they created for more ideas!


I know I have a few more of my own and look forward to making some truly one of a kind metal projects with these ImpressArt metal stamps! My sister wants to borrow them and make a few things too! (we are twins, we love the same stuff)! I hope you have a wonderful weekend! Thanks for hopping over here and adding more giddy to your life!


I did receive the ImpressArt Metal Stamp tools as listed above, to use for this tutorial at no cost to me. It does not have any effect on my opinions as set forth in this tutorial. The opinions here are my own. 

This tutorial is shared with you in the hopes that you will learn a new fun craft. Please do not use my tutorials for your own gain. Please do not use my photos without permission and please do not retake any photos to remake the tutorial for your own blog or another company. These photos and the text are copyright protected. Thank you for your cooperation.

Monday, July 25, 2011

Busy Monday: Laptop Greeting Cards & an Elmer's Giveaway

Hello crafters! I was contacted by Elmer's a couple of months back, to see if I would be interested in receiving a Kid's Summer Camp kit with tons of their products to make something with and blog about. I'm not a review blog and will not go into the "reviews" of each product they sent me, but I will instead share with you what you'll need, to make your own Laptop Greeting Card. And if you are the one lucky reader (that leaves a comment below) - you just might be the one to win a fun package of your own.


I'm happy to say, I finally got my girls and some of their friends together for an awesome craft session! I have been waiting weeks to share this Laptop Greeting Card idea with you all! The girls were so excited to crank the tunes and get to work, and I think the only thing I needed was more space!

It all started off with this awesome crate...I think my husband is jealous and I'm worried about leaving it alone for any extended period of time, as it may go missing and I may never get it back. 

Check out what was inside...The Host (or as I called it the "Mommy") kit!, 5 other kid crafter kits and a generous gift card for purchasing more supplies (like scrapbooking paper, etc).

Here's what the girls saw before the crafting madness started...A whole slew of goodies and bright colors! They too loved the burlap baggies, and were equally excited to be able to keep it and bring it home!

Here's one of my daughter's (Elephant), using a pair of Elmer's scissors for a fun edge effect!
This one's little boo-boo, didn't prevent her from gluing down her keyboard and having a blast...
Ladybug colored in her keyboard with heavy duty permanant markers!
Elephant begins to find the joy of her Elmer's Foam Core board creation and looks deep into the "laptop screen" allowing her imagination to run free!

My older daughter (Monkey) is finishing up the coloring in process on her last few key's, with her dual end permanent marker set. These dual end markers were a definite hit!
Mittens finished placing her gems and laptop "skins" by using the glue dots from her kit. The glue dots were my favorite! She also colored in some of her keys with the Gel pens! With just a hint of glitter they were a hit also!

So here's what you'll need for your Laptop Greeting Cards - or even just to make a laptop to play with and learn where all the keys are on the keyboard!

1 - 1 Elmer's Bi-Fold Foam Board - measuring 12 x 18 (when folded it's 12 x 9)
2 - 1 Box (per child) Elmer's Craft Bond Glue Dots - these are so stinkin' FUN!!! (but beware - if your little one drops them on the kitchen floor like mine did...you'll have to find them all the hard way! lol!)
3 - Elmer's Craft Bond Extra strength glue sticks (these are blue and dry clear!) These worked best for gluing the keyboard to the inside of the laptop.
4 - Elmer's Double Sided Tape dispenser (we picked this up with our gift card and i LOVED it! It was gone before the crafting session was over!) This double sided tape was the best for getting the thicker glitter scrapbook pages to stay down. We def needed more than one roll!

Some of the others you may want:
1 - Gel Pens,
2 - Project Popperz Markers - these were the dual ended markers (please use these with proper ventalation and supervision!), and of course...
3 - Glitter Glue that puff's up when dried!
4 - the X-ACTO rounded corner punch


Some of the other things you'll need:
1 - Scrapbooking paper...on cell phones and iPads, they call it skins...pick out your favorite scrapbooking papers to cover your laptop inside and out!

2 - Print out a copy of my Kid Giddy Keyboard for fun and learning!

3 - Dog Tags (if you want to use them as a mouse like my girls did - or if you want to put it on the front with a symbol like I did (see pic above)).

4 - Ribbon - If your child wants to use it like a real laptop, it will need to stay open...you can poke holes in the sides, about 3 inches from the fold, and 1/2" from the edge, using a screwdriver (on a rug or other soft surface). Put the ribbon through the inside of the hole, to the outside, and tie it in a double or triple knot to secure it. Then place the bottom of the same ribbon into the other hole from the inside, and tie knots on the outside also. Besure both sides are tied at an even length.
5 - Shower Curtain Liner - yep I said a shower curtain liner. Now for this project I used a brand new one! But for yours - you can get the one in your shower - replace it and use the very top of it and toss the bottom! The top is always clean as new and can totally be reused! I used the clear shower curtain liner for the "screen" part of the laptop and if you leave the top open, you can slide new messages in or new pictures. Then the liner makes the screen look more real!
6 - Imagination - you don't need tons of it...but a little will go a long way!

So here's the info about the giveaway....Your "Host" bag and the 2 "kid" bags will not be the exact same as the ones we received, but will have the same products. If you'd like a chance to win - please leave a sweet comment below. (PLEASE NOTE: Elmer's said the winners must be U.S. residents; & a gift card is not included in the prize pack). The winner will have to email me a ship to address and the product will be sent directly to you. Thanks for reading, commenting & entering....and good luck! Comments must be posted by Saturday July 30, 2011 11:59EST to be counted. Winner will be announced Monday! Thank you!

I hope you all enjoy making pretend laptops to play with or laptop greeting cards to send! Thank you Elmer's for sending me fun in a box! The girls had such a blast! Have an awesome week! I will have more exciting tutorials to come in the next couple of weeks...so please stay tuned!


Friday, June 3, 2011

Giddy Up Friday: Teacher Appreciation Gift Idea


Last year I coordinated an end of the year teacher appreciation gift for all the teachers in my daughters preschool class. With the help of all the students, I made these platters at a local paint your own pottery studio (Glazey Days) for each teacher. First I found out their favorite color(s), for their name and the year, and a coordinating color for all the kids names!

I initially had the students write their names on each plate with a pencil - but that proved difficult as some wrote really huge and I saw we would quickly run out of room. I quickly switched gears and instead, had them write their name just once on a piece of paper, which I later traced onto the plates and then traced with the glaze.
I added a quote "it starts with one....and ends with a thousand possibilities" which is from the Montessori philosophy and included one yellow dot for each childs name, to represent the concept of the the "golden beads". I also wrote all of the teachers names in a lowercase font - because that is the Montessori way of teaching the alphabet (only lowercase first). My daughter Elephant drew a sweet little picture of the school that I later traced onto the back of each plate.
 I thought it was a worthy keepsake and wanted to share the idea with all of you, in case any of you are looking for some ideas! You could easily do it on a much smaller scale on a mug orice cream bowl as well.

The last pic is one of the tags (I'm no scrapbooker - but I thought they came out pretty cute!) I made to include each child's name on the gift that participated in it, and each child/family was present to give the gifts to each teacher. I couldn't share this last year since it was done at the very end...and I'm not sure what we are doing this year - since I still have a couple of weeks remaining!

Have a great weekend!