Tuesday, June 18, 2019

Sew Plush Planner Sew Along Week 3

Welcome to Week 3 of the Kid Giddy Sew Plush Planner sew along! To make things a little easier in this post - I'm only going to show you the zipper pages of one of the planners I'm working on. This can be a super hard section, especially if you don't like zippers, but I'll also share some tips to simplify. If you want to see a video of all the original SewPlushPlanner features - check it out here...in this post
Just to quickly revisit some details...if you have not yet purchased a copy of the Sew Plush Planner from my Kid Giddy Etsy shop, you can do so here.... Whatever you do, please do not share your purchased pattern with someone else as it will upset me greatly. Please abide by my copyrights. Thank you! The Sew Plush Planner pattern will also come with some cute Bullet Planner Page blocks that are fun foundation paper piecing blocks to sew and use on the inside of your Sew Plush Planner if you'd like, or as it's own mini or quilt. All photos should be shared on Instagram using the hashtag #sewplushplanner.

Here's the Schedule we will follow:
Week 1 - Cover
Week 2 - Pages 1/2 and 3/4
Week 3 - Pages 5/6 and 7/8
Week 4 - Pages 9/10
Week 5 - Pages 11/12
Week 6 - Assembly

Pages 5/6 and 7/8 are the zipper pages, but before we get to those we have to make our little tabs as I made and chain stitched in the photo above...follow the cut out instructions in the pattern to make those and then place them on your front pages like so...it's easier to place them like this so you don't have to worry about some crazy mathematics to be sure they are evenly spaced. Be sure there is a little room at the top on the first page and a little at the bottom on the last page for seam allowances. Don't you just love how these Sunprint 2019 fabrics from Alison Glass play so nicely together?!
Once you have the tabs evenly spaced, pin them in place. One tip already to simplify your Sew Plush Planner is to not make tabs. You can use ribbon, labels, selvage, etc. or just leave them off completely and not have tabs at all.
Put aside all of the other pages you don't need right now - and just keep out pages 5/6 and 7/8. Place them as show below with zippers pinned in place. On the left side is my zipper pouch using the 5/6 pages and on the right is my zipper pouch using the 7/8 pages. If you really are phobic of zippers as I used to be (seriously I avoided them at all costs!), please consider giving them a try. If you really can't find yourself moving on from that fear - try hook and loop tape! It would work really well here.
I can't repeat too much info that is in the Sew Plush Planner instructions - copyrights - but wanted to give you some colorized assistance! The photos from here on out are for the spreads. That means the zipper pouches are sewn together, not as individual pouches. To sew them as individual zipper pouches, please read the instructions shown in the pattern. If you lay out your pieces as follows - take the top and switch it to underneath, then sew the left side (the left side of the floral print to the opposite side of the pink zipper).
If If you still need more help, I can upload a quick video in the Kid Giddy Sewing Patterns facebook group for reference. Just let me know! After the step above sew on your lining pieces. To simplify - don't add a lining. Truly easier!
I added a top stitch as you'll see in the photo below...but don't recommend it. It's not written in the pattern and has caused my zipper ends to stay tucked in a little more than I prefer. Once the pieces are connected as follows (the white lining is hidden underneath and attached to the pink zipper on the magenta word print side...and also to the orange zipper underneath the orange word print side) you can then sew it into the tube as further below. Before continuing, unzip both zippers a little bit, to be sure one is unzipped enough for turning right side out.

If your zipper spreads look like this inside out...you did it right. Now you find the opening on the liner and and gently pull the zipper pouches right side out.
Give the zipper pouches a good press and then they are done and ready for assembly week. Next week we will talk about sewing with mesh and vinyl. Be sure to share your Sew Plush Planner sew along pics with me on instagram. Tag me @kidgiddy on the photo and use the hashtags #sewplushplanner and #kidgiddy in the captions! I'm truly looking forward to seeing what you come up with!

Thanks so much for visiting!


http://kidgiddy.us2.list-manage1.com/subscribe?u=9ea4c419178a2e61b529af8aa&id=975aef860e


Disclosure: I received some Alison Glass fabric from Alison to use at my discretion. Expressed opinions are always my own. There are no affiliate links.

Wednesday, June 12, 2019

Sew Plush Planner Sew Along Week 2

Hello all, its a delayed start to Week 2 of the Kid Giddy Sew Plush Planner sew along! Last week I was working on 5 Sew Plush Planner covers, and now I'm working on 6...soon to be 7. I just keep getting more ideas for new pages and want to be sure they work before sending them out in the world. Some of the Sew Plush Planner organizers I'm working will feature the pages in the original pattern, and the other ones I'm making will have new pages for an add on pattern that will be available later in the sew along. If you want to see a video of all the current features - check it out here...in this post. Last week I finished the badge button Sew Plush Planner and love how it turned out. Now want to make one for my enamel pins too. How's your cover coming along?

Just to quickly revisit some details...if you have not yet purchased a copy of the Sew Plush Planner from my Kid Giddy Etsy shop, you can do so here.... Whatever you do, please do not share your purchased pattern with someone else as it will upset me greatly. Please abide by my copyrights. Thank you! The Sew Plush Planner pattern will also come with some cute Bullet Planner Page blocks that are fun foundation paper piecing blocks to sew and use on the inside of your Sew Plush Planner if you'd like, or as it's own mini or quilt. All photos should be shared on Instagram using the hashtag #sewplushplanner.

Here's the Schedule we will follow:
Week 1 - Cover
Week 2 - Pages 1/2 and 3/4
Week 3 - Pages 5/6 and 7/8
Week 4 - Pages 9/10
Week 5 - Pages 11/12
Week 6 - Assembly

Now that that's out of the way - let's get on to Week 2! Week 2 are pages 1/2 and 3/4. As I was working on these, and forgetting all of the measurements, I had to refer back to my pattern and sadly found two errors. Please make note of this errata on your pattern pieces or on your copy of the PDF. The Page Template says the width is 7" when it's actually 7 1/4". All other mentions of the page width through out the pattern are correct at 7 1/4". For the "sticky note" batting, it would be 6 1/2" width. My sincerest apologies for the errors despite checking it over and having it edited.

As you'll see in the photos below, I'm not sewing all of the pages together until assembly week. I've sewn all of the additional pieces (the sticky notes, envelope and pocket with strap), but they are only pinned together for layout purposes. There are two different options in the pattern instructions for putting pages together, so I'm waiting to decided until the assembly week to show you both options. If you haven't decided if you want to sew them together as single pages or as spreads, leave the additional pieces unsewn from the pages. Pin them for now. Below are the pages for my Sew Plush Planner that has my Westie Dog Block pattern on the front cover. I used batting on this envelope and have decided I prefer the light weight stabilizer instead. I may remake it, but I'm thinking the batting might prove beneficial for added protection depending on what's put inside, especially if I use it for metalsmithing. These are this beautiful Sunprint 2019 prints from Alison Glass.

When you finish making your sticky notes and envelope you can give them a press if you'd like. I press the top folded edge of the sticky notes but prefer to leave the envelope with rolled edges. It will sit easier once the flaps are sewn together and the snaps are put in place.   


For one of the other planners I'm going with an "English Teacher" theme...yes - for my friend that is an english teacher. lol. These prints are from Word Play by Sarah Fielke by Windham fabrics. Hopefully my friend doesn't see these pics, but I want to show you how you can do a different theme inside and go with a random vibe or more consistent (as in the next photo).

If you want to go more consistent and matchy matchy like I did here with these Mendocino prints by Heather Ross, use the same page prints for front and back (6 prints total) instead of double the number of prints. There are also multiple chances for fussy cutting. On the pocket page it ends up covering up the octopus on the bottom, bummer right?! So I fussy cut the pocket piece to have an octopus on it and now I have it back.

Once you have all of the pieces for pages 2 and 4, share a picture on IG and tag me @kidgiddy on the pic and with the hashtag #sewplushplanner and #sewplushplannersal in the post comment. Then you can set them aside with the snaps needed for assembly later in the sew along.


Over the course of the week, start thinking about the zipper colors you want or need and make sure you have them ordered for next week. While you are at it, start looking for some cute and fun zipper pulls or keychains that work as zipper pulls. I found these random CareBear (tm) keychains. I let my daughter pick one and opened it up to find a the cute "Heartsong" CareBear. It matches perfectly with my original Sew Plush Planner, and now I want all of the others! lol. So let's see what you've got on your cover if you've got it finished and let's see your 1 - 4 pages?! Be sure to share your Sew Plush Planner sew along pics with me on instagram. Tag me @kidgiddy on the photo and use the hashtags #sewplushplanner and #kidgiddy in the captions! I'm truly looking forward to seeing what you come up with!

Thanks so much for visiting!


http://kidgiddy.us2.list-manage1.com/subscribe?u=9ea4c419178a2e61b529af8aa&id=975aef860e


Disclosure: I received some Alison Glass fabric from Alison as well as the Word Play and Medocino from Windham Fabrics, to use at my discretion. Expressed opinions are always my own. There are no affiliate links.

Monday, June 3, 2019

Sew Plush Planner SAL - Week 1 Cover Contest

Good morning all! I'm so excited to be hosting this Kid Giddy Sew Plush Planner sew along! Although the word "Sew" is in it's title, the Sew Plush Planner is also a travel organizer that is great for other crafts and hobbies, including but not limited to Planning, Journaling, Cross Stitching, Embroidery, Crocheting, Knitting, Scrapbooking, Metal Smithing, etc. If you have a lot of little things and tools that need to be carried around to classes or on vacations, this is a great catch all organizer to bring along with you. If you want to see a video of all the features - check it out here...in this previous post.

First thing first, if you have not yet purchased a copy of the Sew Plush Planner from my Kid Giddy Etsy shop, you can do so here.... Whatever you do, please do not share your purchased pattern with someone else as it will upset me greatly. Please abide by my copyrights. Thank you! The Sew Plush Planner pattern will also come with some cute Bullet Planner Page blocks that are fun foundation paper piecing blocks to sew and use on the inside of your Sew Plush Planner if you'd like, or as it's own mini or quilt.

Here's the Schedule we will follow:
Week 1 - Cover
Week 2 - Pages 1/2 and 3/4
Week 3 - Pages 5/6 and 7/8
Week 4 - Pages 9/10
Week 5 - Pages 11/12
Week 6 - Assembly

Some of you may want to jump ahead and get some of your Sew Plush Planners done before the July 4th weekend and I don't blame you, they truly are great for traveling! If you do jump ahead, be sure to check in each week and share your pages for that week. All photos should be shared on Instagram using the hashtag #sewplushplanner.

Week 1 is all about the cover - so why not make it a cover contest! I decided I wanted to try something different than my first Sew Plush Planner, which lead from one idea to the next to the next...so what can you come up with?

I started my second Sew Plush Planner cover with my Westie Dog Block pattern. I wanted one with a green background and used this beautiful Sunprint 2019 pattern "Daydream" in "Clover" from Alison Glass.
Then I had this other idea...I have tons of button/badge pins and I haven't decided what to do with them, but the stash keeps growing. As I was working on the Westie cover, I thought, hey I could use a Sew Plush Planner to keep my pins on (or "in" for all of the pin collectors out there). So I laid out all of my button pins and sought my husband's assistance for selecting enough to put on the front and back cover. I realized the pins could get hooked on things so I added some vinyl to the top which reminds me of those bottle cap counter tops and tables you see at restaurants!

If you add some vinyl to your cover, be sure to place the binding on from the front side (not the inside as shown on Fig 2 in the Cover Prep section of the pattern PDF). By placing it on the front side, it will protect the vinyl from the feed dogs and will allow you to flip the binding over and hand sew the binding to the zipper (not the vinyl). Who wants to hand stitch through vinyl? Not me!

Here's the inside of the cover. I'm thinking I'm going to hand stitch a little covering over the inside to make it prettier...but haven't decided on that just yet.

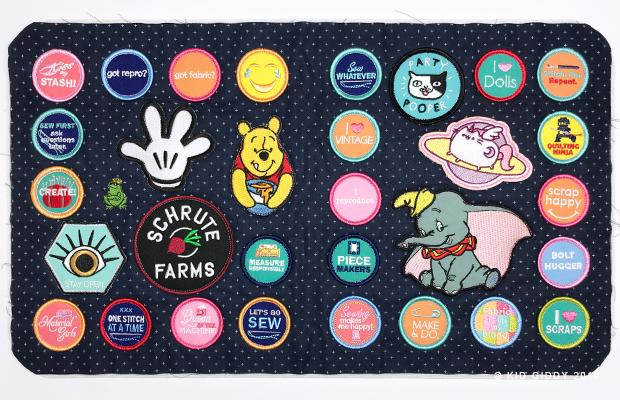
As I was working on the button/badge pin idea...I realized I also have tons of patches. Remember all those Moda Merit Badges that came out not long ago? Yeah - those! I grabbed all of those and some of my other stashed patches and got to work on yet another Sew Plush Planner.

Are you keeping track? That means I am currently sewing a lot of Sew Plush Planners all at once - 5 to be exact! Call me crazy - I'm used to it. My daughter even said I was being selfish sewing myself 3 more Sew Plush Planners when they don't have one yet! LOL.

To be fair - I'm also making one for my twin sister (@MossAndLotus) and one for my bestie (the one with the Vintage Photo Album blocks)! They both know about them to a degree, but I'm keeping some of the final details a secret until after they get their presents.

So let's see what you've got on your cover?! And what will you be using your Sew PLush Planner for? Please be sure to share your Sew Plush Planner sew along pics with me on instagram. Tag me @kidgiddy on the photo and use the hashtags #sewplushplanner and #kidgiddy in the captions! I'm truly looking forward to seeing what you come up with!

Thanks so much for visiting!


http://kidgiddy.us2.list-manage1.com/subscribe?u=9ea4c419178a2e61b529af8aa&id=975aef860e


Disclosure: I received some Alison Glass fabric to use at my discretion and picked up the Moda Merit Badges while at quilt market a couple of years ago as they were given away. Expressed opinions are always my own. There are no affiliate links. Thank you.