Monday, August 22, 2011

Busy Monday: AccuQuilt GO! Hexagon Ball Tutorial

Back in May of this year, I stepped into the AccuQuilt booth during Quilt Market, and pitched a few of my ideas, in the hopes of working with them and their GO! products. About a month ago I was so excited to officially become one of the AccuQuilt Bloggers, and to be able to "officially" share these tutorials with you!

 The first tutorial in my AccuQuilt GO! series, is the Hexagon Ball. I had this grand idea when I started, and multiple times, thought it was going to be a total "craft fail"! Luckily I went with my gut feeling, and kept going. I'm not a quilter. I've made two "pieced quilts" over the last 10 years and they took me at least, 2 1/2 years to complete - each - sad right?!! I don't prefer to sew flat - but rather 3 dimensional. I like quick projects that are simple and fun, and I love being able to reuse and recycle when I can, all the while, making a gift or toy that will be enjoyed for years to come. With the AccuQuilt GO! and an old wool sweater (or thrifty wool find) you can make one of the balls too with minimal effort! So grab your AccuQuilt GO! or GO! Baby and lets get makin'!

Here's what you'll need:
AccuQuilt GO! Machine (Studio or Baby)
AccuQuilt Hexagon 2" - 3" - 5" Die
AccuQuilt Cutting Mat
Old Wool Sweater or anything wool (it must be 100% wool)
Straight Scissors
Sewing Machine (use a regular stitch, not a stretch or zig-zag)
Fiberfill for stuffing (or wool sweater remnants)
Needle & Thread (for sewing closed)

Here's what you do:


1. Select a 100% Wool sweater or other wool item to use for this project. Do not pre-wash (but hope it is clean enough to handle). 2. Carefully cut your wool sweater (or other wool item) apart, at the seams. Cut the arms off, the neck and waist bands, and the body. 3. Cut one of the body pieces into strips just slightly larger than the height of the hexagon size you are going to make. This ball is made using the 3" die. 4. Cut the strips into pieces to be larger than the width of the hexagon size you are going to make.


5. Place one piece of the wool fabric onto the hexagon die, of the size you are making. Cover it with the cutting mat. 6. Roll your cutting mat and die through the machine (be careful to watch your fingers), and roll it through to the other side. (TIP: If your AccuQuilt machine/die & mat are all brand new, like mine; or you are working with a thick fabric, start with only one layer at a time and build up your layers, as possible.) 7. Remove the cut fabric from the cutting mat (reminds me of Flat Stanley!) 8. Cut enough to make a ball (14 pieces) or cut extras so you can choose which pieces you want to use, to create your pattern, as I did (fussy cutting). This sweater can easily make 2 balls, a 3" and a 5".
   
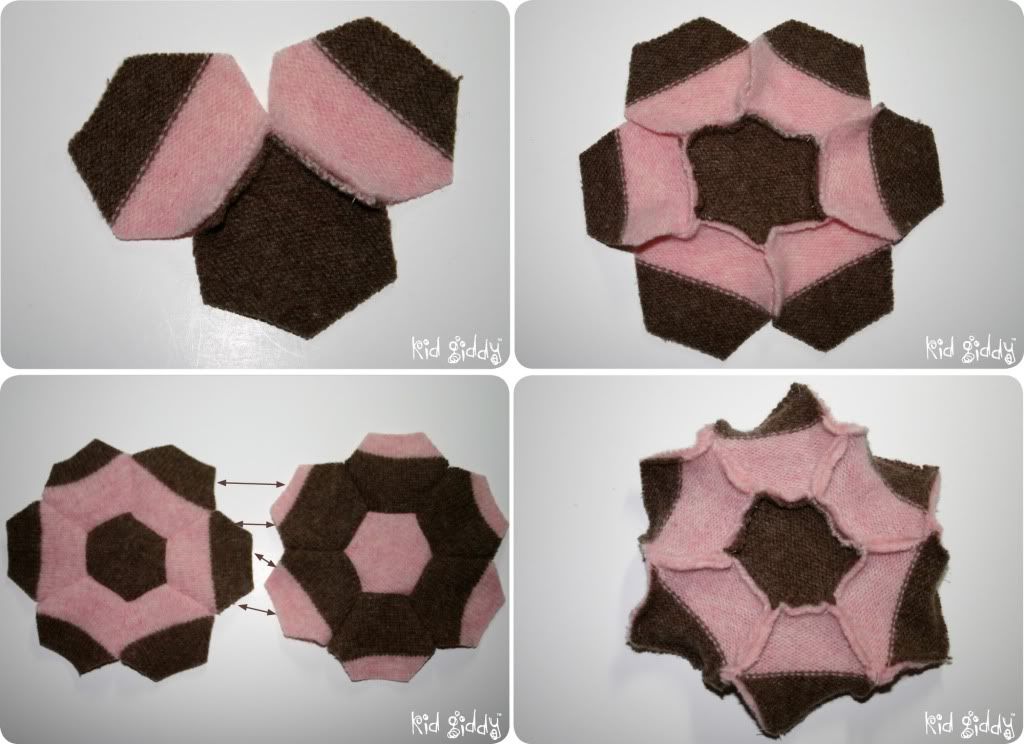
9. Begin with your center piece. Sew one piece, to the center piece, with right sides facing together. (TIP: There is a right side and wrong side to every sweater. Make sure you always have right sides facing) On each piece you will not be sewing from edge to edge, or it will not line up to the next one. You must start with 1/4" unsewn at the corner, sew along the edge, and then stop again, so you have 1/4" remaining on the opposite corner. 10. Continue to sew a piece, along each edge, all the way around the center hexagon. Then, sew each of the edges from the center piece down the edges, using the same 1/4" rule left open at the corner.  11. After you have made both the front and the back, you can begin to connect them. You must connect them as the arrows direct. You will not be connecting the top edge of one hexagon to the top edge of the other half, but rather connecting them at an angle. 12. The results will be a flower looking piece, that will in no way resemble a ball.


13 - 16. After you have sewn all the way around the outer edges, leaving one line unsewn, you can then, carefully, turn the ball right side out. This is where I thought it was going to be a craft fail. But I kept going and just thought I'd have fun anyway with the felting process. I figured if it didn't work as a ball, it would make a fun pin cushion! Ok - moving on...


17. Begin by getting it wet with hot water. If the hot water bothers your hands, use gloves, or just wash it with a load of laundry on the hot (and non-delicate) cycle! 18. Place soap on your hands (be generous), and slowly work the soap into a strong lather. Rub the wool gently at first, and in a circular motion. 19. As you work the wool for a few minutes, you can then press a little harder and move a little quicker. Every once in a while splash it with some hot water and work it harder. This process should take a good 10 minutes. 20. Rinse it with cold  water and then do it all over again. Once you have finished, rinse it very well and be sure when squeezed, there is no soap remaining.


21. When you are finished squeezing out as much of the water as you can, you'll notice the fibers are much tighter and closer together. If this did not happen, try the felting steps again. If it doesn't appear shrunken, there may be other non-wool fibers woven with the wool, in which case it won't work as well. 22. If it worked, place the ball in the dryer (with other items so you don't over heat your dryer), and dry it for about 40 minutes, or until dry! 23. If you place the ball next to one of your left over pieces, you'll see the difference in the fiber weave, and in the size. 24. Now through the opening, generously stuff your ball with your choice of fiberfill. I do prefer a premium blend to prevent bunching. 25. And stitch closed with a needle and thread (step not shown)!

I love the AccuQuilt GO!, and think it has more uses for us crafters than meets the eye! I'm so excited for the other tutorials I'm working on for you...so stay tuned for more fun, AccuQuilt Tutorials coming soon! Oh and did I mention, an awesome AccuQuilt GO! Baby giveaway with 3 Dies of your choice too!! Whootwhoot!

In the meantime, you can sign up for 22 FREE AccuQuilt Patterns - click the image to the right (on the sidebar) for your free patterns and download them today - it's really that easy!!

Thanks for stopping by and checking out my tutorial! I hope that you make a ball or two, and when you do, I hope you come by and let me know, and also upload them to my Kid Giddy Flickr Group! I just recently started the group, so I'm needing more company! If you've made something using one of my designs, or tutorials, please post it to the group! Have a wonderful day & week!


http://kidgiddy.us2.list-manage1.com/subscribe?u=9ea4c419178a2e61b529af8aa&id=975aef860e


Disclaimer: I have not been paid by AccuQuilt to design this tutorial, but I have been given some products listed, in order to make it. This does not, in any way, alter my opinions of the product being used.

Monday, July 25, 2011

Busy Monday: Laptop Greeting Cards & an Elmer's Giveaway

Hello crafters! I was contacted by Elmer's a couple of months back, to see if I would be interested in receiving a Kid's Summer Camp kit with tons of their products to make something with and blog about. I'm not a review blog and will not go into the "reviews" of each product they sent me, but I will instead share with you what you'll need, to make your own Laptop Greeting Card. And if you are the one lucky reader (that leaves a comment below) - you just might be the one to win a fun package of your own.


I'm happy to say, I finally got my girls and some of their friends together for an awesome craft session! I have been waiting weeks to share this Laptop Greeting Card idea with you all! The girls were so excited to crank the tunes and get to work, and I think the only thing I needed was more space!

It all started off with this awesome crate...I think my husband is jealous and I'm worried about leaving it alone for any extended period of time, as it may go missing and I may never get it back. 

Check out what was inside...The Host (or as I called it the "Mommy") kit!, 5 other kid crafter kits and a generous gift card for purchasing more supplies (like scrapbooking paper, etc).

Here's what the girls saw before the crafting madness started...A whole slew of goodies and bright colors! They too loved the burlap baggies, and were equally excited to be able to keep it and bring it home!

Here's one of my daughter's (Elephant), using a pair of Elmer's scissors for a fun edge effect!
This one's little boo-boo, didn't prevent her from gluing down her keyboard and having a blast...
Ladybug colored in her keyboard with heavy duty permanant markers!
Elephant begins to find the joy of her Elmer's Foam Core board creation and looks deep into the "laptop screen" allowing her imagination to run free!

My older daughter (Monkey) is finishing up the coloring in process on her last few key's, with her dual end permanent marker set. These dual end markers were a definite hit!
Mittens finished placing her gems and laptop "skins" by using the glue dots from her kit. The glue dots were my favorite! She also colored in some of her keys with the Gel pens! With just a hint of glitter they were a hit also!

So here's what you'll need for your Laptop Greeting Cards - or even just to make a laptop to play with and learn where all the keys are on the keyboard!

1 - 1 Elmer's Bi-Fold Foam Board - measuring 12 x 18 (when folded it's 12 x 9)
2 - 1 Box (per child) Elmer's Craft Bond Glue Dots - these are so stinkin' FUN!!! (but beware - if your little one drops them on the kitchen floor like mine did...you'll have to find them all the hard way! lol!)
3 - Elmer's Craft Bond Extra strength glue sticks (these are blue and dry clear!) These worked best for gluing the keyboard to the inside of the laptop.
4 - Elmer's Double Sided Tape dispenser (we picked this up with our gift card and i LOVED it! It was gone before the crafting session was over!) This double sided tape was the best for getting the thicker glitter scrapbook pages to stay down. We def needed more than one roll!

Some of the others you may want:
1 - Gel Pens,
2 - Project Popperz Markers - these were the dual ended markers (please use these with proper ventalation and supervision!), and of course...
3 - Glitter Glue that puff's up when dried!
4 - the X-ACTO rounded corner punch


Some of the other things you'll need:
1 - Scrapbooking paper...on cell phones and iPads, they call it skins...pick out your favorite scrapbooking papers to cover your laptop inside and out!

2 - Print out a copy of my Kid Giddy Keyboard for fun and learning!

3 - Dog Tags (if you want to use them as a mouse like my girls did - or if you want to put it on the front with a symbol like I did (see pic above)).

4 - Ribbon - If your child wants to use it like a real laptop, it will need to stay open...you can poke holes in the sides, about 3 inches from the fold, and 1/2" from the edge, using a screwdriver (on a rug or other soft surface). Put the ribbon through the inside of the hole, to the outside, and tie it in a double or triple knot to secure it. Then place the bottom of the same ribbon into the other hole from the inside, and tie knots on the outside also. Besure both sides are tied at an even length.
5 - Shower Curtain Liner - yep I said a shower curtain liner. Now for this project I used a brand new one! But for yours - you can get the one in your shower - replace it and use the very top of it and toss the bottom! The top is always clean as new and can totally be reused! I used the clear shower curtain liner for the "screen" part of the laptop and if you leave the top open, you can slide new messages in or new pictures. Then the liner makes the screen look more real!
6 - Imagination - you don't need tons of it...but a little will go a long way!

So here's the info about the giveaway....Your "Host" bag and the 2 "kid" bags will not be the exact same as the ones we received, but will have the same products. If you'd like a chance to win - please leave a sweet comment below. (PLEASE NOTE: Elmer's said the winners must be U.S. residents; & a gift card is not included in the prize pack). The winner will have to email me a ship to address and the product will be sent directly to you. Thanks for reading, commenting & entering....and good luck! Comments must be posted by Saturday July 30, 2011 11:59EST to be counted. Winner will be announced Monday! Thank you!

I hope you all enjoy making pretend laptops to play with or laptop greeting cards to send! Thank you Elmer's for sending me fun in a box! The girls had such a blast! Have an awesome week! I will have more exciting tutorials to come in the next couple of weeks...so please stay tuned!


Friday, July 15, 2011

Giddy Up Friday: Craft Cabinet Organization

My little girls love to create just as much as I do. My oldest daughter has been drawing since she was only 14 months old on a Magna Doodle, no joke! My youngest daughter caught wind of the fun and started, just around 2 years old. It's been non-stop creating ever since. We learned early on that we needed a place where they could keep their coloring books and crayons, magna doodles, etc.  A place they could easily get to, without getting into the wrong things or getting hurt! Enter in the creation of the "craft cabinet".
This is the finished result
Their "craft cabinet" has been a great source of inspiration and has always been filled to the brim. We have filled it, emptied it, cleaned it and reorganized it, over and over many times. Finally we came up with a much better system that has kept it cleaner more times than not. Everything has a place and everything must be in that place or there is weeping and frustration from all members of the family when something can't be found.

These photos document the clean out process from last year! It's a very "Clean Sweep" style of organizing. The cabinet (in our needing to be remodeled kitchen) is used for their crafting supplies and measures 22"W x 23"D x 38"H total. A small space, organized really well, can house a ton of craft supplies! I promise! So here goes....
Clean Sweep - take everything out first!
Here's the panoramic view of the mess we created...
Here's Elephant joining in the sorting process!
I'm amazed at how much was eventually crammed in there!
All of the drawers were removed and emptied. Then sorted by labels.
Monkey & Elephant show off our amazing results!
We had the 4 larger bins already, as well as the 3 drawer pieces, but adding the labels, changing the layout a little and moving up the middle shelf level, helped tremendously. Although these pictures were from October of last year, I'm happy to say - it still looks this good!

In the bins, we have:
1) All play-doh
2) Coloring books (now for guests) or notebooks (which they use more often)
3) Wooden objects, googly eyes and other beading or fun kid projects
4) Felt, PomPoms, Pipe Cleaners, Foam stickers, etc.

The bins are standard plastic containers and the 3 Drawer units are 8 1/2 x 11. I have since bought them a standard 12 x 12 Scrapbooking tote, since the scrapbooking pads don't fit into either the bins or drawers.

I'm sharing the labels I made for the drawers, in a color version and in a black and white version (if you'd like to color your own). I used clear packing tape to "laminate" them and then stuck them to the inside of the drawers, where the handle of each drawer creates a curve. I only used 9, but I have added more so you can pick and choose which you need or prefer to use! Click on the image below to get to the Google Doc to download the PDF.


I hope you enjoy them. Let me know if I'm missing a really important label and I'll add some more later. Have a great weekend!

Wednesday, July 6, 2011

Busy Day: My Craft Room

So I kind of don't want to post all these pictures lol!...but this room has evolved over the past year or two and will no longer be my craft room when we convert the space above our garage to our very real Studio space! Until then, I must be grateful for what I have and hope I won't be judged that it's all filled with buckets and bins of fabric and crafts! It's not as spacious as many other "craft spaces" I've seen in the blogging world, but it is sufficient for my needs for the next year. After that I will be busting at the seams - literally! I started off very simple and then started selling on Etsy, then designing patterns for Crafts n' things, and then working for Anna Griffin, and now with all the other projects in the works - it's all piling up - and I'm out growing my once perfect space!

So here it is regardless:
This is the Fabric stash that I dig from most frequently - My oldest daughter Monkey, painted the orange picture when she was in Kindergarten specifically for my craft room. That silver tin is from my mom when she was in Germany. I now have a Ribbon shelf rack on top of it...which is in the next two pics!
This little darling sits on top of the ribbon rack! She rocks! And so does Kermit the frog! Can you tell I like Gnomes, Cowgirls and frogs? (and the little bear - her name is Molly. She's the youngest from a Limited Edition series that The Limited Inc offered one year during Christmas. The big papa bear Harry is up above!)
The little girl doll, was featured in a previous post - she's my doll from when I was little. The jar of threads are all from the edges after washing my fabrics! I'm still trying to decide what to use them all for! Maybe doll hair! The green jars...I stocked up on them for the new Studio space!
This is my pride and joy sewing table. It's the one from Pottery barn with the really REALLY awesome drawer inside (all the compartments are so handy)! It may not be ideal for the machine - but it works! My inspiration board hangs above - the butterfly t-shirt my mom made for me when I was little! My hubby got me an awesome chair in my most favorite color!
Here's my cutting table and off on the side...*blushes*...all my fabric stash that I don't use on a regular basis. I also have projects that are waiting to be done in some of the front bins as well! The window is off to the left - great to look out and get lost in space (or better - in the garden)!
These are all my books and magazines that have brought me much inspiration! The baskets are filled with fun things my daughters are allowed to do when they feel like hanging out with me instead of playing! They have their own fabric stashes and [plastic] needlepoint crafts!

I hope you enjoyed a little peek into my creative space! On friday - I will be sharing the "Craft Cabinet" that we have set up for our daughters everyday use! I'll have a freebie download available too!

Have a great day!