Showing posts with label Paper Piecing Patterns. Show all posts

Thursday, September 3, 2020

The Pearson Tree Farm Quilts

Pearson Tree Farm Quilt #1 - quilted by Jaki Soper of QuiltStudio55

I've hemmed and hawed on writing this post because this quilt was never meant to be such a public "worldwide" project where I shared all my backstory feelings regarding it. However, it became bigger than me - and so many people helped so I felt I should share the whole story as a way to show how amazing this quilting community is and to show in some small way, my gratitude to all of you that participated. 

Back in December 2019, a local family in my town, lost their husband, father, grandfather, friend, in a very tragic and horrific way. It was weeks before Christmas and where there was once hope and joy, there was immediately sadness and fear. I live in a big town and word got out quickly that a man was on the run and had brutally stabbed this dear man outside his home and headed north. Many talked about the tragic situation but no one knew what to do. I felt a tremendous amount of sadness for his wife who found him while he was still alive. I wanted to do something to help her, remembering my own Granny that lost her husband to natural causes but was there beside him. I didn't feel anything I could ever do would help take away that sadness she was likely feeling and everything that went along with the terrible situation. 

A week passed and I continued to think of her. After seeing many news stories about Jim Pearson and his family's Beech Ridge (Tree) Farm, I got this image of a (Christmas) tree quilt with a red heart on it. I pushed it out of my mind thinking a quilt won't help, however, I wanted to help change the narrative going on in the town/world. There are good people here. Evil will not win. We can do something, anything to show we care, and that we are here for her, even those of us that didn't know her personally and she didn't know us. The image kept coming back, so I sat at my computer one day and designed a bunch of different "Christmas Trees" in my EQ8 program to see how it would look. 

The process of designing the blocks and the quilt helped me and so maybe this quilt could help Nancy, but I knew this was not something I could sew on my own with a quick turn around. Since I knew others in my town were feeling as I was feeling, I reached out to the local town "mom fb group" and asked if anyone else wanted to help make a block. So many people signed up to sew a block - some offered monetary donations for supplies - some were willing to learn to sew in order to be a part of it - while others forwarded the info to local sewing groups and police stations (as one of the adult children was a soon to retire police officer) and news of the quilt project began to spread.

I quickly had enough people signed up to make a queen size quilt, from people in my town, state and even a few from out of state. Someone in the mom fb group suggested we make two more quilts for the adult children, that also lived in town, and was only sorry she didn't know how to sew. Knowing I only had enough blocks coming for 1 quilt, I knew I needed a new source for 2 more quilts worth of blocks, or three quilts weren't going to be possible. My only option at that point was to reach out to all of you, my @kidgiddy community on IG and the response brought me to tears. Without hesitation you all signed up, showed up and shared the post. Within 24 hours I had to shut down the sign up form, before I had more blocks than I knew what to do with. I felt like I closed a door with more people knocking outside. You all are so amazing!
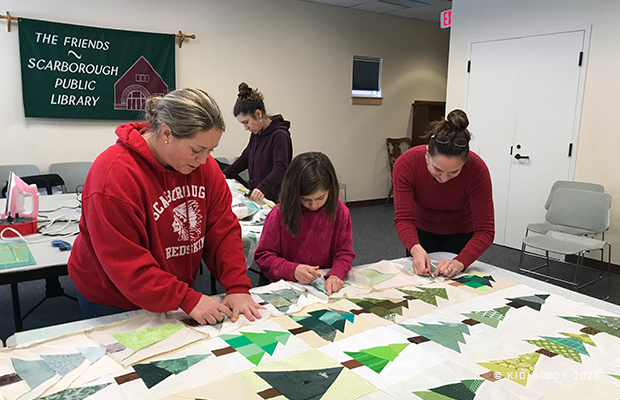
The local Scarborough Public Library offered their public space for me to have "sew-ins" so I could teach folks how to sew the foundation paper piecing blocks, or how to sew the patchwork or applique versions. If someone wasn't there to learn, we were able to use that time to start sewing blocks together for the first quilt as the packages started coming in early January. Everyday at mail time was so exciting and always turned into tears of gratitude. Some of you sent letters and some also included the coloring page that your kids colored in (that were gifted with the quilts). 
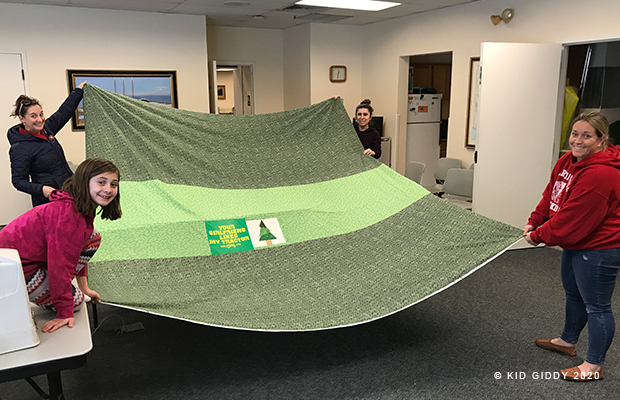


February and March brought more of the same but by mid March our last sew-in happened just in time to make the quilt backs before Covid shut everything down. I had a couple of volunteers that helped piece the last blocks for two of the quilts together in their homes, while I finished the first quilt. With all the quilt tops and backs done, a local friend, Jess, began helping me search for local longarmers willing to give their time to quilt them. Other friends shared my posts and tagged their friends too which resulted in offers from as far west as Seattle and as far South as Florida and Texas to quilt the quilts, but I became hesitant mailing anything out with Covid taking over the news. 

Pearson Tree Farm Quilt #2 - quilted by Tammy Johnson courtesy of Alewives Fabric Shop

We finally secured 3 local quilters within driving distance that were willing to quilt them for this cause (Jaki Soper - Quilt Studio 55 in Maine, Alewives Fabric Shop quilter Tammy Johnson also in Maine, and Patty Sciacca from Massachusetts. Covid slowed down the finishing process, but eventually everything was done.

Pearson Tree Farm Quilt #3 - quilted by Patty Sciacca Crafts

When the quilts came back they were trimmed up and sent right back out to my local volunteers Leslie and Jennipher for binding and all the hand stitching needs. These quilts were truly a community effort that I was honored to be a part of. It was not just this local community, but a worldwide community of quilters that want to do good with their skills. In total, I received 235 blocks from approximately 75 quilters in the US, Canada and the UK. 

You can see everyone that helped in some way or another listed on the labels that my husband and I created. Jess, a friend of the Pearson family, also made pillows for each of the grandkids so they would have something as well. Each pillow and all three quilts have a tree or two pieced from Jim's clothing. The quilts have 1 or two blocks with his work shirt and one t-shirt tree from the clothing provided by the family. You can see in one of the images above, I made two tree blocks for Nancy's quilt using one of Jim's work shirts that had his name on the left side above the pocket and the farm name on the right side above the pocket. We were sure to use as much of the shirts that we cut into so as not to waste any of the material. Not even the buttons.  


While the quilts (and pillows) were being made, we had many folks wanting to donate so much funding to the quilts, which would've been more than needed. Eventually the family was able to set up a memorial education scholarship in Jim's honor, and the first recipient this year was recently awarded a scholarship for his freshman year at college. For more information about the Beech Ridge Farm, or to support the Pearson Family Memorial Scholarship, you can visit their websites (links highlighted). If you would like to purchase the #PearsonTreeFarmQuilt blocks pattern, please know that I am in the process of working with them to offer it on their website or a dedicated Etsy shop, with proceeds going to the Pearson Family Memorial Scholarship. I will update that info here when it becomes available. 

I truly want to thank everyone that helped make these quilts happen. It was a lot of work to put together and thanks to Covid took way longer than anticipated, but the process was made easier with the help and love of so many others. The Pearson family was grateful for the outpouring of love from so many strangers worldwide and really enjoyed looking at the variety of trees and hearing how they all came together. I never could've done this myself...certainly not 3 quilts (or the 9 pillows Jess also made), but not even the one quilt. Thank you again!


http://kidgiddy.us2.list-manage1.com/subscribe?u=9ea4c419178a2e61b529af8aa&id=975aef860e


Disclosure: Although this is not a sponsored post - I did receive the EQ8 software previously which helped to create the blocks and quilt layout, but the opinions and comments provided are always my own. There are no affiliate links. Thank you.

Monday, July 20, 2020

The Lobster Quilt Block

I've lived near coastal waters most of my life and lobsters and buoys have always been a part of the scenery. I designed a stuffed Lobster (named Pinchy) for my book Sewing Tales to Stitch and Love back in 2013. A year later in 2014 I began designing foundation paper piecing patterns, I sketched out this Lobster as my second block (the Anchor was my first), but I never finished developing it through all these years. There was just something about it I didn't love, but as I revisited it, I easily changed the tail and head in my Electric Quilt EQ8 program file and fell in love. So to say this #LobsterQuiltBlock has been years in the making, is no joke.


The Malibu and Ruby + Bee Fabrics I used in the block above and are shown with the quilt layout below were such a perfect fit right for this ocean loving girl (me) and this Lobster block. I actually grew up going to Malibu Beach every summer in New York when I lived on Long Island. These adorable fabrics are available from Windham Fabrics. I reached out to Windham and they provided me with the fabric swatch files so I could easily import them into EQ8 and whip up a fun layout. If you have fabrics you want to use for a project, but have never tried this, here's a quick video tutorial.

You can get a copy of my new #LobsterQuiltBlock by visiting my Kid Giddy Etsy shop. Want to Learn to Design and Sew Foundation Paper Piecing patterns? You can find the ebook in my shop as well. Visit the Electric Quilt website to learn how to convert your designs into the EQ8 program to make designing and printing your patterns easier. Please share your #LobsterQuiltBlocks with me on Instagram @kidgiddy #kidgiddy.

Thanks so much for visiting!


http://kidgiddy.us2.list-manage1.com/subscribe?u=9ea4c419178a2e61b529af8aa&id=975aef860e


Disclosure: As a Media Partner with Electric Quilt, I may receive compensation for this post. I also received the Malibu and Ruby + Bee Fabrics from Windham Fabrics to help create my block, but the opinions and comments provided are always my own. There are no affiliate links at this time. Thank you.

Friday, May 22, 2020

Free Patterns: Birdhouse Mini Quilt and a Weighted Comfort Bunny

Hi all, I have two more fun and FREE projects for you to make over on the Bernina We All Sew website. Most recently I designed this Birdhouse Mini Quilt with my mom in mind. She loves birds (even own a couple at one time named Pete and Repeat) and raised four kids on her own while being an art teacher, so I designed it with four houses and a momma bird near by.
It works great for using up scraps for all the houses and the bird, as each block finishes at 3" and the mini quilt finishes at 12.5". For the background you'll only need a fat quarter or, you could easily sew up various scraps in shades of blue and then use them for larger pieces.  Don't want to sew smaller blocks, you can easily enlarge these blocks and trim the seam allowances to a true 1/4" to make a 24" mini quilt.

Last month, I designed this Weighted Comfort Bunny for the Bernina We All Sew website. It's a project near and dear to me. More than 20 years ago I found myself laying in a hospital during the springtime while in college covered in hives and miserable. Everything started a couple of days earlier, but I was eventually hospitalized and alone for at least a day (until my mom arrived). As I got better I was allowed to have some visitors that brought me a sweet little bunny stuffed animal from the gift shop. It’s the only reminder I have from my time in the hospital. In the months and years that followed, any time I got sick…"Sick Bunny" came out for cuddles. When I had my two girls and one of them got sick…Sick Bunny again came to the rescue.


Although we now have a real bunny (Lola), she’s not exactly a cuddle on demand animal. There’s no denying that animals (even stuffed toys) provide comfort in times of need. During this unique spring season, I want to share a sewing tutorial with all of you to help you make your own comfort bunny, with a little weight. The weight helps to feel like a constant hug. Just having it sit on your lap, or a child’s lap, can be of great comfort. If you or someone you know is struggling with anxiety or depression during these very difficult and challenging times, this comfort bunny could be a wonderful gift to make and share. I make no medical claims or guarantees, but believe that this spring is that time to get sewing and try anything and everything to help our loved ones while in isolation. So head on over and make your own Weighted Comfort Bunny.

I'm looking forward to seeing all of your #BirdhouseMiniQuilt and your cuddle worthy #WeightedComfortBunny! Thanks so much for visiting and hope you enjoy sewing these fun projects! Please share your finished projects with me @kidgiddy on Instagram. Be sure to tag @berninausa too!

http://kidgiddy.us2.list-manage1.com/subscribe?u=9ea4c419178a2e61b529af8aa&id=975aef860e


Disclosure: I received products from Shannon Fabrics, Bernina and Aurifil, as a designer, Bernina Ambassador and Aurifil Artisans to share ways I use my Bernina sewing machine and the threads, but the opinions and comments provided are always my own. Thank you.

Saturday, December 22, 2018

Making Quilts in Electric Quilt

This just might be the last official Electric Quilt Brand Ambassador post of the year. Not only is the year coming to a close, but my computer is very much out of room (literally only 22gb remaining). Somehow I was able to delete enough "stuff" to get this post put together for you. I've had so much fun experimenting with the Electric Quilt Company Block Spotlight each month and decided this time to screen record it. This month is the Amaryllis Block which is perfect for the Christmas season, but also works great for the spring time too, especially when Easter rolls around.If you haven't tried making a quilt and uploading it to the EQ8 Block Spotlight post, you really should give it a go!
When I am working with a block and trying to figure out a quilt layout, I treat it the same as sketching in a notebook. I just start and keep going to see where I end up. Remember though, it's so important to save each quilt as you go along so you can go back and look at them all, and select your favorite to sew together when you are done.

The first picture I posted above is actually the last quilt I designed. It feels super modern and geometric for a flower, but also directional and sharp which was very different than my first below.

I was trying to stay away from symmetry, but my ambidextrous self has a hard time doing that. I added some rows and columns and made it symmetrical and also rectangular. Here you can see with rotating the blocks, the star really pops and become the focus of this design.
When you start playing with color and even the oh so fun "Randomize" button, you get a whole entirely different looking quilt, with a very different focus.

Experimenting further but now as a more pictorial quilt, I tried using the Amaryllis block to look like the Amaryllis plant with it's long thick stems.


Once I had this layout, I wanted to try the other colors most typically seen with the Amaryllis plant, of white and yellow. It would make a beautiful Easter wall hanging I think. Perfect for spring decorating in your home. You could easily add one more Amaryllis block in a smaller scale in that very center square that is created with all four corners.

Now that you've seen all of the blocks, watching my video below (or on YouTube) will allow you to see the steps I took to get to each design. Be sure to subscribe to my Kid Giddy YT channel for new videos in the future.

What do you think? Do you have a favorite layout? Have you tried experimenting with the Electric Quilt Block Spotlights each month? It's a great exercise and great practice to get to know the program, so if you haven't already, I highly recommend you challenge yourself to give it a go!

I just want to add before signing off, that I am truly so grateful to be able to work with great companies like the Electric Quilt Company, especially while being one of their Brand Ambassadors this year. I have been using their product for many years now, and still find something new when I break out of my own box and pick a new tool I haven't used before. (Which reminds me - while visiting the EQ website, if you want to add anything to your stash, you can use the code "EQ8Kerry" to save 20% off your purchases before the code expires at the end of the year).

With that said, I am also truly so grateful for each and every one of you that has supported me in my pattern making and design work. I appreciate when you give me credit for the patterns of mine you are using, because it allows me to see how you interpret them and how much fun you are having with them. It also further supports me by helping your friends know where they can get the pattern too. Thank you from the top and bottom of my heart for every time you've read a blog post, every like or comment on social media, every purchase and share of one of my patterns. You all inspire me every day with your excitement and enthusiasm. Wishing you all a Merry Christmas, a belated Happy Chanukah, or Joy in the holiday you celebrate. May you all have a wonderful, safe and prosperous Happy New Year!


http://kidgiddy.us2.list-manage1.com/subscribe?u=9ea4c419178a2e61b529af8aa&id=975aef860e


Disclosure: As a brand ambassador for Electric Quilt Company, I have received the EQ8 product for free, but the opinions and comments provided are always my own. This is not an affiliate code. Thank you.

Monday, June 18, 2018

The Tonga Block - Aurifil Designer of the Month

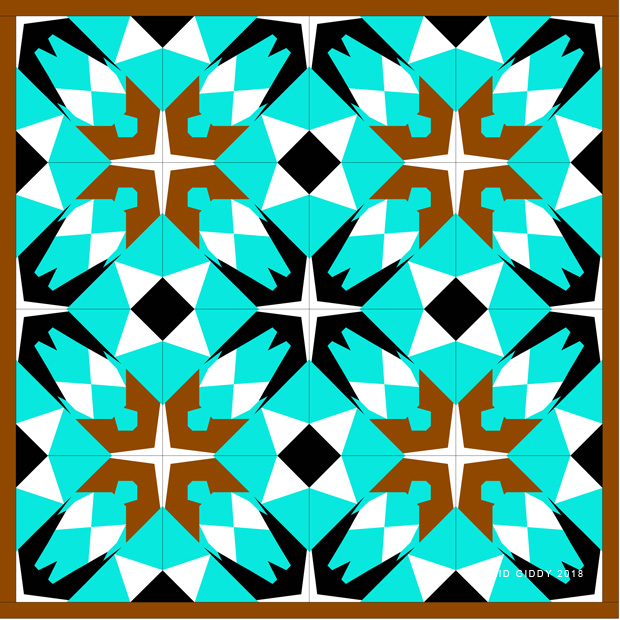
I can't believe it's halfway through June already! That means I am the Aurifil Designer of the Month and my new Tonga Block has been posted! Last year (Quilter) Pat Sloan invited me to be a part of this years Designer line up and I couldn't have been more excited! Naturally I picked June (because it's the best month = summer) and created for all of you the free Tonga Block in EQ8. I had a lot fun making various color combos and playing with potential layouts in EQ8 and you can too. EQ8 makes it so quick and fun!
As I was playing with the colors in EQ8, I was looking at some of my Aurifil threads and using some of those colors in the layouts. I figured the brown could easily replace the black, but I was leaning more towards black in the end anyway. I'm still trying to figure out which color combo I love the most to sew into a quilt. Here's the Tonga Block in just 2 colors not including the binding.  (Turquoise and White)
Here's the Tonga Block in 3 Colors, not including the binding. (Turquoise, White and Black)

And the final combo, the Tonga Block in 4 colors. (Turquoise, White, Black, Rust)

I think my fav is the 4 color combo. Do you have a fav? I ended up using the same layout, but wanted to show that with various color combos, it can look very different.
Do you want to know what inspired my Tonga block? You can read more about it on the Aurifil blog. And when you are done printing out your free Tonga Block, head on over to Pat Sloan's blog to see some Tonga Block Sewing Tips she shared. When you finish sewing your Tonga Blocks, please share them with me on social media by tagging me @KidGiddy, #kidgiddy and AurifilDOM2018!

Thanks so much for stopping by, please be sure to sign up for the Kid Giddy newsletter by clicking the link below....


http://kidgiddy.us2.list-manage1.com/subscribe?u=9ea4c419178a2e61b529af8aa&id=975aef860e


Disclosure: As a brand ambassador for the Electric Quilt Company, I received EQ8 program for free, but the opinions and comments provided are always my own.

Tuesday, June 12, 2018

New EQ8 Foundation Paper Piecing Patterns

I've been rather quiet here on my website, because I've been so busy in the studio with tons of secret sewing and designing, that I haven't shared with you some fun new patterns I've created in EQ8 yet!

I could sit and design patterns in EQ8 all day because it's so easy. Getting those designs sewn up and formatted into a PDF for you is the harder and more time consuming part, but worth it in the end...right?!

Well here are some new patterns I have listed in my shop.

First up is a collaboration I did earlier in the year with AnnKelle (Kelle Boyd). She had these cute giraffes and owls prints and I just had to make them into paper piecing blocks. I wanted to keep them relatively simple - so I stuck with her designs instead of going crazy detailed. I'm only offering them in my Etsy shop (to control the VAT tax purchases), but after all the etsy and paypal fees are taken out, the rest of the money from each set sold, will go to a Backpack program that puts food into children's backpacks on weekends, during school vacations and summer. I'm so excited to help this cause and ask that you help contribute where you can as well. Food insecurity leads to learning difficulties as well as many other issues. Kids should never go hungry.

My next quilt is more of a personal design. I'm going to be making various Martial Arts animals for a quilt of my own, and started with the Tiger Tiger Quilt, as a gift for my former Sensei that moved down to Texas. He felt the Tiger was his Martial Arts animal, but I was also born in the year of the Tiger. I included the character for Tiger up above the face of the tiger. Each animal I design, will also have it's Mandarian/Kanji character above it so I can learn a little of the languages as I go. I also find Chinese and Japanese calligraphy to be beautiful and couldn't leave it out of the design.

I finally sat myself down and mapped out the Vintage Photo Album Quilt blocks. I've had this idea for well over a year, and kept pushing it further to the back, silly me. It's one of those really quick and easy mix and match patterns that you can fussy cut to your hearts content. There are so many options and the results are super cute! I'd love to print some of my family photos onto fabric and make a genealogy quilt that shows my family tree. It would make a great memory quilt too. There are so many blocks and options (just two shown below), but please know - no quilt instructions or measurements are provided because of the mix and match - make your own concept.

I'm excited to share that Electric Quilt has come out with a new EQ8 Designing Quilts book where you can learn all the tricks and tips from EQ8 designers. Myself included. See that Sailboat Ship block on the back cover of the book? I teach you how to design the block and quilt using my very own photo, step by step! You can grab your copy at Electric Quilt (and make sure you use the code "EQ8Kerry" to save 20%).
http://electricquilt.com/online-shop/eq8-designing-quilts/

There's a few more new blocks coming, but those are still a secret. Hopefully these can keep us all busy sewing for a bit until I can release the others. Do you have a favorite? Is there a design you are pulling for? Maybe it's a new block I've got in the works, or can add to the future list?!

Thanks so much for stopping by, please be sure to sign up for the Kid Giddy newsletter by clicking the link below....


http://kidgiddy.us2.list-manage1.com/subscribe?u=9ea4c419178a2e61b529af8aa&id=975aef860e


Disclosure: As a brand ambassador for the Electric Quilt Company, I received EQ8 program for free, but the opinions and comments provided are always my own.

Wednesday, January 31, 2018

Electric Quilt Company Brand Ambassador

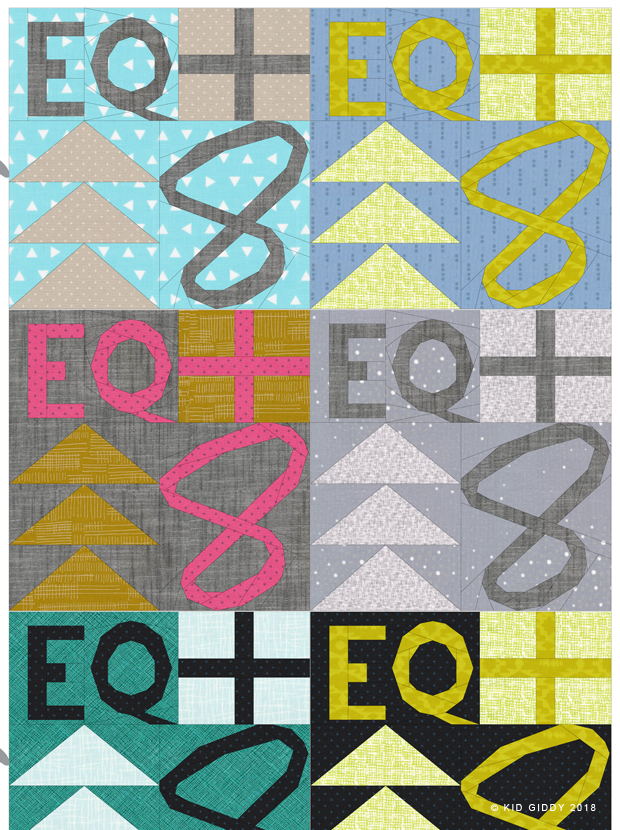
It's really no secret at this point that I have loved working with the Electric Quilt Company EQ7 program over the past 3 (almost 4) years. It's even less of a secret that I love working in EQ8 even more. Therefore I'm so thrilled and honored to share with you that the Electric Quilt Company has selected me as one (of their two) EQ Brand Ambassadors this year along side AnneMarie Chany (of GenX Quilters). 
Last year I created four foundation paper piecing dog blocks as part of my new #DogBlockSeries. I have always loved dogs but haven't been able to have one of my own since childhood. So I have decided to live vicariously through all of my friends and family and my love of sewing. It all started with the French Bull Dog as a collaboration between Christopher Thompson, his gorgeous frenchie Edie and myself for his gorgeous Blue Carolina line. She was a smashing hit, but she was lonely and so I created the Pug Dog.


Along came EQ8, so to test it all, I created the German Shepherd (one of the most loyal dogs from my childhood) and then the Scotty Dog in memory of my late Granny. She just loved Scotties - so with it being Christmas and all, I couldn't resist the iconic Scotty with a huge bow. I learned a lot about EQ8 while designing the German Shepherd and the Scotty and was so excited about the new features and some fixes that I hoped one day would be made. (I'll share some of those favorites later...)
With those four puppies done...and more to come...I started thinking of how I wanted my quilt to look. I brought them all together in EQ8 (some I designed earlier in EQ7 - so I simply brought them into my new EQ8 file) to map out some quilt ideas. I didn't want to do a standard 12 up quilt. That could take forever since I don't have all 12 designed yet. Instead I went with a truly whimsical quilt design (using the custom layout option in EQ8) that makes you want to sing out..."How much is that puppy in the window"! Right?

What do you think? I cut up my first French Bull Dog block to make it into a cute silhouette shaped mug rug (for Christopher's awesome #theunconventionalminiquilt challenge), so I need to make another one first, but I'm excited to make this fun #DoggyInTheWindowQuilt, who's with me? I'll be sharing the details of this quilt in my newsletter next week...so be sure to sign up below!

In the meantime, I have a couple of awesome things about EQ8 to share with you. One of my favorite updates was the coloring. When I colored my blocks, and found a little line I needed to delete or decided to change, I would click back over to the coloring tab and then had to recolor everything all over again. It was as if the wind blew all of my color to the left. Sure it was time consuming but I just thought, it was all still faster than anything I could've done on my own. Now in EQ8, the program understands when you color something, and make a small change, it leaves most of the color there. If you have a block of 4 different color squares, and delete one line (so now you have 2 squares and a rectangle) it picks just one color to be from those two squares. It may not be the color you want, but it leaves the other two squares alone. So it's less recoloring, and that saves so much time!

One of my other favorite new feaures...and I just found out about it...is that you can undo when grouping patches and numbering patches. So when you are ready to print the Foundation Pattern - the window pops up on the Sections Tab. And you'll see notes on the right side, and a little box (that I usually check) that says "I want to section and number myself without EQ's help". Once you check that box to start grouping your patches...this is the screen you'll see. It says "Foundation Sections: Now click on all the patches that you want to be in the same section". And this vast empty space...

After you click on the first patch you'll see new messages added...


The first one says "To make the shaded patches into one section, click the group button. But what if you click an extra patch? I used to have to click the "Start Over" button. Every time either in the very beginning or the very end. But now, see that new second message? "To remove a patch from a section, hold SHIFT and click on that patch."!!! Do you know what that means??? It's like an UNDO button without being an UNDO button!!!! And it's not just one undo - you can click undo a lot of times. All the way back to the beginning if you'd like. It's like this new little update that slipped under my radar this whole time, and now has me realizing how much time I will save when I have all these itty bitty tiny pieces and accidentally click the wrong one. What to know what else this means?

It means that you can also hold the SHIFT key and click on the patches too when you are in the numbering tab. It doesn't say that here on the right side...but you still can. I tried it and it worked! So maybe you want to change a sequence or you accidentally clicked in a different section and that numbered it B1, when it really has to be B5 - you can undo it!

These are just a few more reasons I love the new EQ8 program and over the course of the year, I'll be sharing some tips and tricks for working in EQ8 and hope you'll come by and check them out. I also have some new patterns coming out soon and a new 12 week sew along planned for Christmas. It's a quilt I've been trying to put together for the past few years!

If you are new to the Electric Quilt company, or just new to hearing about EQ8, visit their website for even more info and tons of helpful tutorials and videos. Use the code "EQ8Kerry" to save 20% off of all your purchases (this whole year!!!)! Don't forget to sign up for my newsletter. Next week I'll be sharing the Doggy in the Window Quilt measurements as I mentioned below and the pattern for this #GeoHourglass block I created for this tutorial.

Thanks always for stopping by!


http://kidgiddy.us2.list-manage1.com/subscribe?u=9ea4c419178a2e61b529af8aa&id=975aef860e