

Showing posts with label Sewing. Show all posts

Thursday, September 3, 2020

The Pearson Tree Farm Quilts

Pearson Tree Farm Quilt #1 - quilted by Jaki Soper of QuiltStudio55

I've hemmed and hawed on writing this post because this quilt was never meant to be such a public "worldwide" project where I shared all my backstory feelings regarding it. However, it became bigger than me - and so many people helped so I felt I should share the whole story as a way to show how amazing this quilting community is and to show in some small way, my gratitude to all of you that participated. 

Back in December 2019, a local family in my town, lost their husband, father, grandfather, friend, in a very tragic and horrific way. It was weeks before Christmas and where there was once hope and joy, there was immediately sadness and fear. I live in a big town and word got out quickly that a man was on the run and had brutally stabbed this dear man outside his home and headed north. Many talked about the tragic situation but no one knew what to do. I felt a tremendous amount of sadness for his wife who found him while he was still alive. I wanted to do something to help her, remembering my own Granny that lost her husband to natural causes but was there beside him. I didn't feel anything I could ever do would help take away that sadness she was likely feeling and everything that went along with the terrible situation. 

A week passed and I continued to think of her. After seeing many news stories about Jim Pearson and his family's Beech Ridge (Tree) Farm, I got this image of a (Christmas) tree quilt with a red heart on it. I pushed it out of my mind thinking a quilt won't help, however, I wanted to help change the narrative going on in the town/world. There are good people here. Evil will not win. We can do something, anything to show we care, and that we are here for her, even those of us that didn't know her personally and she didn't know us. The image kept coming back, so I sat at my computer one day and designed a bunch of different "Christmas Trees" in my EQ8 program to see how it would look. 

The process of designing the blocks and the quilt helped me and so maybe this quilt could help Nancy, but I knew this was not something I could sew on my own with a quick turn around. Since I knew others in my town were feeling as I was feeling, I reached out to the local town "mom fb group" and asked if anyone else wanted to help make a block. So many people signed up to sew a block - some offered monetary donations for supplies - some were willing to learn to sew in order to be a part of it - while others forwarded the info to local sewing groups and police stations (as one of the adult children was a soon to retire police officer) and news of the quilt project began to spread.

I quickly had enough people signed up to make a queen size quilt, from people in my town, state and even a few from out of state. Someone in the mom fb group suggested we make two more quilts for the adult children, that also lived in town, and was only sorry she didn't know how to sew. Knowing I only had enough blocks coming for 1 quilt, I knew I needed a new source for 2 more quilts worth of blocks, or three quilts weren't going to be possible. My only option at that point was to reach out to all of you, my @kidgiddy community on IG and the response brought me to tears. Without hesitation you all signed up, showed up and shared the post. Within 24 hours I had to shut down the sign up form, before I had more blocks than I knew what to do with. I felt like I closed a door with more people knocking outside. You all are so amazing!
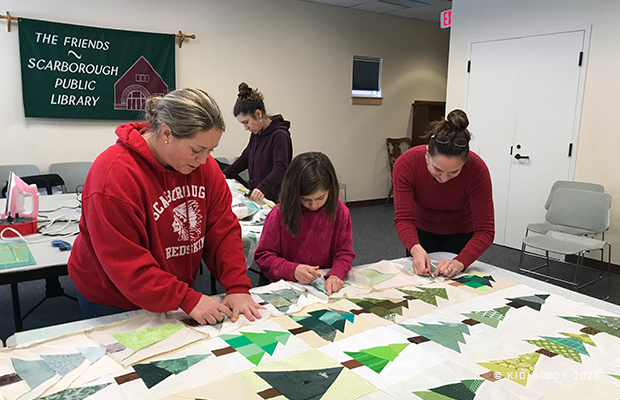
The local Scarborough Public Library offered their public space for me to have "sew-ins" so I could teach folks how to sew the foundation paper piecing blocks, or how to sew the patchwork or applique versions. If someone wasn't there to learn, we were able to use that time to start sewing blocks together for the first quilt as the packages started coming in early January. Everyday at mail time was so exciting and always turned into tears of gratitude. Some of you sent letters and some also included the coloring page that your kids colored in (that were gifted with the quilts). 
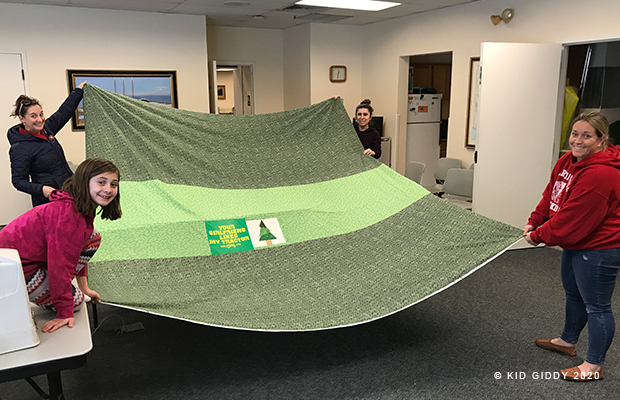


February and March brought more of the same but by mid March our last sew-in happened just in time to make the quilt backs before Covid shut everything down. I had a couple of volunteers that helped piece the last blocks for two of the quilts together in their homes, while I finished the first quilt. With all the quilt tops and backs done, a local friend, Jess, began helping me search for local longarmers willing to give their time to quilt them. Other friends shared my posts and tagged their friends too which resulted in offers from as far west as Seattle and as far South as Florida and Texas to quilt the quilts, but I became hesitant mailing anything out with Covid taking over the news. 

Pearson Tree Farm Quilt #2 - quilted by Tammy Johnson courtesy of Alewives Fabric Shop

We finally secured 3 local quilters within driving distance that were willing to quilt them for this cause (Jaki Soper - Quilt Studio 55 in Maine, Alewives Fabric Shop quilter Tammy Johnson also in Maine, and Patty Sciacca from Massachusetts. Covid slowed down the finishing process, but eventually everything was done.

Pearson Tree Farm Quilt #3 - quilted by Patty Sciacca Crafts

When the quilts came back they were trimmed up and sent right back out to my local volunteers Leslie and Jennipher for binding and all the hand stitching needs. These quilts were truly a community effort that I was honored to be a part of. It was not just this local community, but a worldwide community of quilters that want to do good with their skills. In total, I received 235 blocks from approximately 75 quilters in the US, Canada and the UK. 

You can see everyone that helped in some way or another listed on the labels that my husband and I created. Jess, a friend of the Pearson family, also made pillows for each of the grandkids so they would have something as well. Each pillow and all three quilts have a tree or two pieced from Jim's clothing. The quilts have 1 or two blocks with his work shirt and one t-shirt tree from the clothing provided by the family. You can see in one of the images above, I made two tree blocks for Nancy's quilt using one of Jim's work shirts that had his name on the left side above the pocket and the farm name on the right side above the pocket. We were sure to use as much of the shirts that we cut into so as not to waste any of the material. Not even the buttons.  


While the quilts (and pillows) were being made, we had many folks wanting to donate so much funding to the quilts, which would've been more than needed. Eventually the family was able to set up a memorial education scholarship in Jim's honor, and the first recipient this year was recently awarded a scholarship for his freshman year at college. For more information about the Beech Ridge Farm, or to support the Pearson Family Memorial Scholarship, you can visit their websites (links highlighted). If you would like to purchase the #PearsonTreeFarmQuilt blocks pattern, please know that I am in the process of working with them to offer it on their website or a dedicated Etsy shop, with proceeds going to the Pearson Family Memorial Scholarship. I will update that info here when it becomes available. 

I truly want to thank everyone that helped make these quilts happen. It was a lot of work to put together and thanks to Covid took way longer than anticipated, but the process was made easier with the help and love of so many others. The Pearson family was grateful for the outpouring of love from so many strangers worldwide and really enjoyed looking at the variety of trees and hearing how they all came together. I never could've done this myself...certainly not 3 quilts (or the 9 pillows Jess also made), but not even the one quilt. Thank you again!


http://kidgiddy.us2.list-manage1.com/subscribe?u=9ea4c419178a2e61b529af8aa&id=975aef860e


Disclosure: Although this is not a sponsored post - I did receive the EQ8 software previously which helped to create the blocks and quilt layout, but the opinions and comments provided are always my own. There are no affiliate links. Thank you.

Tuesday, June 18, 2019

Sew Plush Planner Sew Along Week 3

Welcome to Week 3 of the Kid Giddy Sew Plush Planner sew along! To make things a little easier in this post - I'm only going to show you the zipper pages of one of the planners I'm working on. This can be a super hard section, especially if you don't like zippers, but I'll also share some tips to simplify. If you want to see a video of all the original SewPlushPlanner features - check it out here...in this post
Just to quickly revisit some details...if you have not yet purchased a copy of the Sew Plush Planner from my Kid Giddy Etsy shop, you can do so here.... Whatever you do, please do not share your purchased pattern with someone else as it will upset me greatly. Please abide by my copyrights. Thank you! The Sew Plush Planner pattern will also come with some cute Bullet Planner Page blocks that are fun foundation paper piecing blocks to sew and use on the inside of your Sew Plush Planner if you'd like, or as it's own mini or quilt. All photos should be shared on Instagram using the hashtag #sewplushplanner.

Here's the Schedule we will follow:
Week 1 - Cover
Week 2 - Pages 1/2 and 3/4
Week 3 - Pages 5/6 and 7/8
Week 4 - Pages 9/10
Week 5 - Pages 11/12
Week 6 - Assembly

Pages 5/6 and 7/8 are the zipper pages, but before we get to those we have to make our little tabs as I made and chain stitched in the photo above...follow the cut out instructions in the pattern to make those and then place them on your front pages like so...it's easier to place them like this so you don't have to worry about some crazy mathematics to be sure they are evenly spaced. Be sure there is a little room at the top on the first page and a little at the bottom on the last page for seam allowances. Don't you just love how these Sunprint 2019 fabrics from Alison Glass play so nicely together?!
Once you have the tabs evenly spaced, pin them in place. One tip already to simplify your Sew Plush Planner is to not make tabs. You can use ribbon, labels, selvage, etc. or just leave them off completely and not have tabs at all.
Put aside all of the other pages you don't need right now - and just keep out pages 5/6 and 7/8. Place them as show below with zippers pinned in place. On the left side is my zipper pouch using the 5/6 pages and on the right is my zipper pouch using the 7/8 pages. If you really are phobic of zippers as I used to be (seriously I avoided them at all costs!), please consider giving them a try. If you really can't find yourself moving on from that fear - try hook and loop tape! It would work really well here.
I can't repeat too much info that is in the Sew Plush Planner instructions - copyrights - but wanted to give you some colorized assistance! The photos from here on out are for the spreads. That means the zipper pouches are sewn together, not as individual pouches. To sew them as individual zipper pouches, please read the instructions shown in the pattern. If you lay out your pieces as follows - take the top and switch it to underneath, then sew the left side (the left side of the floral print to the opposite side of the pink zipper).
If If you still need more help, I can upload a quick video in the Kid Giddy Sewing Patterns facebook group for reference. Just let me know! After the step above sew on your lining pieces. To simplify - don't add a lining. Truly easier!
I added a top stitch as you'll see in the photo below...but don't recommend it. It's not written in the pattern and has caused my zipper ends to stay tucked in a little more than I prefer. Once the pieces are connected as follows (the white lining is hidden underneath and attached to the pink zipper on the magenta word print side...and also to the orange zipper underneath the orange word print side) you can then sew it into the tube as further below. Before continuing, unzip both zippers a little bit, to be sure one is unzipped enough for turning right side out.

If your zipper spreads look like this inside out...you did it right. Now you find the opening on the liner and and gently pull the zipper pouches right side out.
Give the zipper pouches a good press and then they are done and ready for assembly week. Next week we will talk about sewing with mesh and vinyl. Be sure to share your Sew Plush Planner sew along pics with me on instagram. Tag me @kidgiddy on the photo and use the hashtags #sewplushplanner and #kidgiddy in the captions! I'm truly looking forward to seeing what you come up with!

Thanks so much for visiting!


http://kidgiddy.us2.list-manage1.com/subscribe?u=9ea4c419178a2e61b529af8aa&id=975aef860e


Disclosure: I received some Alison Glass fabric from Alison to use at my discretion. Expressed opinions are always my own. There are no affiliate links.

Wednesday, June 12, 2019

Sew Plush Planner Sew Along Week 2

Hello all, its a delayed start to Week 2 of the Kid Giddy Sew Plush Planner sew along! Last week I was working on 5 Sew Plush Planner covers, and now I'm working on 6...soon to be 7. I just keep getting more ideas for new pages and want to be sure they work before sending them out in the world. Some of the Sew Plush Planner organizers I'm working will feature the pages in the original pattern, and the other ones I'm making will have new pages for an add on pattern that will be available later in the sew along. If you want to see a video of all the current features - check it out here...in this post. Last week I finished the badge button Sew Plush Planner and love how it turned out. Now want to make one for my enamel pins too. How's your cover coming along?

Just to quickly revisit some details...if you have not yet purchased a copy of the Sew Plush Planner from my Kid Giddy Etsy shop, you can do so here.... Whatever you do, please do not share your purchased pattern with someone else as it will upset me greatly. Please abide by my copyrights. Thank you! The Sew Plush Planner pattern will also come with some cute Bullet Planner Page blocks that are fun foundation paper piecing blocks to sew and use on the inside of your Sew Plush Planner if you'd like, or as it's own mini or quilt. All photos should be shared on Instagram using the hashtag #sewplushplanner.

Here's the Schedule we will follow:
Week 1 - Cover
Week 2 - Pages 1/2 and 3/4
Week 3 - Pages 5/6 and 7/8
Week 4 - Pages 9/10
Week 5 - Pages 11/12
Week 6 - Assembly

Now that that's out of the way - let's get on to Week 2! Week 2 are pages 1/2 and 3/4. As I was working on these, and forgetting all of the measurements, I had to refer back to my pattern and sadly found two errors. Please make note of this errata on your pattern pieces or on your copy of the PDF. The Page Template says the width is 7" when it's actually 7 1/4". All other mentions of the page width through out the pattern are correct at 7 1/4". For the "sticky note" batting, it would be 6 1/2" width. My sincerest apologies for the errors despite checking it over and having it edited.

As you'll see in the photos below, I'm not sewing all of the pages together until assembly week. I've sewn all of the additional pieces (the sticky notes, envelope and pocket with strap), but they are only pinned together for layout purposes. There are two different options in the pattern instructions for putting pages together, so I'm waiting to decided until the assembly week to show you both options. If you haven't decided if you want to sew them together as single pages or as spreads, leave the additional pieces unsewn from the pages. Pin them for now. Below are the pages for my Sew Plush Planner that has my Westie Dog Block pattern on the front cover. I used batting on this envelope and have decided I prefer the light weight stabilizer instead. I may remake it, but I'm thinking the batting might prove beneficial for added protection depending on what's put inside, especially if I use it for metalsmithing. These are this beautiful Sunprint 2019 prints from Alison Glass.

When you finish making your sticky notes and envelope you can give them a press if you'd like. I press the top folded edge of the sticky notes but prefer to leave the envelope with rolled edges. It will sit easier once the flaps are sewn together and the snaps are put in place.   


For one of the other planners I'm going with an "English Teacher" theme...yes - for my friend that is an english teacher. lol. These prints are from Word Play by Sarah Fielke by Windham fabrics. Hopefully my friend doesn't see these pics, but I want to show you how you can do a different theme inside and go with a random vibe or more consistent (as in the next photo).

If you want to go more consistent and matchy matchy like I did here with these Mendocino prints by Heather Ross, use the same page prints for front and back (6 prints total) instead of double the number of prints. There are also multiple chances for fussy cutting. On the pocket page it ends up covering up the octopus on the bottom, bummer right?! So I fussy cut the pocket piece to have an octopus on it and now I have it back.

Once you have all of the pieces for pages 2 and 4, share a picture on IG and tag me @kidgiddy on the pic and with the hashtag #sewplushplanner and #sewplushplannersal in the post comment. Then you can set them aside with the snaps needed for assembly later in the sew along.


Over the course of the week, start thinking about the zipper colors you want or need and make sure you have them ordered for next week. While you are at it, start looking for some cute and fun zipper pulls or keychains that work as zipper pulls. I found these random CareBear (tm) keychains. I let my daughter pick one and opened it up to find a the cute "Heartsong" CareBear. It matches perfectly with my original Sew Plush Planner, and now I want all of the others! lol. So let's see what you've got on your cover if you've got it finished and let's see your 1 - 4 pages?! Be sure to share your Sew Plush Planner sew along pics with me on instagram. Tag me @kidgiddy on the photo and use the hashtags #sewplushplanner and #kidgiddy in the captions! I'm truly looking forward to seeing what you come up with!

Thanks so much for visiting!


http://kidgiddy.us2.list-manage1.com/subscribe?u=9ea4c419178a2e61b529af8aa&id=975aef860e


Disclosure: I received some Alison Glass fabric from Alison as well as the Word Play and Medocino from Windham Fabrics, to use at my discretion. Expressed opinions are always my own. There are no affiliate links.

Thursday, January 3, 2019

The Splendid Sampler 2 - My Grandfather Clock

Happy New Year! I am so excited for all the fun we are going to have this year, who's with me? To get this party started we have this "Grandfather Block" I was asked to design for Pat Sloan and Jane Davidson for their Splendid Sampler 2 book. It was so much fun to design this foundation paper piecing block in Electric Quilt using the EQ8 program, and then add some embroidery and needle turn applique. So if you have ever wanted to try a little bit of everything in one block, I'm sharing some of my tips below...so here you go! 

These are the fabrics (all fat quarters) I was sent from Moda Fabrics along with some Aurifil threads. I wanted to share with you my process for selecting the fabrics so as you are considering fabrics for your Grandfather Clock, you'll have the best outcome.

As tradition calls for it, I used a pure white for the face of the clock and built it out from there. I selected the two tones of beige for my "wood" coloring. One as a lighter color as if it has light shining on it and one darker for shadows. I did the same for the blue. The darker blue allows the clock to have the "inside" feeling while the lighter blue helps the pendulum to sit forward. The red helps the face to pop but I added the tiny touch of blue in the center with the fussy cut tulip to balance out the blue in the lower half. So as you select your colors, know that using two tones for wood and two tones for the blue areas would work best.

To transfer the face of your clock onto a large piece of white fabric, use a strong light source (like the Daylight Company Wafer 2 lightbox) and a water soluble marking pen (mine is from Prym/Dritz).

Place your white fabric into a hoop to embroider the face. I used the 8782 Blue Wool 12 thread from Aurifil so it would be thicker and only require a single stitch per line. Because I used Roman Numerals, it made stitching it so quick (because no curves!), but feel free to change yours to numbers if you prefer.
Be creative with the "time" that you stitch on your clock. This can be a personal number or memory with a date or time reference. There are 4 members of my family (hubby and 2 daughters) and I have 8 siblings so I have my 'arrows' (hands) pointing at the 4 and 8, which would be 4:40.

When putting your clock face together and attaching it to your foundation paper pieced block, be sure to use a pin in the center of each pattern piece to align them properly. These center points are marked on the pattern pieces specifically to help align them. Transfer those center points onto your fabric and use the pin technique shown above.

When your Grandfather Clock is all put together, you can then flip over your block and carefully cut out the excess fabric to reduce the bulk if you choose to do so.

My Paternal Grandfather had 6 Grandfather Clocks in his house. I think my uncle now has them all in Connecticut, but I will always remember them scattered about and chiming throughout the home he built in Maryland for his family. The block we designed was supposed to represent "I'm living my best quilting life when....", and for me that is when I am spending time with my family and living a balanced life. Time passes so quickly and it's so important to not miss what is in front of you at any given time. So I designed a clock. But not just any clock, a Grandfather Clock, to add in that important element of family and history and making memories. Do you have a Grandfather Clock memory or story? I'd love to hear it. Please feel free to share it below or find me (Kid Giddy) on Instagram and Facebook to share your story there.

You can get a copy of the Splendid Sampler 2 book by clicking through to the Splendid Sampler website. Thanks so much for visiting!


http://kidgiddy.us2.list-manage1.com/subscribe?u=9ea4c419178a2e61b529af8aa&id=975aef860e


Disclosure: I received the fabric and thread to help create my block and also received a copy of the book for having made my block, but the opinions and comments provided are always my own. There are no affiliate links. Thank you.

Tuesday, May 30, 2017

Neptune and Mermaid Tote Bag

Nancy over at Free Spirit graciously asked me to make something with their newest fabric designer's line "Neptune and Mermaid" by Toyko Milk. There's so much I'd love to make with it (because it's just that versatile), but I started off with this fun in the sun, Beach Tote bag. My daughter's love it so much, they each want one, which shouldn't be a problem since there are so many possibilities with all the beautiful prints.
This tote bag has 4 large pockets, one on each side and one in the front as well as the back. I used some Soft and Stable from ByAnnie to keep it from flopping over in the sand (because no one wants sand in their bag). I also decided this fushia glitter vinyl I purchased from SewSweetness was the perfect match for the flowers in this "Lost Atlantis - Aqua" print and perfect for keeping the water out of the bottom of my bag. Salt water and sunshine are the two worst things for vibrant fabrics - so I'll be sure to keep it dry and behind my beach chair during future outings.

I kept the FMquilting simple by following the organic movement of the fish, flowers, and mermaids to accentuate them a little more. I accidentally sewed the straps onto the bag across from each other, and had to quickly correct that, so when you are making a bag of any kind...don't pull a Kerry on your straps! lol. And PSA: don't use a thin needle like I did with your vinyl! Sara told me I should have used a denim or leather weight needle and would likely not have broken two needles...if they were thicker.
I'm currently debating which prints to use for the next tote bag but think I'm sticking with these. I love the bathing suits in the Song of the Siren/ What Would Poseidon Say? prints and love the aqua with the lime green colorings. Of course I also still love those pops of pink flowers too.

I'm so excited summer is coming right around the corner and excited to bring my new beach tote with me for a day of relaxing! Thank you to Free Spirit for allowing me to work with these gorgeous fabrics and to ByAnnie for providing me with Soft and Stable whenever I need it!

I appreciate you for stopping by and reading up on all my goings on. Please be sure to sign up for my emails to get info about new patterns, new Sizzix dies, future sales or coupons and other fun stuff.


http://kidgiddy.us2.list-manage1.com/subscribe?u=9ea4c419178a2e61b529af8aa&id=975aef860e

Thursday, June 2, 2016

Come Sew with Me!

Want to come sew with me and learn how to make a doll or two or tons? I'm so excited to announce that I'll be teaching a Sizzix Kid Giddy retreat in mid August at the Missouri Star Quilt Co retreat center and I would LOVE for you to join me for some seriously fun sewing! I want to teach you all I know - all of my doll sewing secrets. Here's why...
"Give a man a fish and he'll eat for a day. Teach a man to fish and he'll never go hungry." Sound familiar? This was the response I gave to my friend at our lunch date when she asked one last time if she could pay me to make her a doll for her daughter. She loved my dolls, but I rarely sell them.  Quickly I said "no" (again).

Instead of making it for her, I suggested she come over to my home studio so I could teach her how to make her own. She knew how to sew a little, but never made a doll. I told her she could buy a doll from me, or anyone else, or she could learn how to make countless dolls. Not only would it save her money - for reals, but each doll would become something special, something worth passing down...heirlooms. My friend accepted my offer, so we booked a date.
She came over two weeks later to make a doll for her daughter. Between our chatter and giggles, she learned how to use the Sizzix die cut machine, glue baste, sew curves, use new stitches on the sewing machine, clip and notch curves, and stuff her doll in only 4 hours. That's it - just 4 hours!

Once she finished stuffing the doll, I taught her how to sew a ladder stitch to close up the bottom of the doll. Then we gave her eyes, as well as a belly button to call it done. As she was sewing it closed we got to chatting about handmade things. She didn't know all that it took to make a doll and how not everyone realizes how long things take to make - be it clothing, or dolls, or quilts. Everything takes time, every stitch is thought out and meaningful. When we make something with our own hands, it will be appreciated so much more than it would've been otherwise, if purchased. She was so proud of her doll, and I was so proud of her and her doll too. We were pretty exhausted but we took a selfie with her doll anyway just before she left at 10pm.
The next morning, her daughter woke up to the best present her mother had ever made her. She sent me a video (which I understandably can't share) in the which her daughter exclaimed her excitement that this new doll was all hers, and her mom made it. She even said "WOW - good job Mommy"! After much excitement, her daughter also lovingly gave her doll a name, later changing it to Elizabeth. 

This was never meant to be a blog post...but I asked my friend recently if I could share this story. I wanted to share why I'm so excited to teach this class, and what it means to me. It's in these moments that I realize, this is why I do what I do, and why I want to share it with others. The moments of teaching someone something new and seeing the lightbulb grow brighter every second, or the daughter's moment of excitement seeing this brand new doll to love on, made just for her, by her mom, it's all worth it. Here's what my sweet friend said about her experience - nothing edited:

"I have known Kerry for approx 2 years. When I found out she sewed for a living and I saw all her beautiful creations, I just knew I had to get my hands on a doll! They are so incredibly cute and I knew my daughter would love to have one. Especially if it looked just like her. So a few months ago Kerry and I met up and I asked her once again if she would make me a doll. I even offered to pay!!! She finally caved in and said, “NO, but you can come over and I will TEACH you how to make a doll.” I’m not going to lie, I wasn’t very thrilled. I’m extremely intimidated with sewing machines and anything to do with a needle and thread. However, since I really wanted this doll, I knew I had to commit and just do it! Kerry was amazing to say the least. She is so particular and an achiever at everything she does. Making the doll was definitely challenging; Mind you, like I said before, I’m scared of anything to do with sewing. Kerry made it as simple and easy as possible for me. This doll took us four hours to complete but was totally doable, and we had an AWESOME time making this doll together! I found out a lot of other hidden talents this lady has, she is unbelievably talented. She is an amazing mom, wife and friend.
After I left, I had such immense gratitude for her. That doll took us 4 hours to make. I know she can probably get a doll done on her own much quicker, but it still takes time, precision and effort on her part. You know the saying, “give a man a fish and you feed him for a day. Teach a man to fish and you feed him for a lifetime”. Well she took the time out of her busy schedule and not only taught me how to make a doll, but gave me the confidence and realization that I could do this again. Next time, I know I won’t be so nervous! Yes, there will be a next time, since my daughter is already asking for another one. Kerry, THANK YOU for all your love and encouragement and helping me make something so precious. It is an heirloom that will be passed down for many generations to come."
We made this doll "naked" so we could take her daughter's old clothes and make them doll size with my new die. During the retreat, we will be making Kid Giddy Dolls (and/or Foxes), Doll Clothes (using my new Sizzix Doll Clothes die) and even a fun class on using my Sizzix Kid Giddy Doll/Fox pieces for a really cute applique quilt block. Did I mention there will be a trunk show with Jenny Doan Wednesday evening and a trunk show with me the morning we get started? I'm bringing all my dolls with me - including Bubbles, Queen Phoebe, Elvis and so many others! They didn't want to miss out on coming to the retreat too for inspiration and to meet all of you.
For more information about the class, materials to bring, registration info and to sign up, please click here to visit the Missouri Star Quilt Co. / Kid Giddy retreat listing. I'm so excited to sew with you and teach you all of my tips and tricks in doll making! I can't wait to see what we make together!


http://kidgiddy.us2.list-manage1.com/subscribe?u=9ea4c419178a2e61b529af8aa&id=975aef860e