Showing posts with label Quilt Blocks. Show all posts

Thursday, September 3, 2020

The Pearson Tree Farm Quilts

Pearson Tree Farm Quilt #1 - quilted by Jaki Soper of QuiltStudio55

I've hemmed and hawed on writing this post because this quilt was never meant to be such a public "worldwide" project where I shared all my backstory feelings regarding it. However, it became bigger than me - and so many people helped so I felt I should share the whole story as a way to show how amazing this quilting community is and to show in some small way, my gratitude to all of you that participated. 

Back in December 2019, a local family in my town, lost their husband, father, grandfather, friend, in a very tragic and horrific way. It was weeks before Christmas and where there was once hope and joy, there was immediately sadness and fear. I live in a big town and word got out quickly that a man was on the run and had brutally stabbed this dear man outside his home and headed north. Many talked about the tragic situation but no one knew what to do. I felt a tremendous amount of sadness for his wife who found him while he was still alive. I wanted to do something to help her, remembering my own Granny that lost her husband to natural causes but was there beside him. I didn't feel anything I could ever do would help take away that sadness she was likely feeling and everything that went along with the terrible situation. 

A week passed and I continued to think of her. After seeing many news stories about Jim Pearson and his family's Beech Ridge (Tree) Farm, I got this image of a (Christmas) tree quilt with a red heart on it. I pushed it out of my mind thinking a quilt won't help, however, I wanted to help change the narrative going on in the town/world. There are good people here. Evil will not win. We can do something, anything to show we care, and that we are here for her, even those of us that didn't know her personally and she didn't know us. The image kept coming back, so I sat at my computer one day and designed a bunch of different "Christmas Trees" in my EQ8 program to see how it would look. 

The process of designing the blocks and the quilt helped me and so maybe this quilt could help Nancy, but I knew this was not something I could sew on my own with a quick turn around. Since I knew others in my town were feeling as I was feeling, I reached out to the local town "mom fb group" and asked if anyone else wanted to help make a block. So many people signed up to sew a block - some offered monetary donations for supplies - some were willing to learn to sew in order to be a part of it - while others forwarded the info to local sewing groups and police stations (as one of the adult children was a soon to retire police officer) and news of the quilt project began to spread.

I quickly had enough people signed up to make a queen size quilt, from people in my town, state and even a few from out of state. Someone in the mom fb group suggested we make two more quilts for the adult children, that also lived in town, and was only sorry she didn't know how to sew. Knowing I only had enough blocks coming for 1 quilt, I knew I needed a new source for 2 more quilts worth of blocks, or three quilts weren't going to be possible. My only option at that point was to reach out to all of you, my @kidgiddy community on IG and the response brought me to tears. Without hesitation you all signed up, showed up and shared the post. Within 24 hours I had to shut down the sign up form, before I had more blocks than I knew what to do with. I felt like I closed a door with more people knocking outside. You all are so amazing!
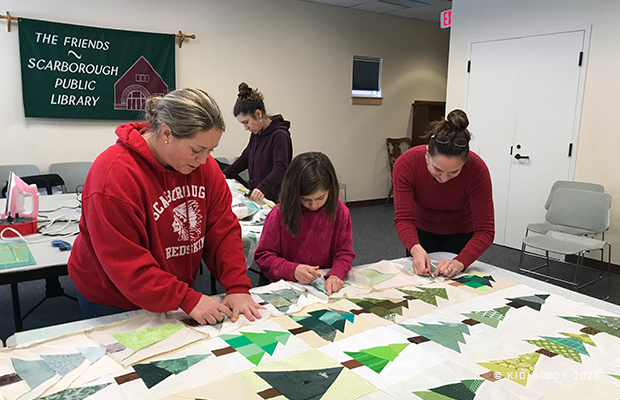
The local Scarborough Public Library offered their public space for me to have "sew-ins" so I could teach folks how to sew the foundation paper piecing blocks, or how to sew the patchwork or applique versions. If someone wasn't there to learn, we were able to use that time to start sewing blocks together for the first quilt as the packages started coming in early January. Everyday at mail time was so exciting and always turned into tears of gratitude. Some of you sent letters and some also included the coloring page that your kids colored in (that were gifted with the quilts). 
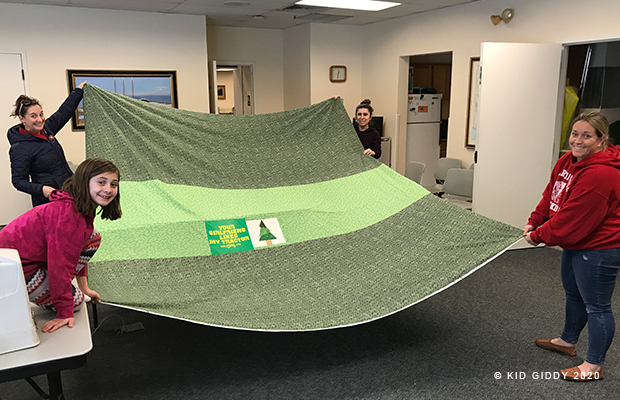


February and March brought more of the same but by mid March our last sew-in happened just in time to make the quilt backs before Covid shut everything down. I had a couple of volunteers that helped piece the last blocks for two of the quilts together in their homes, while I finished the first quilt. With all the quilt tops and backs done, a local friend, Jess, began helping me search for local longarmers willing to give their time to quilt them. Other friends shared my posts and tagged their friends too which resulted in offers from as far west as Seattle and as far South as Florida and Texas to quilt the quilts, but I became hesitant mailing anything out with Covid taking over the news. 

Pearson Tree Farm Quilt #2 - quilted by Tammy Johnson courtesy of Alewives Fabric Shop

We finally secured 3 local quilters within driving distance that were willing to quilt them for this cause (Jaki Soper - Quilt Studio 55 in Maine, Alewives Fabric Shop quilter Tammy Johnson also in Maine, and Patty Sciacca from Massachusetts. Covid slowed down the finishing process, but eventually everything was done.

Pearson Tree Farm Quilt #3 - quilted by Patty Sciacca Crafts

When the quilts came back they were trimmed up and sent right back out to my local volunteers Leslie and Jennipher for binding and all the hand stitching needs. These quilts were truly a community effort that I was honored to be a part of. It was not just this local community, but a worldwide community of quilters that want to do good with their skills. In total, I received 235 blocks from approximately 75 quilters in the US, Canada and the UK. 

You can see everyone that helped in some way or another listed on the labels that my husband and I created. Jess, a friend of the Pearson family, also made pillows for each of the grandkids so they would have something as well. Each pillow and all three quilts have a tree or two pieced from Jim's clothing. The quilts have 1 or two blocks with his work shirt and one t-shirt tree from the clothing provided by the family. You can see in one of the images above, I made two tree blocks for Nancy's quilt using one of Jim's work shirts that had his name on the left side above the pocket and the farm name on the right side above the pocket. We were sure to use as much of the shirts that we cut into so as not to waste any of the material. Not even the buttons.  


While the quilts (and pillows) were being made, we had many folks wanting to donate so much funding to the quilts, which would've been more than needed. Eventually the family was able to set up a memorial education scholarship in Jim's honor, and the first recipient this year was recently awarded a scholarship for his freshman year at college. For more information about the Beech Ridge Farm, or to support the Pearson Family Memorial Scholarship, you can visit their websites (links highlighted). If you would like to purchase the #PearsonTreeFarmQuilt blocks pattern, please know that I am in the process of working with them to offer it on their website or a dedicated Etsy shop, with proceeds going to the Pearson Family Memorial Scholarship. I will update that info here when it becomes available. 

I truly want to thank everyone that helped make these quilts happen. It was a lot of work to put together and thanks to Covid took way longer than anticipated, but the process was made easier with the help and love of so many others. The Pearson family was grateful for the outpouring of love from so many strangers worldwide and really enjoyed looking at the variety of trees and hearing how they all came together. I never could've done this myself...certainly not 3 quilts (or the 9 pillows Jess also made), but not even the one quilt. Thank you again!


http://kidgiddy.us2.list-manage1.com/subscribe?u=9ea4c419178a2e61b529af8aa&id=975aef860e


Disclosure: Although this is not a sponsored post - I did receive the EQ8 software previously which helped to create the blocks and quilt layout, but the opinions and comments provided are always my own. There are no affiliate links. Thank you.

Monday, June 18, 2018

The Tonga Block - Aurifil Designer of the Month

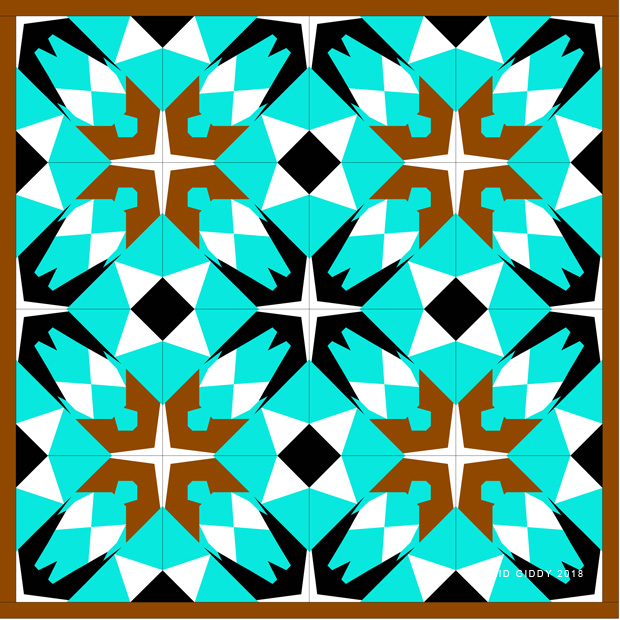
I can't believe it's halfway through June already! That means I am the Aurifil Designer of the Month and my new Tonga Block has been posted! Last year (Quilter) Pat Sloan invited me to be a part of this years Designer line up and I couldn't have been more excited! Naturally I picked June (because it's the best month = summer) and created for all of you the free Tonga Block in EQ8. I had a lot fun making various color combos and playing with potential layouts in EQ8 and you can too. EQ8 makes it so quick and fun!
As I was playing with the colors in EQ8, I was looking at some of my Aurifil threads and using some of those colors in the layouts. I figured the brown could easily replace the black, but I was leaning more towards black in the end anyway. I'm still trying to figure out which color combo I love the most to sew into a quilt. Here's the Tonga Block in just 2 colors not including the binding.  (Turquoise and White)
Here's the Tonga Block in 3 Colors, not including the binding. (Turquoise, White and Black)

And the final combo, the Tonga Block in 4 colors. (Turquoise, White, Black, Rust)

I think my fav is the 4 color combo. Do you have a fav? I ended up using the same layout, but wanted to show that with various color combos, it can look very different.
Do you want to know what inspired my Tonga block? You can read more about it on the Aurifil blog. And when you are done printing out your free Tonga Block, head on over to Pat Sloan's blog to see some Tonga Block Sewing Tips she shared. When you finish sewing your Tonga Blocks, please share them with me on social media by tagging me @KidGiddy, #kidgiddy and AurifilDOM2018!

Thanks so much for stopping by, please be sure to sign up for the Kid Giddy newsletter by clicking the link below....


http://kidgiddy.us2.list-manage1.com/subscribe?u=9ea4c419178a2e61b529af8aa&id=975aef860e


Disclosure: As a brand ambassador for the Electric Quilt Company, I received EQ8 program for free, but the opinions and comments provided are always my own.

Tuesday, September 26, 2017

Unconventional Mini French Bull Dog Quilt and a Pug

Hi everyone - I'm excited Christopher from The Tattooed Quilter asked me to be included in his Unconventional Mini Quilt hop to celebrate his Blue Carolina fabric with Riley Blake. I designed this French Bull Dog block using the Electric Quilt EQ7 program based on his sweet Edie puppy when his fabric was releasing for market.


Although I love a great block with lots of white behind it - I loved this challenge because it makes you think outside of the box and makes you work really hard on that binding! This puppy was no exception. Who says a puppy block can't be turned into it's own mini without all the extras? I'd even say you could use it as a mug rug - but who would want to smother that face with anything other than kisses?! Then of course there's the option to make it super sized and make it a sweet area rug, or huge wall hanging. So many options!

Even though there's no details, I love the back too where you can focus on the general shape of the French Bull Dog.


Here is the original 10" x 10" block. She'd make a cute all over quilt, but also an unconventional but wickedly cute mini!

Because I had so much fun with the French Bull Dog Block, I decided to design an entire dog series with it. Next up...the Pug. I mean seriously - little Prince and Princesses? Bow ties and crowns?
Thanks so much for stopping by and thank you especially to Christopher for including me in this blog hop. It's always fun to play with new fabrics and be crazy inspired by them as I have been with your prints!. If you haven't seen the Blue Carolina fabrics Christopher designed with Riley Blake Fabrics you have got to go take a look at all of them and stock up while you can. They are all gorgeous! After you make some French Bull Dog and Pug Dog blocks of your own - I'd love to see them. Please be sure to add #kidgiddy and #dogblockseries to your post.


http://kidgiddy.us2.list-manage1.com/subscribe?u=9ea4c419178a2e61b529af8aa&id=975aef860e


Disclaimer: Although I received this fabric for free, opinions are always my own. There are no affiliate links. 


Monday, May 15, 2017

Kid Giddy Sizzix Doll Appliqué Sew Along - Block 1

Hi everyone,
Sometimes the best laid plans are still not enough to give me more time on the clock. Last year I finally got around to finishing my Ballerina Doll Quilt, but wanted to have even more fun and make 9 applique doll blocks to put into one huge quilt. I thought there might be some other sewists out there that would join me in sewing together. You can make your blocks into a quilt as I am planning on doing, or you can make 9 different blocks and use them individually. As individual blocks, they could be great as tools in a Homeschool or Montessori style class room. They can be fully sewn or made to be a "get the doll dressed" style block that helps to teach specific skills.

This is the first Kid Giddy Doll Applique block using my Kid Giddy Sizzix Doll die for a fun 9 block quilt along I'm hosting throughout the rest of the year. This first block represents April Showers. You can make each of your blocks similar to mine, or you can create your very own blocks. Later on, some of my blocks may use a combo of the Sizzix Kid Giddy Doll die (for the head and body) and the Sizzix Kid Giddy Fox die (for the arms and legs) as I did for the first Ballerina Doll block above.

Before we get started, here are some basic tidbits of info you may find helpful:
In order to use the die, you'll need a Sizzix Big Shot Machine (if you can get the Big Shot Plus - you can use all of my dies on it) and the BigZ XL 25" cutting pads. You can use the smaller cutting pads for some parts, but not for the legs as they are longer than the shortest pads.

What you'll need for each block:
1) 1 Fat Eighth of skin tone fabric of choice. Depending on how you choose to sew your doll applique blocks, you may need less. (1 Fat Qtr will be enough for 2 doll blocks, or 1 stuffed doll).
2) Background Fabric (I used white) - 13" x 18" (or larger if desired). 
3) Other materials will depend on the doll you wish to make (additional quilters cotton prints and wool felt for hair if desired).
4) Glue, Fine glue tip and Iron are helpful for glue basting your pieces in place.
5) Bright thread for stitch basting and matching thread for needle turn applique or raw edge applique.
6) Create A Pattern paper for designing any extra pieces (as I did for the jacket, hood and raindrops).

I have decided that I am going to needle turn all of my blocks. I just love the look of needle turn applique, but understand some others may prefer to raw edge applique. For those that also wish to needle turn applique, but haven't done so yet, I learned some great techniques from Carolyn Friedlander's CreativeBug class (not an affiliate link). If you are going to raw edge applique your blocks, you should use an iron on fusible stabilizer prior to cutting out your pieces on the die. Some steps may vary for raw edge appliquers but may not all be noted.

To Start sewing your block:
Step 1: Sew the doll and head pieces together, placing right sides together and using a 1/4" seam allowance. (You may notice in the later pics, I also sewed the boots to the bottom of the legs and the raincoat sleeves to the hands. I cut off the excess skin colored fabric underneath)
Step 2: Place your doll pieces down on your block background as desired (mine are centered but your design may not work best if centered). Lightly glue baste each piece to be sure correct placement at first (as this can be moved around if necessary). Using your brighter thread, stitch the pieces in place 1/2" away from the seam allowance. Clip and notch your curves (within the 1/4" seam allowance - not at, and not more than) to reduce the bulk around the edges (see pic below).

Step 3: While I am needle turning, I love using the two products: the Dritz squishy Thimble grips, and the Thread Cutterz ring. I have bought many and have them all scattered throughout my house and may mom and sister's houses too. lol.
Turn under your edges and stitch in place.

Step 4: When sewing the arms in place, make sure they are going to still be under the body portion when the body is turned 1/4" under too. Note that the little thumbs are pretty awkward, but the stitch basting here really helps.

Step 5: If you hold your block up to a light source, you can see one of my corners just barely makes it under the body edge (on the right hand side). I'll be sure to tuck it in the better on the next block. You may also see here that I have tucked the legs further up than normal. I wanted this one and all of mine to look younger and therefore shorter. Again, you can make your blocks as you would like, just be sure your blocks are all the same size in the end if you want uniformity, and that your blocks are large enough to accommodate your design.

Step 6: Continue adding and sewing all of your detail pieces as you'd like, as I'm doing with the hood, jacket panels and raindrops to complete your block, staying within the 1/4" - 1/2" seam allowance. I've decided to leave the jacket pieces unsewn on the inside and bottom edges. This will allow her jacket to move around. If you decided to add this type of feature, double roll the edges, glue baste and top stitch to secure the hems.

Step 7: Add a face as desired. This can be drawn with fabric markers, sewn with an embroidery machine (test on an extra face piece first), or hand embroidered (as I did for the first time ever below). I haven't decided how I am going to do their faces - I think I need some embroidery lessons or something - so the faces may come later. This one is from my Ballerina. Unplanned and noticeably so.  But I loved her little heart lips and those eye lashes!


Step 8: Once you have all of your pieces sewn, you can cut off the excess background from the back if you prefer, following the basting thread stitches. Be sure not to cut the front pieces and do not cut too close to the sewn edges (not shown). Remove the basting stitches.

Because this tutorial and sew along was supposed to start in April, I'm already a month behind my own schedule. I will be posting two blocks in June, unless I get May's block done sooner. As you can see, this is a pretty casual sew along. If you have any questions about this tutorial, please leave me a comment below so I can answer it for all to see and benefit from as well. I would really love to see your doll blocks. Please be sure to tag #kidgiddy on IG. I will be opening my KidGiddy Group up again on FB for sharing as well after I return from Quilt Market.

Thanks so much for stopping by. Please be sure to sign up for my emails to get info about new patterns, new dies, future sales and other fun stuff.


http://kidgiddy.us2.list-manage1.com/subscribe?u=9ea4c419178a2e61b529af8aa&id=975aef860e

Friday, March 31, 2017

Basic Square and Hexie Blocks in Electric Quilt

Hello everyone.

It's be a really really crazy month and I'm so glad to have had a couple days of sleep to catch up after all the madness. There was a lot of secret sewing going on here that I can't share until May and October - but until then, I've been playing in my Electric Quilt EQ7 program again and wanted to share these fun blocks with you! I've been hearing a lot of people are afraid to start paper piecing - they don't know where to start, in terms of sewing and designing. I designed some basic blocks and took some screen shots to help visualize how they work.

Last time I posted about EQ7 and learning how to paper piece - I said paper piecing was kind of like playing pick up sticks in reverse order. I mentioned that you have to go in a particular order as you place the fabric and sew it down. It would be the same as putting pieces of paper down around the outside to get the shape you want on the inside.

This simple Square block is similar to what a log cabin block would be. However, instead of cutting out all of the pieces exact in the beginning and sewing patchwork style, you are sewing the lines on the paper, with the pieces of fabric underneath. Your first block is the white center block. This allows you to fussy cut your center as you wish. You would sew both sides to your center block and then both top and bottom pieces last. While designing in the program, you may have to put lines down, but then erase them. If you extended the lines up and down from pieces 2 and 3, you would have a basic 9 patch block. By erasing the two lines in area 4, and the two lines in area 5, it becomes a log cabin type block.


This Hexie block is just as basic as the square block - just has two extra patches.


I designed this Hexie (hexagon) block a long time ago but not as a paper piecing block. I wasn't able to get my hexie in the center consistently, becoming easily frustrated, so I decided this would make a perfect foundation paper pieced block. Now my blocks are consistent and so much more fun. If you are not a fan of sewing English Paper Pieced hexies, or larger set in seam hexies, you just might love this block. You can sew it with a fussy cut center on point or with your top and bottom hexie lines straight across. When designing your blocks in EQ7, you get to decide how they will look. Although I designed the block as 6" x 6", I have included it as a 3" x 3" Hexie block (another great feature of EQ 7 is choosing the size you'd like to print the block as. I have also included three other easy hexie blocks I created in EQ7, with slightly different lines. This pattern is only available in my Etsy shop. They are great for scrap busting and just good ol' fussy cutting fun. You'll also get the bonus square block!

As you begin to sew blocks, and start designing them, it does get easier. You can check out my Land of Magic Crown and Land of Magic Star blocks too as the next levels up. More pieces and more sections.

What's more fun than that? If you haven't tried EQ7 or EQ Mini, now is your chance to win an EQ Mini from the Electric Quilt Co! It's a great beginner program to get you started on your way to designing your own blocks and quilts just the way you want! Head on over to my Kid Giddy Instagram page for more info - and to enter. Look for the blocks image above...that will be the giveway post!


http://kidgiddy.us2.list-manage1.com/subscribe?u=9ea4c419178a2e61b529af8aa&id=975aef860e

Disclaimer: This blog may accept forms of compensation, including cash and product, and although I may be compensated for this post, all opinions shared are always my own. There are no affiliate links.

Thursday, September 15, 2016

Farmer's Wife Sampler Quilt Along - Bride #17

I'm excited to share my third block (Bride # 17) for Angie (GnomeAngel) and Fat Quarter Shop's Farmer's Wife QAL. I decided to paper piece this Bride block because of all the smaller triangular pieces, and because it's just so fun and easy. If you are new to paper piecing, check out my Tracy block tutorial for some of my paper piecing tips as well as my own paper piecing tutorial I recently posted here for my own Crown and Star blocks. You can also check out Angie's Bride post in the which she has linked up many of the bloggers that shared full paper piecing tutorials.

I loved the story of the Bride that was getting married and moving from the City to the farm. Reminded me of my move from Long Island N.Y. to Maine more than 15 years ago. I picked the fabrics to represent a bridal bouquet. I think this Bride block could make a beautiful memory quilt for any wedding gift using the same colors and even prints as the bridal bouquets. Here I decided to use my new Rifle Paper Co floral prints because the flowers were just to perfect not to - right?! I always begin all of my paper piecing projects by coloring coding the pieces to keep things straight while sewing. It's even better if you color code it so the colors match the fabrics you are using, but I just grabbed a multi-colored pen, and a marker.


Once all of the sections are sewn, be sure to press them before trimming the edges. Once you have trimmed them all, this block goes together quickly and easily as 4 mini blocks. Sew the larger sections together, and then add the little corners on as directed. Sew two blocks together on both sides, then as a whole. This just might be one of the easiest in the book, with stunning results.  
If you want to check out my other Farmer's Wife block post, you can check out Malvina here. If you want to join in on the fun, you can find Angie's Bride tutorial on her website Gnome Angel, as well as grainline tips from Marti on her blog.
You can get the book and all your fabric needs from The Fat Quarter Shop and the Marti Michell templates from Marti's website! Thanks so much for stopping by. Show me your bride blocks by tagging me on Instagram @kidgiddy. I'd love to see them.


http://kidgiddy.us2.list-manage1.com/subscribe?u=9ea4c419178a2e61b529af8aa&id=975aef860e


Disclaimer: Because I am a blogger in this quilt-a-long, I graciously received a copy of the Farmer's Wife book and gift card from the Fat Quarter shop (yes I picked up more Cotton and Steel fabrics for my quilt) as well as a full set of templates from Marti Michell. The links above are not affiliate links - because my state won't allow that. The opinions as always, as well as the tutorial and photos, are all my own.