Showing posts with label Sewing Kids. Show all posts

Friday, May 22, 2020

Free Patterns: Birdhouse Mini Quilt and a Weighted Comfort Bunny

Hi all, I have two more fun and FREE projects for you to make over on the Bernina We All Sew website. Most recently I designed this Birdhouse Mini Quilt with my mom in mind. She loves birds (even own a couple at one time named Pete and Repeat) and raised four kids on her own while being an art teacher, so I designed it with four houses and a momma bird near by.
It works great for using up scraps for all the houses and the bird, as each block finishes at 3" and the mini quilt finishes at 12.5". For the background you'll only need a fat quarter or, you could easily sew up various scraps in shades of blue and then use them for larger pieces.  Don't want to sew smaller blocks, you can easily enlarge these blocks and trim the seam allowances to a true 1/4" to make a 24" mini quilt.

Last month, I designed this Weighted Comfort Bunny for the Bernina We All Sew website. It's a project near and dear to me. More than 20 years ago I found myself laying in a hospital during the springtime while in college covered in hives and miserable. Everything started a couple of days earlier, but I was eventually hospitalized and alone for at least a day (until my mom arrived). As I got better I was allowed to have some visitors that brought me a sweet little bunny stuffed animal from the gift shop. It’s the only reminder I have from my time in the hospital. In the months and years that followed, any time I got sick…"Sick Bunny" came out for cuddles. When I had my two girls and one of them got sick…Sick Bunny again came to the rescue.


Although we now have a real bunny (Lola), she’s not exactly a cuddle on demand animal. There’s no denying that animals (even stuffed toys) provide comfort in times of need. During this unique spring season, I want to share a sewing tutorial with all of you to help you make your own comfort bunny, with a little weight. The weight helps to feel like a constant hug. Just having it sit on your lap, or a child’s lap, can be of great comfort. If you or someone you know is struggling with anxiety or depression during these very difficult and challenging times, this comfort bunny could be a wonderful gift to make and share. I make no medical claims or guarantees, but believe that this spring is that time to get sewing and try anything and everything to help our loved ones while in isolation. So head on over and make your own Weighted Comfort Bunny.

I'm looking forward to seeing all of your #BirdhouseMiniQuilt and your cuddle worthy #WeightedComfortBunny! Thanks so much for visiting and hope you enjoy sewing these fun projects! Please share your finished projects with me @kidgiddy on Instagram. Be sure to tag @berninausa too!

http://kidgiddy.us2.list-manage1.com/subscribe?u=9ea4c419178a2e61b529af8aa&id=975aef860e


Disclosure: I received products from Shannon Fabrics, Bernina and Aurifil, as a designer, Bernina Ambassador and Aurifil Artisans to share ways I use my Bernina sewing machine and the threads, but the opinions and comments provided are always my own. Thank you.

Thursday, April 2, 2015

6 Weeks of Softies Guest Blogger on Sew Mama Sew

I'm excited to be a guest on the Sew Mama Sew blog today for their "6 Weeks of Softies". It's been a very long time since I was on the Sew Mama Sew blog, with my Mini Tent Tutorial (in 2011), so I'm glad to be back. Of all the options and avenues to explore for this 6 week intensive on all things Softies, I decided to gear my post towards Storytelling and Sewing. After all, my book Sewing Tales to Stitch and Love: 18 toy patterns for the storytelling sewist, is just that, a lot of sewing and a lot of stories. A perfect fit - right?!

F&W was kind enough to allow use of my Casco the Dolphin pattern straight from the Coastal Waters section in my Sewing Tales book - so download a copy and get sewing. It's among the five easiest patterns in my book - and can be easier if made a little larger, esp for children. I can't wait to see your dolphins, and hear all about their awesome adventures. Share your pics and stories on Instagram and tag me @kidgiddy and #kidgiddy.

Last week I was in Southern California filming some demo videos for my upcoming Sizzix dies and will share some behind the scenes pics, so check back soon.

Happy sewing and storytelling!


http://kidgiddy.us2.list-manage1.com/subscribe?u=9ea4c419178a2e61b529af8aa&id=975aef860e

Thursday, July 31, 2014

Camp Doll Diaries - Cooking Up Fun in the Sewing Studio

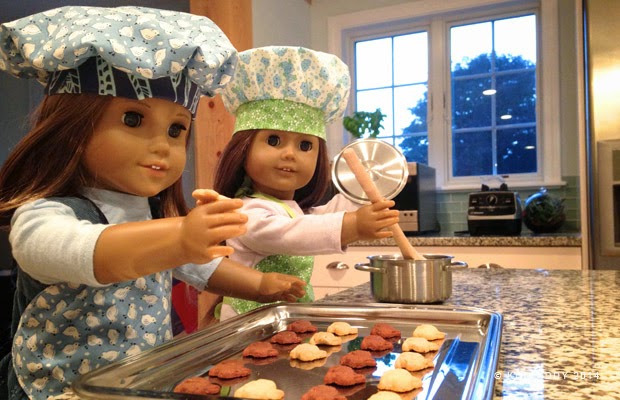
This tutorial has been a long time coming. I first designed this quick chef hat pattern for all the young women at my church to make for girls camp. I wanted to post a tutorial, and then decided to write a book instead. Many months later since then, the folks over at Doll Diaries, contacted me and wondered if I wanted to share a tutorial for all their doll diaries fans. I have two American Girl Doll fans right here in my own home, so technically, we all jumped at the chance to participate in their 2014 Camp Doll Diaries event this summer. If you are coming from the Doll Diaries site - welcome to my Kid Giddy blog. This post will show you how to make the Chef hat. If you have come to my site first - you can make your hat and then visit my Apron post on the Doll Diaries site.
Hi everyone, I'm so excited you are here. We love cooking in the kitchen, but we also love to sew. Today we are going to sew this cute chef hat, and matching apron, so pick out some cute fabric you love and let's get started.

These chef hats and aprons are fairly quick and require a little bit of previous sewing skills, or the help of someone who already sews. The cost of making your own hat and apron will be approximately $3-$5 if you already have the basics, and I will share below some many options to personalize your hat and apron.

What you'll need:
2 fat quarters (your choice of fabric - it can be white or printed) (for beginners I recommend felt for the apron, as it is easier to hand sew, and less flimsy)
2-4 buttons
36" (or 1 yard) of grosgrain ribbon (satin is not recommended)
Basics: Pencil, paper, scissors, needle, thread, pins, sewing machine (helpful but is not necessary if you can and are willing to hand sew), and an iron.

What you'll do:
Step 1: Cut your chef hat band piece to 12.5" x 3". Fold it in half lengthwise, right sides together, and sew along the short raw edge, using a 1/4" seam allowance (green band). Open the band into a circle and press open the sewn seam (purple band). Fold the band in half so the right sides are facing outward and press (blue band).
Step 2: Press the band flat with the seam at one end (green band). Fold the band in half, and each half in half again (purple band). Press the whole band (blue band) to create crease marks for ease of use in later steps. Your band should look like the navy band above. Set the band aside.
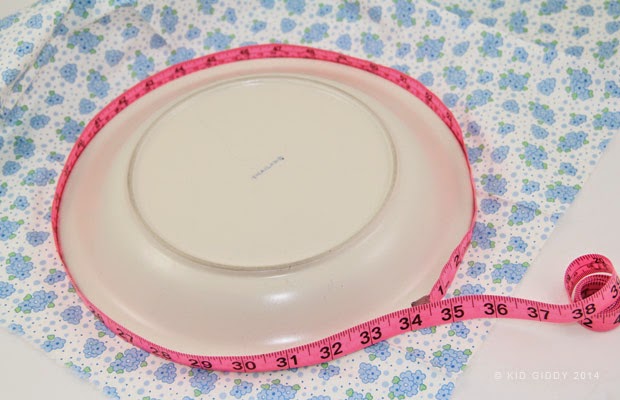
Step 3: Cut out the chef hat top using any dinner plate that is approx 34" around. If you have a circle cutter or special ruler, maybe even a protractor - by all means use what you have that is easiest. I also recommend tracing on a piece of paper first to use as a template.
Step 4: Fold the top piece in half, and then each half in half again. Press all folds so you have crease marks to match up to the bands.

Note: These next steps (5-8) will be the most challenging as it requires a lot of pins. If you have wonder clips, those may work better for younger children, as will skipping steps 5-8 and start at 10.
Step 5: Open up the top circle piece and lay it right side up. Place the band in the center, with the raw edge up, and begin to line up the crease marks on the circle to the marks on the band. Begin with both sides, the top, and bottom.
Step 6: Pin the crease marks that are in between the sides, top and bottom that you just pinned. You should now have 8 pins (or clips).
Step 7: There are now 8 sections that are going to be divided once more. Pull each section to the sides to find the center and pin in place. Repeat this step to the other 7 sections.
Your chef hat should look like this, and have 16 sections.
Step 8: Option 1 - flatten and accordion each section in the center to create a box pleat.
Your chef hat would look like this.
Step 8: Option 2 - fold over each section to the right to create a knife pleat.
Your chef hat would look like this, and would have a sort of spiral effect.
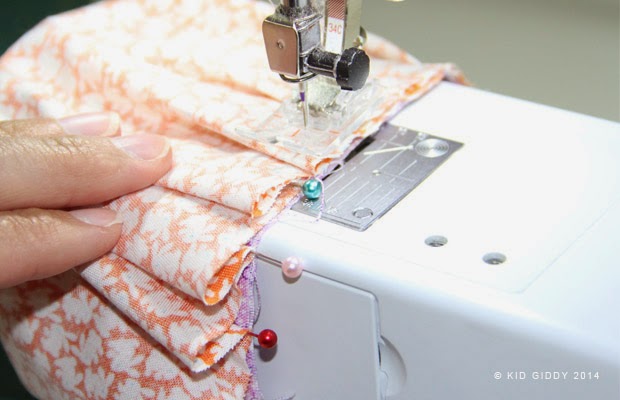
Step 9: Once you have decided which way you want to finish your hat, place the hat around the arm of the machine and stitch the raw edges of the top and the band using a 1/4" seam allowance.
Step 10: If you do not want to pleat your hat at all, and would prefer to gather the edge for a completely different look, switch your machine to a larger stitch length. Leave a good 3" of thread on the beginning and stitch all the way around the top using a 1/8" seam allowance, and leave a 3" tail at the end too. Gently pull on one thread at time to find the piece that will cause it to gather. One will and one won't.
Step 11: Continue to gather the top piece from both ends of the thread, and space the gatherings evenly all the way around as best you can.
Step 12: Pin the band to the inside using the crease marks as your guide (same as steps 5, 6)
Step 13: Sew the raw edge all the way around using a 1/4" seam allowance, and remove the gathering stitch to finish.
Your chef hat will look like this and have a gathered fluffy look.

If you'd like to personalize the hat or apron you could add the following:
1. Name or initials
2. Pocket on the apron (2.5" x 3")
3. Applique shapes
4. Embroidery details
5. Fabric markers, paint or tie dye
6. Felt flower embellishments

Now that you have finished sewing your hats and aprons, it's time to get cooking in the kitchen. Some of our most favorite recipes are Cherry Salad (which is Gluten free!!! and has been pinned like crazy on pinterest), Wonton Soup, and my childhood memory Fluffernutter Balls!

There are so many ways to make this chef hat and apron set just the way you want it and yummy things to whip up. I would love to see your creations, and hope you'll share them with me. Please follow and tag me on Instagram and on Twitter @kidgiddy, or visit my Kid Giddy Facebook page to post a picture of your doll's new chef attire and be sure to use the #kidgiddydolldiaries hashtag. I can't wait to hear what's cooking in your kitchen. As for ours, it's smoothies galore these days, and a few bunny grahams. Be sure to check out the other Camp Doll Diaries events to see what other fun things there are to do this summer, for all your doll fans.

Thanks so much for visiting and sewing with me. If you are new to my blog, please be sure to click the follow button on the right, sign up for my emails (clicking the link below), and all that good stuff. Happy sewing!




Wednesday, February 26, 2014

Sewing Tales for the Holidays Contest Winners

Hello hello - I'm so excited to announce the winners of the Sewing Tales for the Holidays Contest, but before I do that, I'd like to give a huge shout out to the sponsor companies, the judges along side me: Linda (from Sizzix) and Kim (from Prym/Dritz) and all the participants. You can see all the details of the contest here and see criteria for the judging.

So without further ado, the Grand Prize winner is: Kristi from Schnitzel and Boo
Kristi will receive(approx $475 Retail value):
1 seriously awesome FABI from Sizzix
1 Dritz Sewing Bundle Valued at $75
1 - 3 Month Subscription to Quilty Box (this will be the Oct, Nov, Dec boxes)
3 Brand New Titles from F + W Media
A Signed Copy of my Book
1 Pair of Fiskars Scissors
6 Fat Quarters of Heather Bailey's "Lottie Da" fabric collection
3 yards Bosal Foam Create - A - Pattern paper

The 1st Runner up is: Deborah from Fish and Museum
Deborah will receive(approx $200 Retail value):
1 Dritz Sewing Bundle Valued at $50
1 Month Quilty Box
2 Brand New Titles from F + W Media
A Signed Copy of my Book
1 Pair of Fiskars Scissors
2 yards Bosal Foam Create - A - Pattern paper

The 2nd Runner up is: Kim from Babes and Brides

Kim will receive(approx $120 Retail value):
1 Dritz Sewing Bundle Valued at $25
1 Month Quilty Box
1 Brand New Titles from F + W Media
A Signed Copy of my Book
1 yard Bosal Foam Create - A - Pattern paper

I hope you'll take a moment to read their posts and leave a comment. The details in all of them are outstanding. Congratulations everyone. Again I'd like to thank all the other participants who worked so hard to enter the contest - even into the wee hours of the night before the linky closed. The stories that brought your characters to life were so fun to read. I am so grateful for your support of my book and glad to see the fun you all had!

Thank you to the sponsors below for their support and generosity!


Have a great week! To find out more about my book Sewing Tales to Stitch and Love, click the book link to the right. To sign up for my 'lovely' newsletters, click the link below.


Wednesday, November 6, 2013

Sewing Tales Book Blog Hop: Day 3 and a Tiny Canoe

Hi everyone, It's Day 3 of the Sewing Tales Book Blog Hop and the fun is still going strong! Here are today's bloggers:

Whew, the canoe is done. This pattern can be printed at the regular size and fit two little mice inside. You can also shrink the pattern and make it a cute personalized, tiny ornament for your holiday tree.

https://drive.google.com/file/d/0B6St72bEbLYhWEw2S2ExZjRidzA/edit?usp=sharing

Today I will also be posting an awesome giveaway you won't want to miss so keep your blog eyes open...and think winning thoughts.

Thanks so much for coming by and for supporting the blog hop and my book. Make sure you stop in tomorrow for 4 of the final 8 bloggers and another fun Sewing Tales Book Bonus project! If you haven't already, please click that link below and sign up to receive my newsletters. Have a great Wednesday.

Enter for your chance to win a copy of my book and a goodie box the size of Texas to go with it on my giveaway post! Giveaway ends November 14th. 


Thank you again to the Sewing Tales Blog hop sponsors. You can click on this image below and find out more information about each sponsor. Thank you Fairfield, Dritz, Fiskars, Bosal & FreeSpirit. Thank you also to National Nonwovens for providing the wool felt for this project.


http://kidgiddy.blogspot.com/2013/11/sewing-tales-book-blog-hop-sponors.html


Tuesday, August 6, 2013

My Book: Sewing Tales to Stitch and Love

I have tried writing this post over and over, and every time I write it, it sounds boastful, or silly, or crazy, or weird to me. Maybe it wouldn't to you - I don't know. But I've never done this before - I've never written a book and don't know the "right way" to promote it. Is there a right way? Is there a way to shout out from the roof tops how excited I am, without sounding boastful?


Having written a book is like giving birth to a baby elephant. It has consumed my life for the most part of 18 months and I am overjoyed with the results. It feels like old news to me - but for most of you, it is all brand new, and I hope you will love it like I do.

In the coming weeks and months - I will be doing a host of giveaways, and sharing real stories that inspired many of the patterns, so please come back often. I hope you will buy the book (it's available for pre-orders on Amazon as well as on Barnes and Noble) and sew along with me. When my Etsy shop re-opens I will be offering signed copies for sale.

If you have already purchased a copy of my book - I thank you from the bottom of my heart! It means so much to me that all my hard work is being accepted.

I'd like to publicly thank Heather Bailey for writing the foreword. Sewing pattern books don't always have a foreword, but I prayed and asked her to write one for mine and she said yes! She's such an amazing person! If you don't know her - check out her website and learn more about her. She's also hosting a ton of giveaways this month to celebrate her birthday and giveback to all her fans - you don't want to miss out! 

Have a wonderful week!


http://kidgiddy.us2.list-manage1.com/subscribe?u=9ea4c419178a2e61b529af8aa&id=975aef860e


Friday, March 5, 2010

Giddy Up Friday: Sewing for Beginners

OK - So I won't tell you where I was - and who I was talking to...but someone I know has an older child that wants to learn to sew. Since my younger girls are already into this (and sitting on my lap with me to sew)...I thought I would share how I got them started.

Granted many stores now offer mini sewing machines for children 8 and up. But they are not worth it in my opinion. The options and capabilties are few and far between. It also does nothing to "teach" them the art of sewing...which must start by hand! This is also happening with knitting machines and such. If a child is given a blanket they will stay warm for a day, but if you teach a child to sew a blanket, they will stay warm for a lifetime!

We are not going to make a blanket, but will start small instead. Once you have all the materials, this would make a great kit for birthday party favors or gifts for birthday or holidays. There is prep work and you will need a few supplies as follows:
  • 1 Eyelet Plier Kit (not a Grommet Punch)
  • Pieces of Felt (you can buy by the yard or buy many colors in the 81/2" x 11" size)
  • Yarn
  • Plastic Needle
  • Poly-Fil stuffing (it's not all created equal - mid price range is sufficient) (low is ok for this - but know that it will bunch - even if it says it won't! and it's not so soft!) you can also use Bamboo or other fillers
  • Good Scissors too. 
All of these items can be purchased from any craft store (AC Moore, Joann Fabrics, Michaels, Hancocks and even some in the big W store - the one I don't love to promote). If you go to any of the craft stores I have listed, be sure to sign up in advance on their websites for coupons via email. You can save 40, 50 or even 60% off on a single item! Crazy worth it!!!

OK - So here we go.

Step 1: Place 2 of your felt peices together and cut out your desired shape (circle, heart, square - anything simple). You can also cut out block letters and make the whole alphabet - one a day - it would take less than a month!

Step 2: Once you have your shape cut out, grab your eyelet pliers and all along the edge, punch holes approximately 1/4" apart from each other. If they are too close, the felt will tear easily. If it is too far apart, the stuffing can come out. Continue to punch holes until you've gone around the whole shape.

Step 3: Cut one long strand of yarn (from your childs finger tips to the middle of their neck). Thread your needle. Do not place a knot in the needle but rather - let the thread go half way down the longest length.

Step 4: Decide which stitch pattern you think your child can do. Often times, children want to loop around front to back which is called a "Whip Stitch". Another easy stitch is the "Straight Stitch". For an older child ready to learn a new stitch, try the "Blanket Stitch".
To watch video's of how these stitches are done or to learn others - a simple google or you tube search will bring up plenty to watch. (please be cautious when viewing unknown videos on these sites with children present - as some may be mislabeled and inappropriate). Annie's Attic is also a great resource for various Stitch, Crochet, Knitting and Quilting lessons.
Step 5: When you start the stitching, don't put a knot in the end of the thread and leave a good 2-3 inches for tying the knot later. Continue the desired stitch around the shape and leave a 11/2" opening for the stuffing.

Step 6: Stuff the shape to be as fluffy as you'd like. Be careful not to over stuff with love, or it will rip the felt.

Step 7: When you are done stuffing, finish stitching the rest of the way. Tie a good knot with the ends, trim the yarn to about 2" and hide the threads down in with the stuffing. You can do this by poking the needle all the way though to the other side, pulling the left over thread into the center of the stuffie.

Repeat Steps 1 - 7 as many times as you'd like. When you child has mastered that or if your child is older, you can try felt shapes without punching the holes, and using a large doll needle that is rather dull (with adult supervision) and embroidery floss. After that, they can hand sew a small doll blanket using pieces of fabric with a much smaller needle and regular all purpose thread, and then someday will be able to sew on their own buttons, patches and make their own costumes!

My 5 year old daughter made the red heart you see in the top picture! (Thanks little elephant!) Have a great day everyone. If you enjoyed this post, please do leave a comment and let me know. kg