Showing posts with label Dolls. Show all posts

Tuesday, August 16, 2016

Would you like some Sprinkles with that?

Hi everyone - Dana Willard's (MADE Everyday) Boardwalk Delight Fabrics party is ramping up, and today I'm sharing my sweet little Sprinkles doll with you.

Sprinkles was always the first one in line when the ice cream truck rolled around the corner. With a quarter in her hand (I know ice cream off a truck is not $0.25 anymore - but let's go back to that sweet time when it was) she excitedly picked the Cherry Chip ice cream pop covered in chocolate and got a free warm pretzel. Everyday she tried to pick a different ice cream and liked them all, but if you asked her, she would say "anything with sprinkles on top, is my favorite".
She was always decked out in her favorite playtime summer dress (the one with sprinkles all over it of course) her comfy Mary Jane's and little bows around her perfect pig tails. After her ice cream was all gone, she skipped and played hopscotch along the boardwalk until the sun was setting and it was time to go in for dinner.


As soon as I saw Boardwalk Delight, I knew I had to make a little doll that was obsessed with Ice Cream. Sprinkles is that little girl.

I was so grateful Dana asked me to make something for her Boardwalk Delight Lookbook. I loved the fun and playful vibe of Dana's new fabric line and love that it brought back awesome memories of running down the beaches and boardwalks of Long Island, N.Y. when I was younger. It reminded me of the days when guys walked past us carrying coolers filled with novelty ice cream and sodas. (Do they even do that anymore?) It's the perfect fabric to remind you that when you see the ice cream truck coming through your neighborhood for the first and last time of the summer...you make memories and buy ridiculously expensive ice cream, because our children will be grown way too soon and summer will be over before you know it.

How I made the Sprinkles Doll:
I have posted some other tutorials (Queen Phoebe Bunny Doll, Bubbles) that can show you how to make the dress on her. I used my Kid Giddy Sizzix Doll die for her head, body and hair. I used my Kid Giddy Sizzix Fox die for her arms and legs, as well as her socks and mary jane's.

Her collar and bloomers (which you can't fully see in the pic above), were made using my new Kid Giddy Sizzix Doll Clothes die. The quick belly button is a must when making your new dolls with clothes.

I love sharing a new tip, trick or tutorial with each new doll that I make...so if you want to make some little socks for your dolls, you can do so using my quick and easy tutorial below. This tutorial will work with the doll leg/foot piece as well as the fox leg/foot piece as shown in the pics.
Step 1: Begin by cutting out 4 leg/foot pieces. Trim to desired length. If you want to add a cute edge, do so after cutting the sock pieces from the leg/foot areas on the die so you can be sure they are all the same length. I decided to add a little cotton lace detail on the top edge of the socks (because that is how socks always were back in the day). You can do a rolled hem instead or use some other fabric trim. If you do, be sure that you put the right sides together, so the seam of the hem or edge is showing as shown below.
Step 2: Stitch the top 1" - 1 1/2" on the sides. (TIP: I used a thinner old t-shirt material for these socks and used a serger. If you are using quilters cotton, a simple straight stitch will be sufficient.)

Step 3: Turn the sock right side out (according to the top area) and sew the remaining raw edge of the sock from one side around the toe, and up to the other side.


Step 4: Turn the sock right side out again (according to the bottom portion of the sock).

Step 5: Fold down the top edge of the sock. All seam allowances are hidden and the socks go on and off easily. Perfect for kids learning fine motor skills.

Her Mary Jane shoes were made using the same leg/foot piece on the Fox die as were the legs and socks, just cut, trimmed and top stitched accordingly. If you are making a doll using the doll legs, you can do the same thing, just eye ball it as I have done, and add a little strap and button.

For more information or to find out where you can get some of Dana's new fabric, visit Dana's website (link above) or the Art Gallery Fabrics site. For more information on my Kid Giddy dies with Sizzix, please visit Sizzix.com where you can find projects and videos to help you make your own special soft toys.

Thanks so much for stopping by and reading all about Sprinkles as inspired by Boardwalk Delight.


http://kidgiddy.us2.list-manage1.com/subscribe?u=9ea4c419178a2e61b529af8aa&id=975aef860e


Disclaimer: I received fabric from Art Gallery Fabrics to design this doll with. Opinions are my own, and there are no affiliate links. Thank you.

Friday, January 29, 2016

Kid Giddy Sizzix Doll Bubble Dress Tutorial


Happy Friday everyone! Thank you for all the Bubbles love...I love creating these little dolls and their characters - so I'm thrilled when you all enjoy them. If you loved Bubbles and her outfit, I'm sharing how I put it all together, so you can make one too. I decided to make her a dress with a "bubble skirt" (hence her name) but if you just want to make a regular dress skirt, I'm providing the instructions too which are a little different than the photos shown.
As a reminder - Bubbles is made using my Sizzix Kid Giddy Doll die (for the head and body) and the Sizzix Kid Giddy Fox die (for the arms and legs).

Step 1: Cut 4 body pieces. This can be all the same fabric, but I used two so this tutorial is less confusing. I also wanted the bottom to be different than her dress so it 'looked' like she was wearing undies. Cut your top piece across the midsection so it's 2 1/2" from top to bottom. The bottom piece should be cut from the bottom up so it's 1/2" overlapped with the top piece. In this picture above, you'll see a skin tone fabric piece underneath the other two. This is only to illustrate how if you line up the two pieces to the skin tone piece, they must overlap each other to account for the seam allowance.  If you don't account for the seam allowance, the doll's body will be shorter than intended. So my measurements don't really matter - you can place the dress seam where you want, just make sure they overlap by 1/2".
Step 2: Sew the two top body pieces right sides together, side seams only. Repeat this for the bottom portion of the body as well.
Step 3: Cut a piece of fabric that is 9" wide by approx 19 1/2" long if you are making a dress with the bubble skirt. Sew the short ends together and press open the seam. ((Please note: If you have a ruffler foot, PLEASE test a length of 19 1/2" fabric to see how long it is once ruffled before continuing))
If you don't want to make a "bubble" skirt: cut your fabric approx 5" x 19 1/2". Skip to step 5.
Step 4: Fold the fabric in half, wrong sides together, and pin the seams together to keep them aligned. Because this is a bubble skirt, if you want to add fluff, tulle or anything else (to bubble it out), now is the time to do that. 
Step 5: Gather the entire raw edge of the skirt so the circumference is the same as the bottom raw edge of the top body piece. Depending on where you cut the body piece, this could be different for everyone. I also used a ruffler foot and know the settings for my measurements - so please keep in mind your measurements could be different than mine. If you are gathering by hand or using a very long basic stitch, it could be easier to mark various increments to line up along the body seam. 
If you are not making a bubble skirt, match up the ruffled edge to your body piece, and stitch the end seam together (which will be in the center back of the doll) and trim seam allowance accordingly.
Step 6: Turn the top body piece right side out, the bottom body piece wrong side out and the skirt wrong side out (if not making a bubble skirt).
Step 7: Slip the skirt over the top body piece and pin in place. The raw edge of the skirt should be lined up to the bottom raw edge of the top body piece. Do not line it up to the neck seam.
Step 8: Slip the bottom body piece over the skirt and pin in place. This can be tricky because the top and bottom seam of the bottom body portion are almost the same. Be sure you are connecting the middle of the bottom portion to the raw edges.
Step 9: Sew around the raw edge and pull the bottom portion down.

Step 10: Flip the skirt dress down to show the top of the body and finish the doll according to directions with the die. If you didn't make a bubble skirt, roll a double hem along the bottom raw edge and top stitch along the fold.

Step 11: If you want to make a puffy sleeve cut your fabric in the manner shown above. Although this shows the doll arm, you can do the same for the fox arm (as I did but forgot to take a picture of). Make the top edge the same width as the top of the arm, and the bottom wider. Stitch the side seams together and sew a piece of elastic to the bottom edge to gather it into a puffy sleeve.
Step 12: To make the capris, please see all my additional instructions on the sizzix website under projects for the doll. The instructions apply to the fox arms and legs as well.
Step 13:  To make her hair buns, I use 1/2" strips of bamboo blend felt braided together. Roll the braid pieces up to make the bun as small or as large as you want. On the underside, using a long piece of thread, secure all the pieces from one side to another all the way around the bun. Stitch the bun to the doll head in the desired place.

Do you know about the #SewMyself Doll Challenge hosted by GenQ magazine and sponsored by Sizzix? I recently shared how I made some of my Little House on the Prairie look a like dolls for more ideas to make your own for the contest. Head over to Gen Q to check it out.


If you have any questions about this tutorial, please leave me a comment below so I can answer it for all to see and benefit from as well.

Please sign up for my emails to get info about new patterns, new dies, future sales and other fun stuff. I have yet to send out my first one - but I will soon and will surely include something fun.


http://kidgiddy.us2.list-manage1.com/subscribe?u=9ea4c419178a2e61b529af8aa&id=975aef860e

Tuesday, January 26, 2016

Bubbles the Paperie Doll and her tiny CoPilot Bag

I'm so excited to finally share what Amy Sinibaldi's Paperie fabric inspired me to make. Little Bubbles has been fluttering around my house for the past month, as my daughters have snuck in a few cuddles with her here and there. She's in a new spot everyday. I was thrilled Amy asked me to be a part of her blog hop because I knew her fabrics would make the cutest little doll. I didn't skimp on this and kinda broke the mold on her. If you are familiar with my Sizzix Doll dies, you'll notice her arms and legs are not the same as the ones on the doll die. These arms and legs are from the Sizzix Fox die. The pieces are all interchangeable - she's my first bit of proof.
For her outfit - I made Bubbles a little "bubble dress" with puffy sleeves. It was easy to make and looks really cute with a little tulle underneath (my daughter took the tutu from my ballerina doll and added it underneath at one point. It's not shown here - but I'll share that pic when I post the dress tutorial tomorrow). I also decided to give her sweet little capris with some lace detailing) same as on the sleeves). I finished off her dress with two beautiful buttons designed by Jane from "Quilt Jane". Because she lives in Maine - Bubbles clearly needed her own little infinity scarf to keep her warm.
Bubbles is quite unique as you can see from her pink hair and dual hair buns on top. She loves to knit in her free time and travel. Beside her is her little Mini Co-Pilot bag - she loves a good adventure - that word has become her middle name. The word 'adventure' and the bag fit her perfectly.She ven brings her scissors along for some crafty traveling.

Info on making the bag MINI: I made this mini bag for her using Sara Lawson's Co-Pilot pattern from her new Windy City book. I took Sara's bag measurements and divided them by 4. I then took the pattern piece for this bag and shrunk it down to 25% of the original size. Because I changed the size - the seam allowance was no longer the same as required. To fix this - I cut off the seam allowance and added an accurate allowance back on. This kept the pattern 100% accurate in shape and dimensions. This is something I always recommend to people using my patterns (or anyone's patterns) if they make them smaller or larger than advised. I used some Soft and Stable from Patterns by Annie (only one layer for the bottom and sides) to give it body, and of course had to add a little scissor tag to the zipper pull.

If you would like a chance to win a charm pack of Amy's new Limited Edition Paperie fabrics from Art Gallery Fabrics - please leave a comment below (OR on my instagram pic of Bubbles). I'll pick a winner and advise next Tuesday. (EDIT: Thank you to everyone for entering the giveaway here and on my IG feed. Congrats to Kimberly R for winning).
Thanks so much for stopping by and thank you Amy for letting me play with your fabrics. Please sign up for my emails to get info about new patterns, new dies, future sales and other fun stuff. I have yet to send out my first one - but I will soon and will surely include something fun.


http://kidgiddy.us2.list-manage1.com/subscribe?u=9ea4c419178a2e61b529af8aa&id=975aef860e


Disclaimer: I received some fabric from Amy to use for this blog post. I also received a copy of Sara's book and some Soft and Stable since I hadn't ever used it before, as well as the buttons all the way from Australia from Jane. All of the opinions are my own and none of the links above are affiliate links because Maine is crazy like that. Any knitting featured in this story was created by one of my talented daughters.

Thursday, July 31, 2014

Camp Doll Diaries - Cooking Up Fun in the Sewing Studio

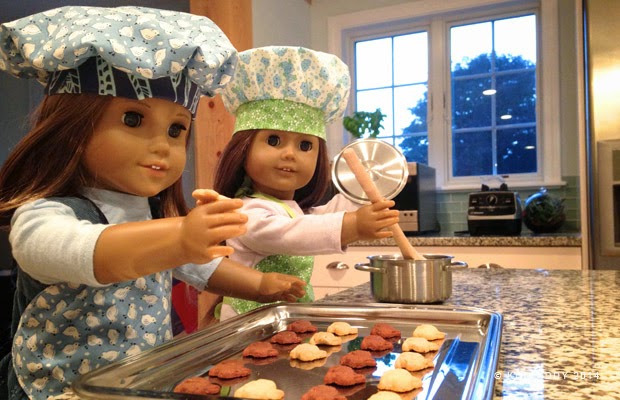
This tutorial has been a long time coming. I first designed this quick chef hat pattern for all the young women at my church to make for girls camp. I wanted to post a tutorial, and then decided to write a book instead. Many months later since then, the folks over at Doll Diaries, contacted me and wondered if I wanted to share a tutorial for all their doll diaries fans. I have two American Girl Doll fans right here in my own home, so technically, we all jumped at the chance to participate in their 2014 Camp Doll Diaries event this summer. If you are coming from the Doll Diaries site - welcome to my Kid Giddy blog. This post will show you how to make the Chef hat. If you have come to my site first - you can make your hat and then visit my Apron post on the Doll Diaries site.
Hi everyone, I'm so excited you are here. We love cooking in the kitchen, but we also love to sew. Today we are going to sew this cute chef hat, and matching apron, so pick out some cute fabric you love and let's get started.

These chef hats and aprons are fairly quick and require a little bit of previous sewing skills, or the help of someone who already sews. The cost of making your own hat and apron will be approximately $3-$5 if you already have the basics, and I will share below some many options to personalize your hat and apron.

What you'll need:
2 fat quarters (your choice of fabric - it can be white or printed) (for beginners I recommend felt for the apron, as it is easier to hand sew, and less flimsy)
2-4 buttons
36" (or 1 yard) of grosgrain ribbon (satin is not recommended)
Basics: Pencil, paper, scissors, needle, thread, pins, sewing machine (helpful but is not necessary if you can and are willing to hand sew), and an iron.

What you'll do:
Step 1: Cut your chef hat band piece to 12.5" x 3". Fold it in half lengthwise, right sides together, and sew along the short raw edge, using a 1/4" seam allowance (green band). Open the band into a circle and press open the sewn seam (purple band). Fold the band in half so the right sides are facing outward and press (blue band).
Step 2: Press the band flat with the seam at one end (green band). Fold the band in half, and each half in half again (purple band). Press the whole band (blue band) to create crease marks for ease of use in later steps. Your band should look like the navy band above. Set the band aside.
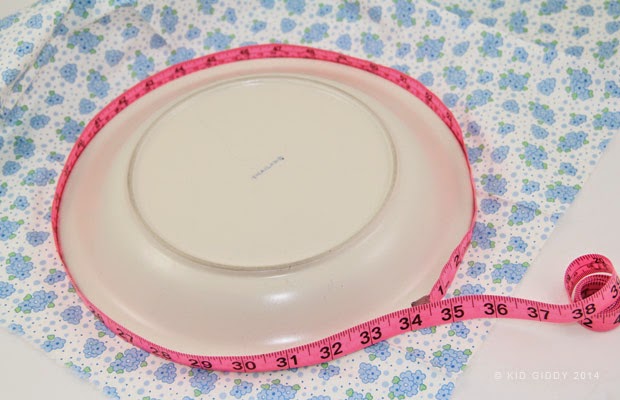
Step 3: Cut out the chef hat top using any dinner plate that is approx 34" around. If you have a circle cutter or special ruler, maybe even a protractor - by all means use what you have that is easiest. I also recommend tracing on a piece of paper first to use as a template.
Step 4: Fold the top piece in half, and then each half in half again. Press all folds so you have crease marks to match up to the bands.

Note: These next steps (5-8) will be the most challenging as it requires a lot of pins. If you have wonder clips, those may work better for younger children, as will skipping steps 5-8 and start at 10.
Step 5: Open up the top circle piece and lay it right side up. Place the band in the center, with the raw edge up, and begin to line up the crease marks on the circle to the marks on the band. Begin with both sides, the top, and bottom.
Step 6: Pin the crease marks that are in between the sides, top and bottom that you just pinned. You should now have 8 pins (or clips).
Step 7: There are now 8 sections that are going to be divided once more. Pull each section to the sides to find the center and pin in place. Repeat this step to the other 7 sections.
Your chef hat should look like this, and have 16 sections.
Step 8: Option 1 - flatten and accordion each section in the center to create a box pleat.
Your chef hat would look like this.
Step 8: Option 2 - fold over each section to the right to create a knife pleat.
Your chef hat would look like this, and would have a sort of spiral effect.
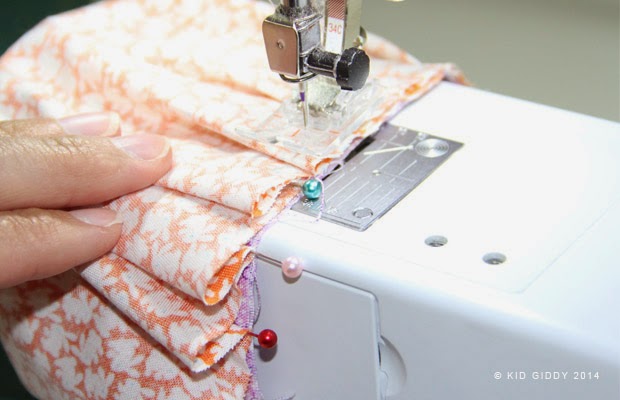
Step 9: Once you have decided which way you want to finish your hat, place the hat around the arm of the machine and stitch the raw edges of the top and the band using a 1/4" seam allowance.
Step 10: If you do not want to pleat your hat at all, and would prefer to gather the edge for a completely different look, switch your machine to a larger stitch length. Leave a good 3" of thread on the beginning and stitch all the way around the top using a 1/8" seam allowance, and leave a 3" tail at the end too. Gently pull on one thread at time to find the piece that will cause it to gather. One will and one won't.
Step 11: Continue to gather the top piece from both ends of the thread, and space the gatherings evenly all the way around as best you can.
Step 12: Pin the band to the inside using the crease marks as your guide (same as steps 5, 6)
Step 13: Sew the raw edge all the way around using a 1/4" seam allowance, and remove the gathering stitch to finish.
Your chef hat will look like this and have a gathered fluffy look.

If you'd like to personalize the hat or apron you could add the following:
1. Name or initials
2. Pocket on the apron (2.5" x 3")
3. Applique shapes
4. Embroidery details
5. Fabric markers, paint or tie dye
6. Felt flower embellishments

Now that you have finished sewing your hats and aprons, it's time to get cooking in the kitchen. Some of our most favorite recipes are Cherry Salad (which is Gluten free!!! and has been pinned like crazy on pinterest), Wonton Soup, and my childhood memory Fluffernutter Balls!

There are so many ways to make this chef hat and apron set just the way you want it and yummy things to whip up. I would love to see your creations, and hope you'll share them with me. Please follow and tag me on Instagram and on Twitter @kidgiddy, or visit my Kid Giddy Facebook page to post a picture of your doll's new chef attire and be sure to use the #kidgiddydolldiaries hashtag. I can't wait to hear what's cooking in your kitchen. As for ours, it's smoothies galore these days, and a few bunny grahams. Be sure to check out the other Camp Doll Diaries events to see what other fun things there are to do this summer, for all your doll fans.

Thanks so much for visiting and sewing with me. If you are new to my blog, please be sure to click the follow button on the right, sign up for my emails (clicking the link below), and all that good stuff. Happy sewing!