Showing posts with label Kid Giddy. Show all posts

Thursday, August 24, 2023

QuiltCon 2024 - I'm Teaching!

Hey everyone, I'm very belatedly sharing the big news that I'm teaching at QuiltCon 2024 in Raleigh, NC again and I would love for you to join me! I first taught at QuiltCon in 2022 and absolutely loved the amazing energy of all my students and the fun of sharing what I do. Are you coming? If so, here is some information about my classes so you can sign up for one, two or all three of them!

The Say it Ain't Sew Quilt classes are bound to be tons of fun. The messages you can create are endless and the font pattern is a mix of patchwork sewing, foundation paper piecing and curves. The pattern comes with all the details to create numbers and punctuations as well, which means you can use the patterns for memories, milestones and so much more! The pattern provides instructions for the regular font, and an elongated font as well. Say it ain't so? Oh yes, it's true! Bonuses galore! These Say It Ain't Sew classes (Thursday 6 - 9pm and Sunday 9 - 12pm) are 3 hours each, but we will stay busy with all the different techniques, tips and tricks! Use class code FPP003 to find them in the QuiltCon search bar. 

The Multiply Your Quilt Blocks class only going to be held once and will be a 6 hours class with a lot of designing and some English Paper Piecing in the second half. This class is all about creating unique blocks using special multiply techniques with a combination of foundational colors and basic blocks we all know and love. What block can you create? I'll bet you no two will be alike! Use class code DES014 to find it in the QuiltCon search bar. (Students will need a computer and the Adobe Illustrator program or something equivalent. For the computer portion, I will only be teaching with the Adobe Illustrator program and may not be able to provide instructions for programs I am not familiar with. However I will try to help find alternative solutions for other programs if time allows. Some prior knowledge of this program will be helpful)

And last but not least is Designing Pixel to Patchwork in EQ8. I have loved the Electric Quilt Program since it came out for Mac computers and I love finding ways to expand my uses of the program to learn something new and create unique designs. This class will teach you how to take a design from pixel to patchwork in the EQ8 program with a little ingenuity and how to prep the file to get your measurements for your design. The Designing Pixel to Patchwork in EQ8 classes  (Friday 1:30 - 4:40pm, and Friday 6 - 9pm) are 3 hours each and also jammed packed with different techniques, tips and tricks! Use class code DES011 to find it in the QuiltCon search bar. (Students will need a computer and the Electric Quilt EQ8 program. For the computer portion, I will only be teaching with the EQ8 program and may not be able to provide instructions for similar programs I am not familiar with. However I will try to help find alternative solutions for other programs if time allows. Some prior knowledge of this program will be helpful). If you have not yet purchased the program, please click here: Electric Quilt EQ8 program (this is an affiliate link - if you purchase through this link, I may be compensated at no additional cost to you).

I love teaching all my tips, tricks and secrets to anyone that wants to learn. I do my best to provide classes that are great for all levels and ask students to come prepared with all the tools needed to make it most successful. I hope you'll join me if you want to level up your sewing and design games. 


Have any questions? Please let me know in the comments below or drop me a dm through Kid Giddy on Instagram. I'm happy to answer any questions prior to class! Huge thank you to all of you that have already signed up for my classes! We are going to have so much fun! Happy stitching as always everyone!


http://kidgiddy.us2.list-manage1.com/subscribe?u=9ea4c419178a2e61b529af8aa&id=975aef860e


Disclosure: This post contains affiliate links as noted and if you click on them and purchase products, I may be compensated at no additional cost to you. Thank you.


Saturday, June 12, 2021

The Pocket Economy Block

If you are new to quilting or have been quilting for a long time, you likely know or have heard of the Economy Block. It has also been called the "square in a square" or the "diamond in a square" block. I've loved it since I first learned about the basic block. It didn't take me long to make a Micro Mini Economy Block in various sizes and offer it with other basic hexie and square paper piecing blocks that can be downloaded in my Etsy shop, as a bundle, if you want to sew small and use up some of those scraps!


Now I've got a fun new spin on the Economy block for you.
Kim @PersimonDreams invited me to participate in her "Old School BOM" sew along throughout this year and I'm excited to share my fun add on to the basic economy block for the month of June. If you've already been sewing I hope you are having fun sewing through all the amazing "Old School BOM" with the other designers. If you are new to the sew along, I hope you'll take some time to check out all of the other designers FREE blocks that have been released.

So what's so fun about this new block? By adding two more pieces, you can make a fun pocket in the center and use the pocket for a sweet little note, little cuddle toy or something else. To get this fun Pocket Economy Block pattern and the simple instructions click the newsletter sign up link here. (PLEASE NOTE: Once you sign up for the newsletter, Mailchimp will automatically send you a confirmation email that you've signed up. Please be patient and await the actual "Welcome Newsletter" that will come some short time after. Be sure to check your spam/junk folders as emails are known to be filtered. Also note, I will not respond to rude and demanding comments or emails. This is a free pattern and negative behaviors will not be tolerated). There are paper template pattern pieces and two different sizes to make. You can sew one 12" block, or sew four 6" blocks and combine those four to make it 12" to fit with all of the other blocks. After you finish sewing your Pocket Economy Block, please be sure to share it with me by tagging me @kidgiddy on Instagram and use the #oldschoolBOM hashtag as well.

I look forward to seeing what's in your pocket! Thanks for sewing with me!


http://kidgiddy.us2.list-manage1.com/subscribe?u=9ea4c419178a2e61b529af8aa&id=975aef860e


Disclosure: There are no affiliate links. Thank you.

Friday, June 11, 2021

Puppy Portraits and a Stitch-a-long

I am beyond excited to finally be sharing this nearly 3 year long project I've been working on with Erin over at Aurifil and the Aurifil company. I had a chance to talk to Erin a bit and shared a lot about this project and why I love Aurifil. You can read all about it over on their Auribuzz blog


Many people over the years have sewn my dog blocks, which started with the French Bulldog block and expanded to eleven more…with other breeds to come later this year. I was at my Mom’s childhood home one summer and saw a wall that was once filled with numerous framed portraits and family reunion photos. She was packing to move and I missed all of the photos. At the time I was trying to think of another fun quilt layout that would work for all 12 dog blocks in the series and thought of a wall of frames. I quickly decided I didn’t want to sew all those 12 blocks again, so I turned it into a cross stitch pattern instead.


When I thought of bringing the cross stitch pattern to “market”, I knew I didn’t want to make money from it, but wanted to do good with it. Oftentimes, designers are asked to give away free patterns to boost sales for one company or a certain product. But when I came up with this idea – there was no product, just the pattern. My idea was to find a way to encourage those that can afford it, to pay for the pattern with 100% of the proceeds to go to various charities. As mentioned, this idea has been in the works for well over a year…and on my end it’s actually been upwards of two and a half years, which was long before Covid. When Covid hit everyone was struggling one way or another, I knew all my prep work was worth it and this was the purpose for the project. To help others with the money raised from the pattern sales. Even though it wasn’t ready to release last year, we knew it would still benefit so many people and continued work on it. Aurifil offered to create the Puppy Portraits spool collection to make it easier for folks to get the colors I used and to help raise awareness to the project. I’m so grateful to work with companies that are actively helping to make a difference for everyone.


We are so excited to share that the Puppy Portraits Stitch-a-Long officially kicks off TODAY (June 10th). Can you guess three of the dogs that might be included on the portrait wall? Reserve/purchase your patterns by filling out the Puppy Portraits Google form linked via the button below.

We are not charging for this event in the traditional sense. Rather, we simply ask that participants make a donation to a charity that is close to theirs hearts or homes to offer passionate and targeted support to those in need. The signup form will require the following details:

— When and where a donation was made (donations must be dated June 10, 2021 or later)
— Donation amount (minimum of $12)
— Screenshot or other proof of donation

We’re excited to track all donation totals as well as charities, organizations, and foundations included. We’ll share details at the end of the stitch-a-long. Participant names and individual donation amounts will not be shared and will remain anonymous.

Upon signup, your name will be added to our pattern distribution list and you’ll receive a PDF download with the Stitch-a-Long frames. The first puppy portrait will arrive in your inbox on July 8th (if you’ve signed up by July 7th), with all subsequent portraits arriving on the 2nd Thursday of each month for 12 months. The frames are numbered in the order in which the puppy portraits will arrive, so please be sure to stitch them in order as noted. When you finish your new ‘puppy of the month’, you can then continue working on the frames.

If you'd like to order the Puppy Portraits collection and the Lugana precut linen (as shown above), you can find it in my Kid Giddy Etsy shop. These are pre-orders and will ship when the product arrives. We appreciate your patience!

We truly hope you will stitch-a-long with us over this next year and feel good about being a part of this special project.


http://kidgiddy.us2.list-manage1.com/subscribe?u=9ea4c419178a2e61b529af8aa&id=975aef860e


Disclosure: There are no affiliate links. Thank you.

Wednesday, September 23, 2020

Electric Quilt Stash Downloads

Recently, I finished making a second version of my Modern Lap Quilt from my Learn to Design and Sew Foundation Paper Piecing ebook. The first Modern Lap Quilt I made was with just two colors, navy and white, so the design was simple and coloring it was super easy.


As I began debating Maureen Cracknell's Autumn Vibes fabrics she kindly sent me, for this second quilt, I was torn on what colors I wanted to use and where. I knew with only one fat quarter per design, I couldn't make the quilt without coloring it in Electric Quilt 8 (EQ8) first. Sometimes it's easy to start cutting into fabric for a quilt when you have extra yardage, but when you don't have extra yardage, you don't have room for error.  Recoloring a design in the EQ8 program first can be super helpful and reduce any stress of cutting into your fabrics. 


To make our lives easier, Electric Quilt offers EQ Stash Online downloads (more than the above image shows) that include many different fabric companies and fabric designers with a variety of special collections as well as solids and basics. Autumn Vibes was included in a past 2018 EQ Stash online download which worked out perfect for me. I had some fun changing the colors as you can see below...


I loved this design above, but used the same print in multiple locations. With only one fat quarter per design, I knew this wouldn't work, but the program gave me room to explore other options. You can see the progression of color and print.

Here I moved to using each print in only one area and allowing room for color patterns to emerge. This one definitely takes on a warmer feel with all of the orange prints. Remember too, the program allows you to "fussy cut" the fabrics within your design as well, like I did with the little fox print.


As you can see, this is the color and print layout I decided on...but changed the white to grey to keep the overall feeling of it warmer and ready for fall. I did change it in the program first, and changed the binding to a navy print (as you can see in the top pic).

You can get a copy of my Learn to Design and Sew Foundation Paper Piecing ebook from my Kid Giddy Etsy shop to make the Modern Lap Quilt for yourself, and you can also grab the EQ8 program from the Electric Quilt website as well as a plethora of EQ Stash downloads to help color your quilts before cutting into your special bundles of fabric. Don't forget to use the code "EQ8KIDGIDDY" to save 20% off your purchases on the Electric Quilt website. Did you know they also have some FREE fabric stash downloads? Yep - they offer one new collection each month for free! So head on over and add some stash downloads to your EQ fabric library, save your 20% and get playing!

Thanks so much for visiting! Please be sure to sign up for my newsletter below...I've got some crazy fun holiday patterns coming October 1st and you won't want to miss out on the amazing savings!


http://kidgiddy.us2.list-manage1.com/subscribe?u=9ea4c419178a2e61b529af8aa&id=975aef860e


Disclosure: I received the Stash downloads to help create my quilt layout and also received a copy of the book for having made my block, but the opinions and comments provided are always my own. There are no affiliate links. Thank you.

Thursday, September 3, 2020

The Pearson Tree Farm Quilts

Pearson Tree Farm Quilt #1 - quilted by Jaki Soper of QuiltStudio55

I've hemmed and hawed on writing this post because this quilt was never meant to be such a public "worldwide" project where I shared all my backstory feelings regarding it. However, it became bigger than me - and so many people helped so I felt I should share the whole story as a way to show how amazing this quilting community is and to show in some small way, my gratitude to all of you that participated. 

Back in December 2019, a local family in my town, lost their husband, father, grandfather, friend, in a very tragic and horrific way. It was weeks before Christmas and where there was once hope and joy, there was immediately sadness and fear. I live in a big town and word got out quickly that a man was on the run and had brutally stabbed this dear man outside his home and headed north. Many talked about the tragic situation but no one knew what to do. I felt a tremendous amount of sadness for his wife who found him while he was still alive. I wanted to do something to help her, remembering my own Granny that lost her husband to natural causes but was there beside him. I didn't feel anything I could ever do would help take away that sadness she was likely feeling and everything that went along with the terrible situation. 

A week passed and I continued to think of her. After seeing many news stories about Jim Pearson and his family's Beech Ridge (Tree) Farm, I got this image of a (Christmas) tree quilt with a red heart on it. I pushed it out of my mind thinking a quilt won't help, however, I wanted to help change the narrative going on in the town/world. There are good people here. Evil will not win. We can do something, anything to show we care, and that we are here for her, even those of us that didn't know her personally and she didn't know us. The image kept coming back, so I sat at my computer one day and designed a bunch of different "Christmas Trees" in my EQ8 program to see how it would look. 

The process of designing the blocks and the quilt helped me and so maybe this quilt could help Nancy, but I knew this was not something I could sew on my own with a quick turn around. Since I knew others in my town were feeling as I was feeling, I reached out to the local town "mom fb group" and asked if anyone else wanted to help make a block. So many people signed up to sew a block - some offered monetary donations for supplies - some were willing to learn to sew in order to be a part of it - while others forwarded the info to local sewing groups and police stations (as one of the adult children was a soon to retire police officer) and news of the quilt project began to spread.

I quickly had enough people signed up to make a queen size quilt, from people in my town, state and even a few from out of state. Someone in the mom fb group suggested we make two more quilts for the adult children, that also lived in town, and was only sorry she didn't know how to sew. Knowing I only had enough blocks coming for 1 quilt, I knew I needed a new source for 2 more quilts worth of blocks, or three quilts weren't going to be possible. My only option at that point was to reach out to all of you, my @kidgiddy community on IG and the response brought me to tears. Without hesitation you all signed up, showed up and shared the post. Within 24 hours I had to shut down the sign up form, before I had more blocks than I knew what to do with. I felt like I closed a door with more people knocking outside. You all are so amazing!

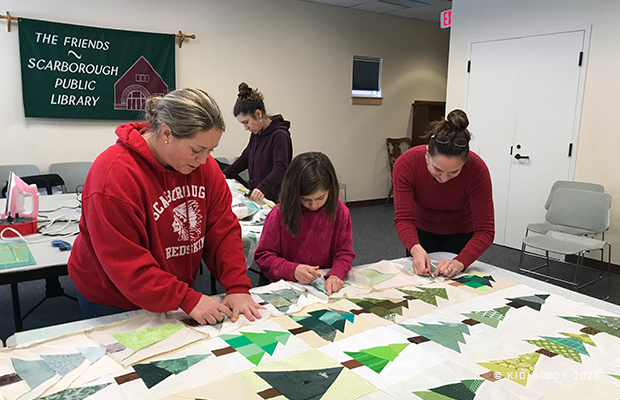
The local Scarborough Public Library offered their public space for me to have "sew-ins" so I could teach folks how to sew the foundation paper piecing blocks, or how to sew the patchwork or applique versions. If someone wasn't there to learn, we were able to use that time to start sewing blocks together for the first quilt as the packages started coming in early January. Everyday at mail time was so exciting and always turned into tears of gratitude. Some of you sent letters and some also included the coloring page that your kids colored in (that were gifted with the quilts). 


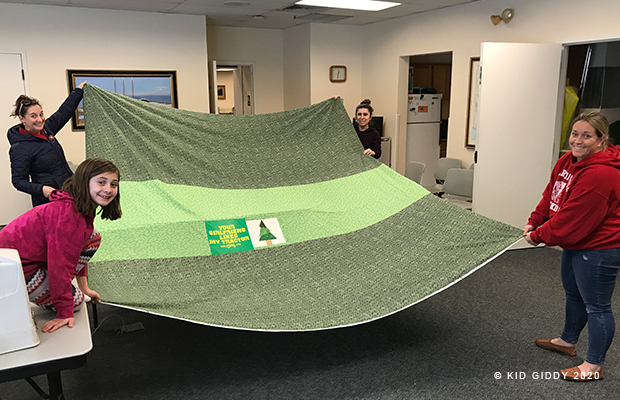
February and March brought more of the same but by mid March our last sew-in happened just in time to make the quilt backs before Covid shut everything down. I had a couple of volunteers that helped piece the last blocks for two of the quilts together in their homes, while I finished the first quilt. With all the quilt tops and backs done, a local friend, Jess, began helping me search for local longarmers willing to give their time to quilt them. Other friends shared my posts and tagged their friends too which resulted in offers from as far west as Seattle and as far South as Florida and Texas to quilt the quilts, but I became hesitant mailing anything out with Covid taking over the news. 

Pearson Tree Farm Quilt #2 - quilted by Tammy Johnson courtesy of Alewives Fabric Shop

We finally secured 3 local quilters within driving distance that were willing to quilt them for this cause (Jaki Soper - Quilt Studio 55 in Maine, Alewives Fabric Shop quilter Tammy Johnson also in Maine, and Patty Sciacca from Massachusetts. Covid slowed down the finishing process, but eventually everything was done.

Pearson Tree Farm Quilt #3 - quilted by Patty Sciacca Crafts

When the quilts came back they were trimmed up and sent right back out to my local volunteers Leslie and Jennipher for binding and all the hand stitching needs. These quilts were truly a community effort that I was honored to be a part of. It was not just this local community, but a worldwide community of quilters that want to do good with their skills. In total, I received 235 blocks from approximately 75 quilters in the US, Canada and the UK. 

You can see everyone that helped in some way or another listed on the labels that my husband and I created. Jess, a friend of the Pearson family, also made pillows for each of the grandkids so they would have something as well. Each pillow and all three quilts have a tree or two pieced from Jim's clothing. The quilts have 1 or two blocks with his work shirt and one t-shirt tree from the clothing provided by the family. You can see in one of the images above, I made two tree blocks for Nancy's quilt using one of Jim's work shirts that had his name on the left side above the pocket and the farm name on the right side above the pocket. We were sure to use as much of the shirts that we cut into so as not to waste any of the material. Not even the buttons.  


While the quilts (and pillows) were being made, we had many folks wanting to donate so much funding to the quilts, which would've been more than needed. Eventually the family was able to set up a memorial education scholarship in Jim's honor, and the first recipient this year was recently awarded a scholarship for his freshman year at college. For more information about the Beech Ridge Farm, or to support the Pearson Family Memorial Scholarship, you can visit their websites (links highlighted). If you would like to purchase the #PearsonTreeFarmQuilt blocks pattern, please know that I am in the process of working with them to offer it on their website or a dedicated Etsy shop, with proceeds going to the Pearson Family Memorial Scholarship. I will update that info here when it becomes available. 

I truly want to thank everyone that helped make these quilts happen. It was a lot of work to put together and thanks to Covid took way longer than anticipated, but the process was made easier with the help and love of so many others. The Pearson family was grateful for the outpouring of love from so many strangers worldwide and really enjoyed looking at the variety of trees and hearing how they all came together. I never could've done this myself...certainly not 3 quilts (or the 9 pillows Jess also made), but not even the one quilt. Thank you again!


http://kidgiddy.us2.list-manage1.com/subscribe?u=9ea4c419178a2e61b529af8aa&id=975aef860e


Disclosure: Although this is not a sponsored post - I did receive the EQ8 software previously which helped to create the blocks and quilt layout, but the opinions and comments provided are always my own. There are no affiliate links. Thank you.

Monday, July 20, 2020

The Lobster Quilt Block

I've lived near coastal waters most of my life and lobsters and buoys have always been a part of the scenery. I designed a stuffed Lobster (named Pinchy) for my book Sewing Tales to Stitch and Love back in 2013. A year later in 2014 I began designing foundation paper piecing patterns, I sketched out this Lobster as my second block (the Anchor was my first), but I never finished developing it through all these years. There was just something about it I didn't love, but as I revisited it, I easily changed the tail and head in my Electric Quilt EQ8 program file and fell in love. So to say this #LobsterQuiltBlock has been years in the making, is no joke.


The Malibu and Ruby + Bee Fabrics I used in the block above and are shown with the quilt layout below were such a perfect fit right for this ocean loving girl (me) and this Lobster block. I actually grew up going to Malibu Beach every summer in New York when I lived on Long Island. These adorable fabrics are available from Windham Fabrics. I reached out to Windham and they provided me with the fabric swatch files so I could easily import them into EQ8 and whip up a fun layout. If you have fabrics you want to use for a project, but have never tried this, here's a quick video tutorial.

You can get a copy of my new #LobsterQuiltBlock by visiting my Kid Giddy Etsy shop. Want to Learn to Design and Sew Foundation Paper Piecing patterns? You can find the ebook in my shop as well. Visit the Electric Quilt website to learn how to convert your designs into the EQ8 program to make designing and printing your patterns easier. Please share your #LobsterQuiltBlocks with me on Instagram @kidgiddy #kidgiddy.

Thanks so much for visiting!


http://kidgiddy.us2.list-manage1.com/subscribe?u=9ea4c419178a2e61b529af8aa&id=975aef860e


Disclosure: As a Media Partner with Electric Quilt, I may receive compensation for this post. I also received the Malibu and Ruby + Bee Fabrics from Windham Fabrics to help create my block, but the opinions and comments provided are always my own. There are no affiliate links at this time. Thank you.

Friday, March 20, 2020

Face Mask Tutorial - With Elastic or Straps

Hello everyone. I hope you are all staying in place, and are healthy and busy. A few weeks ago a dear friend of mine said her husband (a dental student) was being rationed to one medical face mask per day. It got me thinking that this coronavirus wasn't going to slow down and was going to deplete the supply chain here just as it has done elsewhere. As things rapidly changed, my ability to care for my family and also help other elderly friends prepare for the self isolation, I wasn't able to get this tutorial up sooner.

The CDC has said "In settings where face masks are not available, HCP might use homemade masks (e.g., bandana, scarf) for care of patients with COVID-19 as a last resort. However, homemade masks are not considered PPE, since their capability to protect HCP is unknown. Caution should be exercised when considering this option. Homemade masks should ideally be used in combination with a face shield that covers the entire front (that extends to the chin or below) and sides of the face." Please note - I know that these masks are not PPE, but where some are struggling with supplies, I know these are more helpful than bandanas or scarves.

So this is our chance to help. I have posted the basic tutorial first (with elastic - although ties are now most recommended), and have updated it with more info and alternative ways to make the face masks. My hope is that for all of us that can sew, will take the time to sew at least 5 masks to donate to your local hospital, or another medical facility in need. It won't make sense for us all to send masks to one central location as that can easily be overwhelming at a time like this. Nursing homes and midwives and so many others are looking for masks. Even persons that work in hospital kitchens and other places where person hygiene is most important.

Here's what you'll need:

2 pieces of fabric cut 7 1/4"w x 7 1/2" h (yes you can simplify to a 7 1/2" square but please know I based these measurements off of an actual medical mask) To make a kid sized mask - the fabric measurement is 5 1/2"w x 6"h.

Download a copy of the template I have made for the overall piece and the pleats here.

FABRIC RECOMMENDATIONS:

1) I used quilters cotton on the top outer layer, and a tight weave gauze for the inside layer that touches the face. It's not too thin but also not too thick to make it harder to breathe or too hot for the wearer. Two layers of quilters cotton is also great, just use two different colors or prints. By using two different fabrics, the wearer will know which side was outward and which side was touching their face, which keeps them safer! 

2) It is also recommended to use (brand new) t-shirt material that is 100% cotton as the inside lining. (again - I don't recommend using the same quilters cotton print for both sides, as you want to know which side you've potentially touched, and which side is safe to go against the face.)

FILTERS - PLEASE DO NOT USE:

Please DO NOT USE Vaccum Cleaner bags or other Air Filters as they have not been tested for human breathing filter use in a mask...and I have read elsewhere that antimicrobial fabrics are not the safest option either.

Likewise, Sanitary Napkins should NOT be used. This is dangerous and wholly unnecessary. Sticking to 100% cotton and even cotton t-shirts - is always best. If the medical professional wants a filter, they can simply wear the PPE mask UNDER the homemade mask.

TIES or ELASTIC:

1) Straps sewn into the seams on the corners - should be 14" long each, cut 4. A little longer is ok - better long than short. Ties sewn all the way across the top (as shown with selvage in photo below) should be 37" - 40" in length, cut 2. Straps/ties are preferred by many medical professionals as they can be sanitized properly with high heat washing and drying without breaking down.

2) 2 -  5-7" pieces Elastic - (TIP: The 1/8" flat soft stretch elastic by Dritz truly is the best, but you can use the round cord elastic - tip on that coming later, or a flat clear elastic not shown). Elastic length for kids can be the same as adults but adjust shorter for youngest kids (depending on age and size of child). Elastic is becoming harder to find. 1/8" elastic is the best, and most comfortable on the ears. If it's not available, please sew ties. 

ADJUSTABLE NOSE PIECE:

1) Adjustable Nose piece (this nose piece really helps to create a better seal over the wearers face:
1 piece of 1/8"w x 5"l (up to 6") aluminum strip (TIP: this can be found at some hardware stores like ACE but I found mine as a 3/4"w x 12"l piece - as shown above - and cut it down to size with strong metal scissors.

2) You can also use twist ties - twist two together to make a double, and then twist two doubles together - or pipe cleaners - aka chenille sticks.

Here's how:

The first tutorial shows how to sew the mask with elastic, but please read all of the instructions to see how to sew a mask with straps/ties.

Want to make a whole bunch? Mary @Z_Fabrics in Portland Maine is kitting up some mask kits with straps (no elastic needed). We will post more on that soon via @kidgiddy on Instagram.

Step 1: Pin the elastic to the sides of the mask. One on each side. The end of the top elastic shown will go to the right side of the mask, while the bottom elastic will go to the top left side of the mask. I wanted to show the piece flat so it's a bit easier to see.

Step 2: Place the gauze (or lining material) right sides together. The two pink pins will be the start and stop when stitching all around the mask.

Step 3: Before sewing all around the mask, pin the ends of the elastic as mentioned above.

Step 4: Sew all the way around the mask, leaving an opening to turn right side out. Clip the corners and turn right side out and press the edges.

Step 5: Place a metal strip, pipe cleaner, or twist ties up through the opening to the top of the mask. Place is under the seam allowance so you can't see it on the gauze side (this will protect the wearers face while using).

Step 6: Pin just under the metal strip to keep it in place.

Step 7: Add three knife pleats to the mask so when wearing the pleats are facing downward and press with a mini iron and be sure to avoid the pins. Download a copy of the template to easily make your 1/2" knife pleats.

Step 8: Pin the 1/2" knife pleats in place so they don't shift as much while sewing.


Step 9: Sew a top stitch all the way around three sides of the mask, making sure not to sew the top stitch on the metal strip, but rather just underneath it. This will keep the metal strip securely in place.

Don't have elastic or metal strips? That's ok - here are some other variations.

Variation 1: If you don't have elastic, you can use cotton twill strips, binding or bias binding left over from quilts, grosgrain ribbon, or even shoe laces per my hubby. They should be at least 14" long and you'll need 4 strips. Place the raw edge along the side edge and approximately 1/2" below the top edge and 1/2" above bottom edge and pin to sides. Place the gauze on top and like Step 2, and stitch all the way around leaving a small opening for turning right side out. I would recommend sewing with the gauze on bottom to prevent it from stretching.

Here are some of the other things you may have around your space that you can use for ties and straps. It's ok to be creative, so long as it doesn't put the medical professional at risk while wearing.
Variation 2: If you do not have aluminum metal strips, you can use "pipe cleaners" (now called "chenille sticks" cut to 6". Curl the ends and crimp to prevent the metal tips from poking out or poking the wearer. Place inside the mask along the top edge and follow Steps 5 - 9 to finish.
Variation 3: If you have the Bernina Ruffler #86 Foot, you can ruffle the sides instead of pleating. This ruffle was set to 1. That means it was 1 ruffle per stitch. If you own a different machine and ruffler, please check the length on a scrap. The end result should be sides about 3 1/2" long.
Variation 4: We all have selvages and scraps from quilt bindings. Let's use what we have and get creative. Selvages should be cut to 1 3/4"w x 34"l. I cut the ends of my straps with pinking shears instead of tucking them in and making it a perfect finish.

Thanks so much for visiting and I hope to see some of your face masks before you donate them. I am also making some for my family and elderly friends in the hopes that if we or they have to go out, we can have that added protection from the virus. I have asthma as does my daughter, so we are doing all we can to stay safe. If a member of your family gets sick, a little extra protect helps then too. Feel free to share info below and also on Instagram by tagging me @kidgiddy.


http://kidgiddy.us2.list-manage1.com/subscribe?u=9ea4c419178a2e61b529af8aa&id=975aef860e


Disclosure: I received the mini iron from Oliso but the opinions and comments provided are always my own. Thank you.