Showing posts with label Tutorial. Show all posts

Friday, February 7, 2020

FREE Sew Plush Valentine Heart Box Tutorial for Bernina


I'm not sure how it's February already, but I have a super sweet and FREE project for you to make. I designed this Sew Plush Valentine Heart Box for the Bernina We All Sew website, just in time to fill it with all kinds of lovely goodies before Valentine's Day.

Do you have a favorite candy (like dark chocolate?) or sewing notion you'd want to see inside like these beautiful Aurifil Floss spools or are you a jewelry lover? Want to make it bigger or smaller? I am sharing all the details over on their website - so head on over to take a look. Then share your #sewplushvalentineheartbox with me @kidgiddy on Instagram. Be sure to tag @berninausa too!

These sweet fabrics are courtesy of Riley Blake Designs, designed by Lindsay Wilkes and are called Love Letters.

I'm looking forward to seeing all of your heart boxes and what you'll be putting inside! Thanks so much for visiting and hope you love sewing this fun project!


http://kidgiddy.us2.list-manage1.com/subscribe?u=9ea4c419178a2e61b529af8aa&id=975aef860e


Disclosure: I received products from Riley Blake Designs, Bernina and Aurifil, as a designer, Bernina Ambassador and Aurifil Artisans to share ways I use my Bernina sewing machine and threads, but the opinions and comments provided are always my own. Thank you.

Thursday, August 22, 2019

Aurifil Whole Cloth Quilt Challenge

Did you know you can make tiny pompoms with thread? Yep! This month the Aurifil Artisans were given a whole cloth mini quilt challenge using a solid fabric from Painter's Palette Solids by Paintbrush Studio and Aurifil thread. At the time of sign up, I requested the Aurifil 12wt thread because I had yet to really work with a 12wt thread and wanted to experiment with it. Although I didn't know what color fabric and thread I would get, I was so excited to open my package to see that I received the "Shell Pink" fabric (one of their 2019 colors) and Aurifil thread in color number 2425.
I initially wanted to do something like Sashiko when I first began thinking of ideas because the 12wt thread would work great...but things went on a bit of a bird walk in a whole other direction. Because it was pink (even my martial arts sparing gear is pink) and I've loved pink since I was younger, I got to thinking of my bedroom when I was a tween. One summer while my twin sister and I were away, our mom painted a huge pastel rainbow and animal shaped clouds all around our room. When we got back, we stuck glow in the dark stars up on the walls and ceilings for night time effects (what can I say it was the 80's). That got me thinking further back in our past when my sister and I were in Texas and sitting with another girl on the bleachers and she taught us how to make our first pompoms using cereal box templates when we were 7ish. Flashing back to the present, since I also design 3 dimensional toys and quilts, I felt the need to add something 3 dimensional to this project, but with thread...so pompoms it is?!

Now if you really want, you could try making pompoms with 40wt or 50wt thread...but that might take a while! You definitely can make them with Aurifil floss, but I wanted to see if I could make them with 12wt. And it worked...you just have to add water!

To make my tiny pompoms I used the 12wt Aurifil thread, Clover 3/4" pompom maker, fabric snips, and water. Each pompom took me about 10 minutes to make. Yes - we timed it. lol. Begin by wrapping your thread around the clover pompom maker so both sides are full. 

Using your fabric snips, carefully clip the threads right down the center of the pompom maker.

Cut two 8" pieces of thread and wrap them together through the center to tie the pompom. I double loop my first tie and then single loop my second tie to make a really strong knot. By double looping the first one, it won't easily come undone before you knot it with the second tie.

Carefully open the pompom maker.

Remove the pompom and notice it is oddly shaped. This is where the water comes in...

Get your pompom wet by pressing the two sides together and really get the water to soak into the center of the pompom. Once the threads are wet, they will relax a bit and fall into place a lot easier. Squeeze out all of the excess water and shake it using the attached strings (remember how you would shake the troll (tm) dolls to make their hair puff out perfectly...pompoms work the same way!).

Once it has a little shape to it - set it somewhere to dry. Once it's fully dry, use your snips to shape the pompom into a pretty little ball. The more you trim off, the tighter the threads will appear and the smaller the pompom will end up being. Some sides of the pompoms will appear shiny but other (and most parts will looks super soft and will even look like yarn.

Because I wanted the quilting and the pompoms to play nicely together and not have one over power the other, I decided to quilt the background with a basic 1/2" grid using the exact same 2425 color in a 50wt (thank goodness I had this exact color on hand - yay!) and placed the pompoms in a basic polka dot or cookie sheet layout. I cannot tell a lie though - I decided it had to be a pillow - so this finished pic is without the pillow form since it was supposed to be a mini quilt. I wanted it also to have a more finished and professional look, so I used some of the left over fabric to add piping around the edge. This simple and quick design will spruce up any little reading nook and add a little whimsy to your home decor.

Now that I have a cute pillow, I think I'm going to need a large quilt to go with it! Who's up for making more Aurifil thread pompoms? Thanks so much for visiting and I hope to see some more Aurifil thread pompom/whole cloth pillows and quilts out there!


http://kidgiddy.us2.list-manage1.com/subscribe?u=9ea4c419178a2e61b529af8aa&id=975aef860e


Disclosure: I received the fabric and thread to help create my project, but the opinions and comments provided are always my own. There are no affiliate links. Thank you.

Thursday, September 24, 2015

Easy Mushrooms with Sizzix Circle Dies

I'm over on the Sizzix blog today showing you how to make these really easy mushrooms with various Sizzix circle die cut sizes. You can customize them any way you'd like, to make coasters, decorative tea towels or hot pads.


I made this entire set for my swap partner when I hosted the Gnome Swap on instagram. She asked for something "gnomey" for her kitchen, and I just couldn't resist. The coasters fit perfectly in this little cross stitch box I picked up at Target. They finish at 3 1/2" wide.
 
If you want to make a cute and simple tea towel or bar towel set, do a little needle turn applique or make it quicker with raw edge applique as I did.


To make a set of hot pads - make them as quick and easy as the coasters, or treat them like mini quilts and add some fun quilting and of course binding around the edge.

Check out the tutorial over on the Sizzix blog and share your #kidgiddy mushrooms with me on Instagram or Facebook

Thanks for stopping by. For more info about my dies with Sizzix, check out the Sizzix Website and watch my videos on You Tube. To get the kid giddy inside scoop before everyone else - sign up for my newsletter below. Have a great weekend.


http://kidgiddy.us2.list-manage1.com/subscribe?u=9ea4c419178a2e61b529af8aa&id=975aef860e


Thursday, July 31, 2014

Camp Doll Diaries - Cooking Up Fun in the Sewing Studio

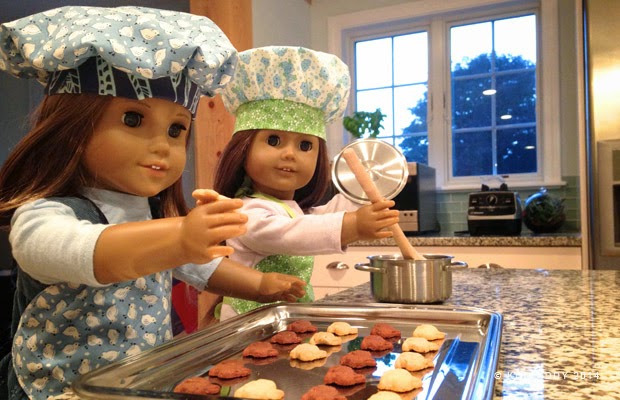
This tutorial has been a long time coming. I first designed this quick chef hat pattern for all the young women at my church to make for girls camp. I wanted to post a tutorial, and then decided to write a book instead. Many months later since then, the folks over at Doll Diaries, contacted me and wondered if I wanted to share a tutorial for all their doll diaries fans. I have two American Girl Doll fans right here in my own home, so technically, we all jumped at the chance to participate in their 2014 Camp Doll Diaries event this summer. If you are coming from the Doll Diaries site - welcome to my Kid Giddy blog. This post will show you how to make the Chef hat. If you have come to my site first - you can make your hat and then visit my Apron post on the Doll Diaries site.
Hi everyone, I'm so excited you are here. We love cooking in the kitchen, but we also love to sew. Today we are going to sew this cute chef hat, and matching apron, so pick out some cute fabric you love and let's get started.

These chef hats and aprons are fairly quick and require a little bit of previous sewing skills, or the help of someone who already sews. The cost of making your own hat and apron will be approximately $3-$5 if you already have the basics, and I will share below some many options to personalize your hat and apron.

What you'll need:
2 fat quarters (your choice of fabric - it can be white or printed) (for beginners I recommend felt for the apron, as it is easier to hand sew, and less flimsy)
2-4 buttons
36" (or 1 yard) of grosgrain ribbon (satin is not recommended)
Basics: Pencil, paper, scissors, needle, thread, pins, sewing machine (helpful but is not necessary if you can and are willing to hand sew), and an iron.

What you'll do:
Step 1: Cut your chef hat band piece to 12.5" x 3". Fold it in half lengthwise, right sides together, and sew along the short raw edge, using a 1/4" seam allowance (green band). Open the band into a circle and press open the sewn seam (purple band). Fold the band in half so the right sides are facing outward and press (blue band).
Step 2: Press the band flat with the seam at one end (green band). Fold the band in half, and each half in half again (purple band). Press the whole band (blue band) to create crease marks for ease of use in later steps. Your band should look like the navy band above. Set the band aside.
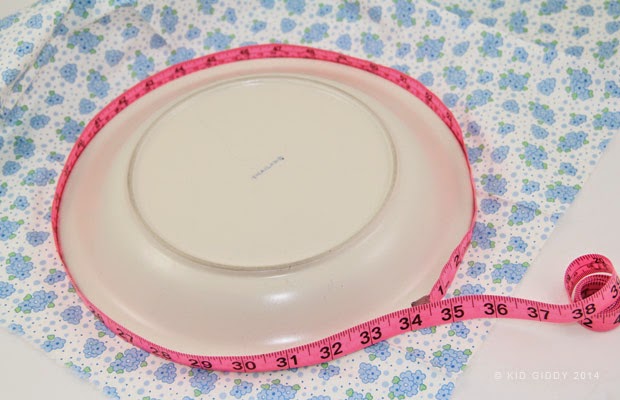
Step 3: Cut out the chef hat top using any dinner plate that is approx 34" around. If you have a circle cutter or special ruler, maybe even a protractor - by all means use what you have that is easiest. I also recommend tracing on a piece of paper first to use as a template.
Step 4: Fold the top piece in half, and then each half in half again. Press all folds so you have crease marks to match up to the bands.

Note: These next steps (5-8) will be the most challenging as it requires a lot of pins. If you have wonder clips, those may work better for younger children, as will skipping steps 5-8 and start at 10.
Step 5: Open up the top circle piece and lay it right side up. Place the band in the center, with the raw edge up, and begin to line up the crease marks on the circle to the marks on the band. Begin with both sides, the top, and bottom.
Step 6: Pin the crease marks that are in between the sides, top and bottom that you just pinned. You should now have 8 pins (or clips).
Step 7: There are now 8 sections that are going to be divided once more. Pull each section to the sides to find the center and pin in place. Repeat this step to the other 7 sections.
Your chef hat should look like this, and have 16 sections.
Step 8: Option 1 - flatten and accordion each section in the center to create a box pleat.
Your chef hat would look like this.
Step 8: Option 2 - fold over each section to the right to create a knife pleat.
Your chef hat would look like this, and would have a sort of spiral effect.
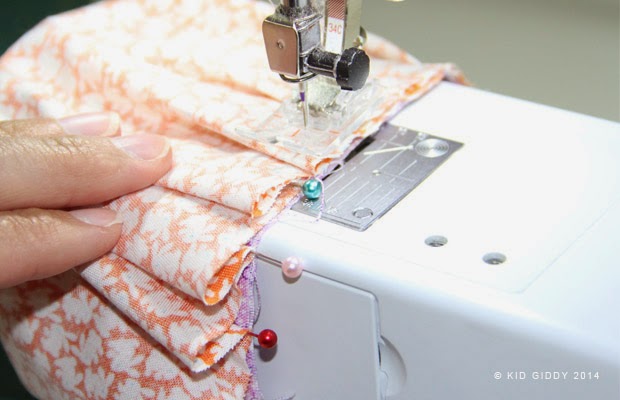
Step 9: Once you have decided which way you want to finish your hat, place the hat around the arm of the machine and stitch the raw edges of the top and the band using a 1/4" seam allowance.
Step 10: If you do not want to pleat your hat at all, and would prefer to gather the edge for a completely different look, switch your machine to a larger stitch length. Leave a good 3" of thread on the beginning and stitch all the way around the top using a 1/8" seam allowance, and leave a 3" tail at the end too. Gently pull on one thread at time to find the piece that will cause it to gather. One will and one won't.
Step 11: Continue to gather the top piece from both ends of the thread, and space the gatherings evenly all the way around as best you can.
Step 12: Pin the band to the inside using the crease marks as your guide (same as steps 5, 6)
Step 13: Sew the raw edge all the way around using a 1/4" seam allowance, and remove the gathering stitch to finish.
Your chef hat will look like this and have a gathered fluffy look.

If you'd like to personalize the hat or apron you could add the following:
1. Name or initials
2. Pocket on the apron (2.5" x 3")
3. Applique shapes
4. Embroidery details
5. Fabric markers, paint or tie dye
6. Felt flower embellishments

Now that you have finished sewing your hats and aprons, it's time to get cooking in the kitchen. Some of our most favorite recipes are Cherry Salad (which is Gluten free!!! and has been pinned like crazy on pinterest), Wonton Soup, and my childhood memory Fluffernutter Balls!

There are so many ways to make this chef hat and apron set just the way you want it and yummy things to whip up. I would love to see your creations, and hope you'll share them with me. Please follow and tag me on Instagram and on Twitter @kidgiddy, or visit my Kid Giddy Facebook page to post a picture of your doll's new chef attire and be sure to use the #kidgiddydolldiaries hashtag. I can't wait to hear what's cooking in your kitchen. As for ours, it's smoothies galore these days, and a few bunny grahams. Be sure to check out the other Camp Doll Diaries events to see what other fun things there are to do this summer, for all your doll fans.

Thanks so much for visiting and sewing with me. If you are new to my blog, please be sure to click the follow button on the right, sign up for my emails (clicking the link below), and all that good stuff. Happy sewing!




Friday, April 11, 2014

Infinity Fabric Cone Bracelet Free Tutorial

Got Scraps? Try this scrappy fabric bracelet on for size. I made this bracelet tutorial for the Craft Industry Today magazine last year but never posted it here on my blog until now, whoops. I receive many compliments every time I wear them. They add color to any outfit, are really easy to make, and great for scrap busting - so make as many as you want!


What you'll need:
Print a copy of the PDF pattern - click here for the google doc
Fabric of your choice. 2 Fat Quarters can make 2 8" bracelets or use scraps.
Thread color of choice
¾” Non-rolling Elastic cut to desired length
Regular Scissors & Pinking Shears
Sewing Machine
NOTE: Seam allowance is 1/4" unless other wise noted.

What you'll do:
Prep: Measure your wrist and hand to determine the length of the bracelet you will want
to make. The elastic should be cut so they are 1" longer than the length your hand
measured (this will keep it loose not tight). Cut out 2 cone pieces for every inch of the
finished bracelet length. (To get over my hand is 8”, I cut my elastic to 9” to cover the
overlap at the end and to prevent it from being too tight). When cutting, the curved edge
of the cone, and the two sides should be cut with the pinking shears, and the 3 inside
edges, should be cut with straight scissors.

Step 1: Make all of your cone pieces by folding them in half, right sides together and sewing
the raw edge.


Step 2: Keeping the cones wrong side out and slip them onto the elastic strap alternating
colors or patterns. The seam edge of the cones should be centered on the top of the
strap. Sew the first cone piece to the elastic leaving ½” – ¾” at the end of the elastic
to connect to the other end.

Step 3: Sew all of the cone pieces to the strap with a ½” in between each piece.

Step 4: With the last cone on the elastic, overlap both ends of the elastic and sew together.

Step 5: Wiggle the final cone in place, just over the sewn elastic ends, and sew it in place.

Step 6: Flip all the cones over so they are right sides facing out.


Alternative Options:
1) To make it fuller, use 3 or 4 cones for every inch.
2) If you are making a necklace, scarf or belt, you can shrink and use the same pattern, and use a thinner elastic or soft but sturdy cording.
3) If you make a belt and want to have the cones all hanging down ward, make sure the cones are sewn in the opposite direction at the half-way point.

The more you wear your bracelet, the softer the edges will get. If you have any questions while making your bracelet or any of the other adapted accessories, please leave a comment below. After you make some - please share some pics and tag me @kidgiddy on instagram or twitter and use the hashtag #kidgiddysewing!


http://kidgiddy.us2.list-manage1.com/subscribe?u=9ea4c419178a2e61b529af8aa&id=975aef860e