Showing posts with label Aurifil. Show all posts

Thursday, August 12, 2021

The Puppy Portraits Cross Stitch SAL: French Bull Dog

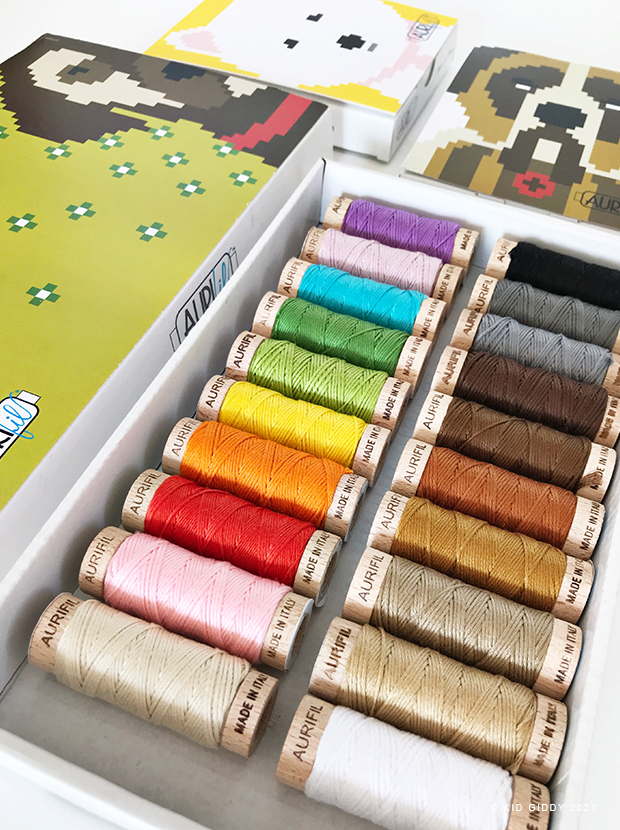
I know I'm not supposed to pick favorites - so I won't - but I have loved this one from the very beginning and hope you will too. This little dapper dog has a sweet little bow tie and a very elegant, very "old fashioned frame" with an enormous bow. I'm so excited to introduce you to the second puppy in the Puppy Portraits cross stitch a long. It's the ever loving, small - but mighty, French Bull Dog!


If you are new to the Puppy Portraits stitch a long, you can find out more about it in the first June post...here and more about the Aurifil company. I also had a chance to talk to Erin a bit and shared a lot about this project and why I love Aurifil. You can read all about it over on their Auribuzz blog. If you haven't signed up yet, it's never too late. You can sign up now. Reserve/purchase your patterns by filling out the Puppy Portraits Google form linked via the button below.

Just a reminder: We are not charging for this event in the traditional sense. Rather, we simply ask that participants make a donation to a charity that is close to theirs hearts or homes to offer passionate and targeted support to those in need. The signup form will require the following details:

— When and where a donation was made (donations must be dated June 10, 2021 or later)
— Donation amount (minimum of $12)
— Screenshot or other proof of donation

We’re excited to be tracking all donation totals as well as the charities, organizations, and foundations that you all have chosen to donate to. To date we have raised well over $2500! We’ll share all the details at the end of the stitch-a-long. Participant names and individual donation amounts will not be shared and will remain anonymous.

Upon signup, your name will be added to our pattern distribution list and you’ll receive a PDF download with the stitch-a-long frames. Because the registrations are being confirmed manually, the first email won't go out the second you sign up. All "FIRST" emails will only be sent on Friday mornings. If you register Friday night or Saturday morning, you may not get the first email until the following Friday. We appreciate your patience. All subsequent portraits will be arriving on the 2nd Thursday of each month for the remainder of the 12 months. The frames are numbered in the order in which the puppy portraits will arrive, so please be sure to stitch them in order as noted if you want to get ahead. When you finish your new ‘puppy of the month’, you can then continue working on the frames.

If you'd like to order the Puppy Portraits collection and your color choice of Lugana precut linen (mushroom is shown above), you can find it in my Kid Giddy Etsy shop. I currently have stock of three different linen fabrics but quantities are limited. Once they sell out it will be considered a pre-order and will ship when more product arrives. We appreciate your patience!

To all that have joined us thus far, we are so excited to have you. To those still deciding or just finding out, we can't wait to have you join the party! We truly hope you will stitch-a-long with us over this next year and feel good about being a part of this special project.


http://kidgiddy.us2.list-manage1.com/subscribe?u=9ea4c419178a2e61b529af8aa&id=975aef860e


Disclosure: There are no affiliate links. Thank you.

Thursday, July 29, 2021

The Puppy Portraits SAL: Mini Poodle

It's still month two (albeit late) so I'm going to share the first puppy release with you before the second one comes out in August! We released the Frames to get you started back in June. Who's the first out of the gate? None other than the Mini Poodle...the youngest and smallest of the bunch. He hasn't grown into his full color yet, but he's still as cute as can be. 

If you are new to the Puppy Portraits stitch a long, you can find out more about it in the first June post...here and more about the Aurifil company. I also had a chance to talk to Erin a bit and shared a lot about this project and why I love Aurifil. You can read all about it over on their Auribuzz blog. If you haven't signed up yet, it's never too late. You can sign up now. Reserve/purchase your patterns by filling out the Puppy Portraits Google form linked via the button below.
Just a reminder: We are not charging for this event in the traditional sense. Rather, we simply ask that participants make a donation to a charity that is close to theirs hearts or homes to offer passionate and targeted support to those in need. The signup form will require the following details:

— When and where a donation was made (donations must be dated June 10, 2021 or later)
— Donation amount (minimum of $12)
— Screenshot or other proof of donation

We’re excited to be tracking all donation totals as well as the charities, organizations, and foundations that you all have chosen to donate to. To date we have raised well over $2000! We’ll share all the details at the end of the stitch-a-long. Participant names and individual donation amounts will not be shared and will remain anonymous.

Upon signup, your name will be added to our pattern distribution list and you’ll receive a PDF download with the stitch-a-long frames. Because the registrations are being confirmed manually, the first email won't go out the second you sign up. All "FIRST" emails will only be sent on Friday mornings. If you register Friday night or Saturday morning, you may not get the first email until the following Friday. We appreciate your patience. All subsequent portraits will be arriving on the 2nd Thursday of each month for the remainder of the 12 months. The frames are numbered in the order in which the puppy portraits will arrive, so please be sure to stitch them in order as noted if you want to get ahead. When you finish your new ‘puppy of the month’, you can then continue working on the frames.

If you'd like to order the Puppy Portraits collection and your color choice of Lugana precut linen (mushroom is shown above), you can find it in my Kid Giddy Etsy shop. I currently have stock of three different linen fabrics but quantities are limited. Once they sell out it will be considered a pre-order and will ship when more product arrives. We appreciate your patience!

To all that have joined us thus far, we are so excited to have you. To those still deciding or just finding out, we can't wait to have you join the party! We truly hope you will stitch-a-long with us over this next year and feel good about being a part of this special project.


http://kidgiddy.us2.list-manage1.com/subscribe?u=9ea4c419178a2e61b529af8aa&id=975aef860e


Disclosure: There are no affiliate links. Thank you.

Friday, June 11, 2021

Puppy Portraits and a Stitch-a-long

I am beyond excited to finally be sharing this nearly 3 year long project I've been working on with Erin over at Aurifil and the Aurifil company. I had a chance to talk to Erin a bit and shared a lot about this project and why I love Aurifil. You can read all about it over on their Auribuzz blog


Many people over the years have sewn my dog blocks, which started with the French Bulldog block and expanded to eleven more…with other breeds to come later this year. I was at my Mom’s childhood home one summer and saw a wall that was once filled with numerous framed portraits and family reunion photos. She was packing to move and I missed all of the photos. At the time I was trying to think of another fun quilt layout that would work for all 12 dog blocks in the series and thought of a wall of frames. I quickly decided I didn’t want to sew all those 12 blocks again, so I turned it into a cross stitch pattern instead.


When I thought of bringing the cross stitch pattern to “market”, I knew I didn’t want to make money from it, but wanted to do good with it. Oftentimes, designers are asked to give away free patterns to boost sales for one company or a certain product. But when I came up with this idea – there was no product, just the pattern. My idea was to find a way to encourage those that can afford it, to pay for the pattern with 100% of the proceeds to go to various charities. As mentioned, this idea has been in the works for well over a year…and on my end it’s actually been upwards of two and a half years, which was long before Covid. When Covid hit everyone was struggling one way or another, I knew all my prep work was worth it and this was the purpose for the project. To help others with the money raised from the pattern sales. Even though it wasn’t ready to release last year, we knew it would still benefit so many people and continued work on it. Aurifil offered to create the Puppy Portraits spool collection to make it easier for folks to get the colors I used and to help raise awareness to the project. I’m so grateful to work with companies that are actively helping to make a difference for everyone.


We are so excited to share that the Puppy Portraits Stitch-a-Long officially kicks off TODAY (June 10th). Can you guess three of the dogs that might be included on the portrait wall? Reserve/purchase your patterns by filling out the Puppy Portraits Google form linked via the button below.

We are not charging for this event in the traditional sense. Rather, we simply ask that participants make a donation to a charity that is close to theirs hearts or homes to offer passionate and targeted support to those in need. The signup form will require the following details:

— When and where a donation was made (donations must be dated June 10, 2021 or later)
— Donation amount (minimum of $12)
— Screenshot or other proof of donation

We’re excited to track all donation totals as well as charities, organizations, and foundations included. We’ll share details at the end of the stitch-a-long. Participant names and individual donation amounts will not be shared and will remain anonymous.

Upon signup, your name will be added to our pattern distribution list and you’ll receive a PDF download with the Stitch-a-Long frames. The first puppy portrait will arrive in your inbox on July 8th (if you’ve signed up by July 7th), with all subsequent portraits arriving on the 2nd Thursday of each month for 12 months. The frames are numbered in the order in which the puppy portraits will arrive, so please be sure to stitch them in order as noted. When you finish your new ‘puppy of the month’, you can then continue working on the frames.

If you'd like to order the Puppy Portraits collection and the Lugana precut linen (as shown above), you can find it in my Kid Giddy Etsy shop. These are pre-orders and will ship when the product arrives. We appreciate your patience!

We truly hope you will stitch-a-long with us over this next year and feel good about being a part of this special project.


http://kidgiddy.us2.list-manage1.com/subscribe?u=9ea4c419178a2e61b529af8aa&id=975aef860e


Disclosure: There are no affiliate links. Thank you.

Friday, May 22, 2020

Free Patterns: Birdhouse Mini Quilt and a Weighted Comfort Bunny

Hi all, I have two more fun and FREE projects for you to make over on the Bernina We All Sew website. Most recently I designed this Birdhouse Mini Quilt with my mom in mind. She loves birds (even own a couple at one time named Pete and Repeat) and raised four kids on her own while being an art teacher, so I designed it with four houses and a momma bird near by.
It works great for using up scraps for all the houses and the bird, as each block finishes at 3" and the mini quilt finishes at 12.5". For the background you'll only need a fat quarter or, you could easily sew up various scraps in shades of blue and then use them for larger pieces.  Don't want to sew smaller blocks, you can easily enlarge these blocks and trim the seam allowances to a true 1/4" to make a 24" mini quilt.

Last month, I designed this Weighted Comfort Bunny for the Bernina We All Sew website. It's a project near and dear to me. More than 20 years ago I found myself laying in a hospital during the springtime while in college covered in hives and miserable. Everything started a couple of days earlier, but I was eventually hospitalized and alone for at least a day (until my mom arrived). As I got better I was allowed to have some visitors that brought me a sweet little bunny stuffed animal from the gift shop. It’s the only reminder I have from my time in the hospital. In the months and years that followed, any time I got sick…"Sick Bunny" came out for cuddles. When I had my two girls and one of them got sick…Sick Bunny again came to the rescue.


Although we now have a real bunny (Lola), she’s not exactly a cuddle on demand animal. There’s no denying that animals (even stuffed toys) provide comfort in times of need. During this unique spring season, I want to share a sewing tutorial with all of you to help you make your own comfort bunny, with a little weight. The weight helps to feel like a constant hug. Just having it sit on your lap, or a child’s lap, can be of great comfort. If you or someone you know is struggling with anxiety or depression during these very difficult and challenging times, this comfort bunny could be a wonderful gift to make and share. I make no medical claims or guarantees, but believe that this spring is that time to get sewing and try anything and everything to help our loved ones while in isolation. So head on over and make your own Weighted Comfort Bunny.

I'm looking forward to seeing all of your #BirdhouseMiniQuilt and your cuddle worthy #WeightedComfortBunny! Thanks so much for visiting and hope you enjoy sewing these fun projects! Please share your finished projects with me @kidgiddy on Instagram. Be sure to tag @berninausa too!

http://kidgiddy.us2.list-manage1.com/subscribe?u=9ea4c419178a2e61b529af8aa&id=975aef860e


Disclosure: I received products from Shannon Fabrics, Bernina and Aurifil, as a designer, Bernina Ambassador and Aurifil Artisans to share ways I use my Bernina sewing machine and the threads, but the opinions and comments provided are always my own. Thank you.

Friday, February 7, 2020

FREE Sew Plush Valentine Heart Box Tutorial for Bernina


I'm not sure how it's February already, but I have a super sweet and FREE project for you to make. I designed this Sew Plush Valentine Heart Box for the Bernina We All Sew website, just in time to fill it with all kinds of lovely goodies before Valentine's Day.

Do you have a favorite candy (like dark chocolate?) or sewing notion you'd want to see inside like these beautiful Aurifil Floss spools or are you a jewelry lover? Want to make it bigger or smaller? I am sharing all the details over on their website - so head on over to take a look. Then share your #sewplushvalentineheartbox with me @kidgiddy on Instagram. Be sure to tag @berninausa too!

These sweet fabrics are courtesy of Riley Blake Designs, designed by Lindsay Wilkes and are called Love Letters.

I'm looking forward to seeing all of your heart boxes and what you'll be putting inside! Thanks so much for visiting and hope you love sewing this fun project!


http://kidgiddy.us2.list-manage1.com/subscribe?u=9ea4c419178a2e61b529af8aa&id=975aef860e


Disclosure: I received products from Riley Blake Designs, Bernina and Aurifil, as a designer, Bernina Ambassador and Aurifil Artisans to share ways I use my Bernina sewing machine and threads, but the opinions and comments provided are always my own. Thank you.

Wednesday, January 29, 2020

Studio and Travel Organization

It's still January, so I can still say welcome to the new year and a new decade. I have tons of new stuff coming down the pike and even some older stuff I haven't shared yet. But first up - the #kidgiddystudio requires a bit of organizing, destashing and overall cleaning up. I've lived in my house for almost 20 years - and I am feeling this "20 year itch" to make some changes (like out with the old - in with...nothing new). Have you ever felt this way? This is the longest I have ever been in one place all of my life, which is so strange to say and feel. But it's true and that means stuff has moved from room to room after baby number one, and then moved again after baby number two, and then again after starting kid giddy, and during renovations, and whew - I'm out of breathe.

My Potter desk above tends to get covered in the WIP's and to-do projects, but I love being able to have a small design board here, my serger and my collection of Aurifil threads on the ready for quick switches and fixes.
For the past 7 years, I have had my studio space above the garage (you can see the start of it here) and what once was fun moving into, is slowly starting to feel suffocating because I create all of the time and make really really big messes. So last weekend, I started clearing 10-20 year old things out of my closet to make more room for thinking and breathing. I'm not done yet - but just getting started is feeling great. I'm letting go of said "things", continuing to organize and can see pretty stuff on my walls and desk again.

Those are some photos I took of my space last year and neglected to share here. I'm working towards this level of clean again...but better...less cluttered. I love having all of my Artbins filled with fat quarters, and my Sterlite bins filled with their own category of things under my cutting table and love that they are easily accessible. The large cutting table pictured above was custom made for me based off of a drawing I gave to the manufacturer to fit the space and to provide the highest level of (easy to access) organizing opportunities. You can find out more about my table by visiting this kidgiddy studio post.

I'm also organizing more of my slow stitching and on the go sewist stuff. I am still making a #SewPlushPlanner for metalsmithing class and all my metals, but I've also recently finished this Sew Plush Planner for my cross stitching and embroidery. These Aurifil Floss spools were not up on my wall, but previously haphazardly snuggling in a pouch. Sad spools. Now they have their own little spot and nest together when the sew plush planner is closed. You can fit 21 different colored spools in this format which is perfect for most cross stitching projects...and of course you can rotate as needed.

These new add on pages are coming soon, but you can see more of the original Sew Plush Planner here and find it in my kid giddy Etsy shop. The original sew plush planner I made houses my "on the go hexie" wares. I'm working on one sew plush planner for a different work in progress and one for my crochet needles and such too. I still have a feeling I'll need a few more! What would you put in yours? How do you stay organized? How do you decided what stays and what has to go? Do you have big plans to change things up this year...in this new decade?

Thanks so much for visiting and I hope to see some ways you organize your space and your sewing travels needs. Feel free to share info below and also on Instagram by tagging me @kidgiddy.


http://kidgiddy.us2.list-manage1.com/subscribe?u=9ea4c419178a2e61b529af8aa&id=975aef860e


Disclosure: I received the floss and threads from Aurifil and this post is a challenge for some of the Aurifil Artisans to share ways we organize our spaces and things, but the opinions and comments provided are always my own. Thank you.

Thursday, August 22, 2019

Aurifil Whole Cloth Quilt Challenge

Did you know you can make tiny pompoms with thread? Yep! This month the Aurifil Artisans were given a whole cloth mini quilt challenge using a solid fabric from Painter's Palette Solids by Paintbrush Studio and Aurifil thread. At the time of sign up, I requested the Aurifil 12wt thread because I had yet to really work with a 12wt thread and wanted to experiment with it. Although I didn't know what color fabric and thread I would get, I was so excited to open my package to see that I received the "Shell Pink" fabric (one of their 2019 colors) and Aurifil thread in color number 2425.
I initially wanted to do something like Sashiko when I first began thinking of ideas because the 12wt thread would work great...but things went on a bit of a bird walk in a whole other direction. Because it was pink (even my martial arts sparing gear is pink) and I've loved pink since I was younger, I got to thinking of my bedroom when I was a tween. One summer while my twin sister and I were away, our mom painted a huge pastel rainbow and animal shaped clouds all around our room. When we got back, we stuck glow in the dark stars up on the walls and ceilings for night time effects (what can I say it was the 80's). That got me thinking further back in our past when my sister and I were in Texas and sitting with another girl on the bleachers and she taught us how to make our first pompoms using cereal box templates when we were 7ish. Flashing back to the present, since I also design 3 dimensional toys and quilts, I felt the need to add something 3 dimensional to this project, but with thread...so pompoms it is?!

Now if you really want, you could try making pompoms with 40wt or 50wt thread...but that might take a while! You definitely can make them with Aurifil floss, but I wanted to see if I could make them with 12wt. And it worked...you just have to add water!

To make my tiny pompoms I used the 12wt Aurifil thread, Clover 3/4" pompom maker, fabric snips, and water. Each pompom took me about 10 minutes to make. Yes - we timed it. lol. Begin by wrapping your thread around the clover pompom maker so both sides are full. 

Using your fabric snips, carefully clip the threads right down the center of the pompom maker.

Cut two 8" pieces of thread and wrap them together through the center to tie the pompom. I double loop my first tie and then single loop my second tie to make a really strong knot. By double looping the first one, it won't easily come undone before you knot it with the second tie.

Carefully open the pompom maker.

Remove the pompom and notice it is oddly shaped. This is where the water comes in...

Get your pompom wet by pressing the two sides together and really get the water to soak into the center of the pompom. Once the threads are wet, they will relax a bit and fall into place a lot easier. Squeeze out all of the excess water and shake it using the attached strings (remember how you would shake the troll (tm) dolls to make their hair puff out perfectly...pompoms work the same way!).

Once it has a little shape to it - set it somewhere to dry. Once it's fully dry, use your snips to shape the pompom into a pretty little ball. The more you trim off, the tighter the threads will appear and the smaller the pompom will end up being. Some sides of the pompoms will appear shiny but other (and most parts will looks super soft and will even look like yarn.

Because I wanted the quilting and the pompoms to play nicely together and not have one over power the other, I decided to quilt the background with a basic 1/2" grid using the exact same 2425 color in a 50wt (thank goodness I had this exact color on hand - yay!) and placed the pompoms in a basic polka dot or cookie sheet layout. I cannot tell a lie though - I decided it had to be a pillow - so this finished pic is without the pillow form since it was supposed to be a mini quilt. I wanted it also to have a more finished and professional look, so I used some of the left over fabric to add piping around the edge. This simple and quick design will spruce up any little reading nook and add a little whimsy to your home decor.

Now that I have a cute pillow, I think I'm going to need a large quilt to go with it! Who's up for making more Aurifil thread pompoms? Thanks so much for visiting and I hope to see some more Aurifil thread pompom/whole cloth pillows and quilts out there!


http://kidgiddy.us2.list-manage1.com/subscribe?u=9ea4c419178a2e61b529af8aa&id=975aef860e


Disclosure: I received the fabric and thread to help create my project, but the opinions and comments provided are always my own. There are no affiliate links. Thank you.

Thursday, January 3, 2019

The Splendid Sampler 2 - My Grandfather Clock

Happy New Year! I am so excited for all the fun we are going to have this year, who's with me? To get this party started we have this "Grandfather Block" I was asked to design for Pat Sloan and Jane Davidson for their Splendid Sampler 2 book. It was so much fun to design this foundation paper piecing block in Electric Quilt using the EQ8 program, and then add some embroidery and needle turn applique. So if you have ever wanted to try a little bit of everything in one block, I'm sharing some of my tips below...so here you go! 

These are the fabrics (all fat quarters) I was sent from Moda Fabrics along with some Aurifil threads. I wanted to share with you my process for selecting the fabrics so as you are considering fabrics for your Grandfather Clock, you'll have the best outcome.

As tradition calls for it, I used a pure white for the face of the clock and built it out from there. I selected the two tones of beige for my "wood" coloring. One as a lighter color as if it has light shining on it and one darker for shadows. I did the same for the blue. The darker blue allows the clock to have the "inside" feeling while the lighter blue helps the pendulum to sit forward. The red helps the face to pop but I added the tiny touch of blue in the center with the fussy cut tulip to balance out the blue in the lower half. So as you select your colors, know that using two tones for wood and two tones for the blue areas would work best.

To transfer the face of your clock onto a large piece of white fabric, use a strong light source (like the Daylight Company Wafer 2 lightbox) and a water soluble marking pen (mine is from Prym/Dritz).

Place your white fabric into a hoop to embroider the face. I used the 8782 Blue Wool 12 thread from Aurifil so it would be thicker and only require a single stitch per line. Because I used Roman Numerals, it made stitching it so quick (because no curves!), but feel free to change yours to numbers if you prefer.
Be creative with the "time" that you stitch on your clock. This can be a personal number or memory with a date or time reference. There are 4 members of my family (hubby and 2 daughters) and I have 8 siblings so I have my 'arrows' (hands) pointing at the 4 and 8, which would be 4:40.

When putting your clock face together and attaching it to your foundation paper pieced block, be sure to use a pin in the center of each pattern piece to align them properly. These center points are marked on the pattern pieces specifically to help align them. Transfer those center points onto your fabric and use the pin technique shown above.

When your Grandfather Clock is all put together, you can then flip over your block and carefully cut out the excess fabric to reduce the bulk if you choose to do so.

My Paternal Grandfather had 6 Grandfather Clocks in his house. I think my uncle now has them all in Connecticut, but I will always remember them scattered about and chiming throughout the home he built in Maryland for his family. The block we designed was supposed to represent "I'm living my best quilting life when....", and for me that is when I am spending time with my family and living a balanced life. Time passes so quickly and it's so important to not miss what is in front of you at any given time. So I designed a clock. But not just any clock, a Grandfather Clock, to add in that important element of family and history and making memories. Do you have a Grandfather Clock memory or story? I'd love to hear it. Please feel free to share it below or find me (Kid Giddy) on Instagram and Facebook to share your story there.

You can get a copy of the Splendid Sampler 2 book by clicking through to the Splendid Sampler website. Thanks so much for visiting!


http://kidgiddy.us2.list-manage1.com/subscribe?u=9ea4c419178a2e61b529af8aa&id=975aef860e


Disclosure: I received the fabric and thread to help create my block and also received a copy of the book for having made my block, but the opinions and comments provided are always my own. There are no affiliate links. Thank you.