|
Pearson Tree Farm Quilt #1 - quilted by Jaki Soper of QuiltStudio55
|
I've hemmed and hawed on writing this post because this quilt was never meant to be such a public "worldwide" project where I shared all my backstory feelings regarding it. However, it became bigger than me - and so many people helped so I felt I should share the whole story as a way to show how amazing this quilting community is and to show in some small way, my gratitude to all of you that participated.

Back in December 2019, a local family in my town, lost their husband, father, grandfather, friend, in a very tragic and horrific way. It was weeks before Christmas and where there was once hope and joy, there was immediately sadness and fear. I live in a big town and word got out quickly that a man was on the run and had brutally stabbed this dear man outside his home and headed north. Many talked about the tragic situation but no one knew what to do. I felt a tremendous amount of sadness for his wife who found him while he was still alive. I wanted to do something to help her, remembering my own Granny that lost her husband to natural causes but was there beside him. I didn't feel anything I could ever do would help take away that sadness she was likely feeling and everything that went along with the terrible situation.

A week passed and I continued to think of her. After seeing many news stories about Jim Pearson and his family's Beech Ridge (Tree) Farm, I got this image of a (Christmas) tree quilt with a red heart on it. I pushed it out of my mind thinking a quilt won't help, however, I wanted to help change the narrative going on in the town/world. There are good people here. Evil will not win. We can do something, anything to show we care, and that we are here for her, even those of us that didn't know her personally and she didn't know us. The image kept coming back, so I sat at my computer one day and designed a bunch of different "Christmas Trees" in my EQ8 program to see how it would look.

The process of designing the blocks and the quilt helped me and so maybe this quilt could help Nancy, but I knew this was not something I could sew on my own with a quick turn around. Since I knew others in my town were feeling as I was feeling, I reached out to the local town "mom fb group" and asked if anyone else wanted to help make a block. So many people signed up to sew a block - some offered monetary donations for supplies - some were willing to learn to sew in order to be a part of it - while others forwarded the info to local sewing groups and police stations (as one of the adult children was a soon to retire police officer) and news of the quilt project began to spread.

I quickly had enough people signed up to make a queen size quilt, from people in my town, state and even a few from out of state. Someone in the mom fb group suggested we make two more quilts for the adult children, that also lived in town, and was only sorry she didn't know how to sew. Knowing I only had enough blocks coming for 1 quilt, I knew I needed a new source for 2 more quilts worth of blocks, or three quilts weren't going to be possible. My only option at that point was to reach out to all of you, my @kidgiddy community on IG and the response brought me to tears. Without hesitation you all signed up, showed up and shared the post. Within 24 hours I had to shut down the sign up form, before I had more blocks than I knew what to do with. I felt like I closed a door with more people knocking outside. You all are so amazing!

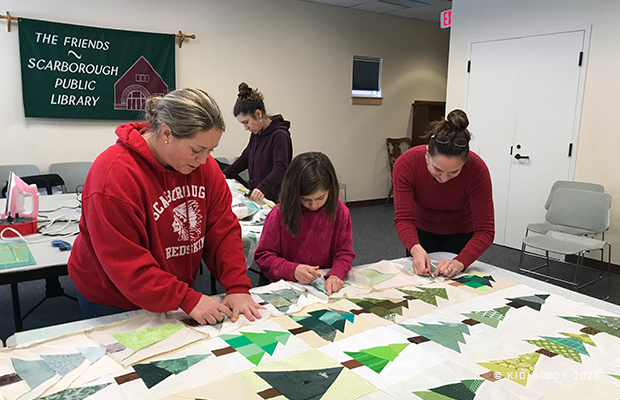
The local Scarborough Public Library offered their public space for me to have "sew-ins" so I could teach folks how to sew the foundation paper piecing blocks, or how to sew the patchwork or applique versions. If someone wasn't there to learn, we were able to use that time to start sewing blocks together for the first quilt as the packages started coming in early January. Everyday at mail time was so exciting and always turned into tears of gratitude. Some of you sent letters and some also included the coloring page that your kids colored in (that were gifted with the quilts).

February and March brought more of the same but by mid March our last sew-in happened just in time to make the quilt backs before Covid shut everything down. I had a couple of volunteers that helped piece the last blocks for two of the quilts together in their homes, while I finished the first quilt. With all the quilt tops and backs done, a local friend, Jess, began helping me search for local longarmers willing to give their time to quilt them. Other friends shared my posts and tagged their friends too which resulted in offers from as far west as Seattle and as far South as Florida and Texas to quilt the quilts, but I became hesitant mailing anything out with Covid taking over the news.
 |
Pearson Tree Farm Quilt #2 - quilted by Tammy Johnson courtesy of Alewives Fabric Shop
|
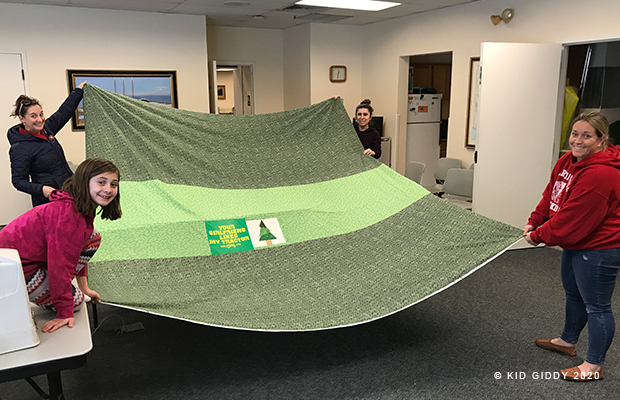
We finally secured 3 local quilters within driving distance that were willing to quilt them for this cause (Jaki Soper - Quilt Studio 55 in Maine, Alewives Fabric Shop quilter Tammy Johnson also in Maine, and Patty Sciacca from Massachusetts. Covid slowed down the finishing process, but eventually everything was done.
 |
Pearson Tree Farm Quilt #3 - quilted by Patty Sciacca Crafts
|
When the quilts came back they were trimmed up and sent right back out to my local volunteers Leslie and Jennipher for binding and all the hand stitching needs. These quilts were truly a community effort that I was honored to be a part of. It was not just this local community, but a worldwide community of quilters that want to do good with their skills. In total, I received 235 blocks from approximately 75 quilters in the US, Canada and the UK.

You can see everyone that helped in some way or another listed on the labels that my husband and I created. Jess, a friend of the Pearson family, also made pillows for each of the grandkids so they would have something as well. Each pillow and all three quilts have a tree or two pieced from Jim's clothing. The quilts have 1 or two blocks with his work shirt and one t-shirt tree from the clothing provided by the family. You can see in one of the images above, I made two tree blocks for Nancy's quilt using one of Jim's work shirts that had his name on the left side above the pocket and the farm name on the right side above the pocket. We were sure to use as much of the shirts that we cut into so as not to waste any of the material. Not even the buttons.
While the quilts (and pillows) were being made, we had many folks wanting to donate so much funding to the quilts, which would've been more than needed. Eventually the family was able to set up a memorial education scholarship in Jim's honor, and the first recipient this year was recently awarded a scholarship for his freshman year at college. For more information about the Beech Ridge Farm, or to support the Pearson Family Memorial Scholarship, you can visit their websites (links highlighted). If you would like to purchase the #PearsonTreeFarmQuilt blocks pattern, please know that I am in the process of working with them to offer it on their website or a dedicated Etsy shop, with proceeds going to the Pearson Family Memorial Scholarship. I will update that info here when it becomes available. I truly want to thank everyone that helped make these quilts happen. It was a lot of work to put together and thanks to Covid took way longer than anticipated, but the process was made easier with the help and love of so many others. The Pearson family was grateful for the outpouring of love from so many strangers worldwide and really enjoyed looking at the variety of trees and hearing how they all came together. I never could've done this myself...certainly not 3 quilts (or the 9 pillows Jess also made), but not even the one quilt. Thank you again!

Disclosure:
Although this is not a sponsored post - I did receive the EQ8 software previously which helped to create the blocks and quilt layout, but the opinions
and comments provided are always my own. There are no affiliate links.
Thank you.